Updated on 2023-01-13
24 views
5min read
An ideal gameplay screen recorder for a PC should consume little physical resources yet include all essential aspects of a reliable screen recorder. And that’s how we compiled this list of three best ways to screen record on PC for gaming. Given the needs of screen recorders from user to user, we have included both multi-purpose screen recorders and task-centric screencast tools. Plus, we have included both premium and free tools so that the guide meets the needs of every user. Furthermore, we have included a stepwise guide to recording the Windows screen using the lightest gameplay screen recorder for PC to help users who do not know how to use a screen recorder.
Part 1: Best Method: How to screen record PC for Gaming with high quality
Eassiy Screen Recorder Ultimate tops this list because not on is it one of the lightest screen recorders for PC, but also because it is a multi-purpose tool. To start with its screen recording capabilities, Eassiy allows you to record the entire screen, customize the recording area, or lock a window to record interruptedly. It comes with a dedicated Game Recorder to let you capture 2D/3D games without any interruptions and lags. Not to mention, you can include both internal/external sound in the screen recording, plus incorporate the webcam footage in any shape (circular, elliptical, square, and more). The best thing about voiceover is you can use advanced functions like limiting background interferences and enhancing microphone sound.
Eassiy also has the must-have annotation toolset to draw and doodle something on the screen during live recording. But what’s substantial about this lightweight screen recorder for Windows 10 is its advanced recording capabilities like schedule recording and auto-end recording. You will find professional tools like Follow Mouse and Around Mouse in Eassiy. But it doesn’t end there, Eassiy lightweight screencast tool also includes essential editing functions, and the program has options for logos and watermarks.
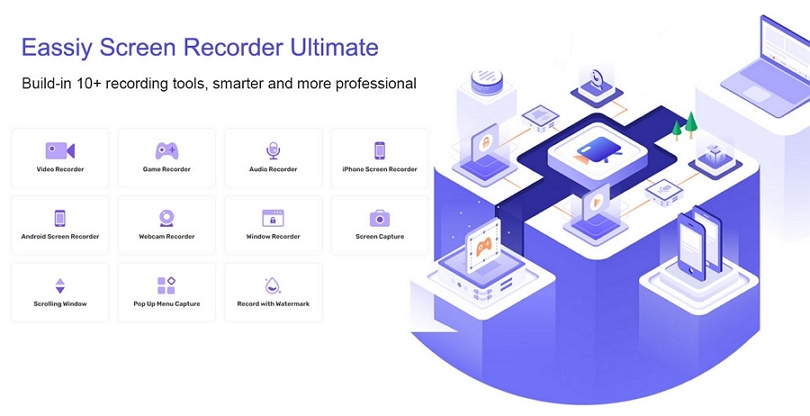
Key Features:
- Dedicated Game Recorder. Capture 2D/3D games seamlessly without any interruptions and lags. Eassiy's technology ensures less physical resource consumption and high performance.
- Annotate during gameplay. Eassiy allows you to draw, scribble, and doodle using an airbrush, paintbrush, highlighter, text, arrows, and other annotation tools during the live recording.
- Capture Webcam. Include the human element via webcam footage. Advanced options like webcam overview shapes like circular, rectangular, and more, allow you to record gameplay on PC like a professional.
- Voiceover. Add microphone sound along with internal gameplay sound on PC during recording. Use advanced options like enhanced microphone sound and limit background interferences.
- Video Editing Suite. Eassiy includes essential trimming, auto-split, and audio editing tools to curate your gameplay recordings for Twitch, Facebook Live, YouTube, and other social platforms.
- You can also record PC screen flexibly (full screen, partial screen, and window-specific recording) for creating other types of screen recordings.
- Take scrolling screenshots, annotate them, and share them on social platforms directly.
- Around Mouse recording and Follow Mouse recording to record gameplay on PC creatively.
- Mirror your iPhone and Android screen and record gameplays via computer.
- Task Scheduler starts and ends recordings without disturbing your gameplay.
- Use logos and custom watermarks to brand your gameplays and make them suitable for a professional environment.
- Save in any format of your choice, or share the video on YouTube, Facebook, Vimeo, and more social platforms.
How to Screen Record on PC for Gaming With No Lags using Eassiy Screen Recorder?
Step 1. Download and Install the Eassiy Screen Recorder on PC
Visit Eassiy official website and download Eassiy Ultimate Screen Recorder, then install it.
Step 2: Launch Eassiy on PC
Locate the Eassiy Screen Recorder icon and double-click on it to launch it. Then, click Game Recorder from the home interface. The Game Recorder facilitates flawless game recording without interruption.

Once you click the Game Recorder option, a pop-up window will appear on your PC screen. Click the drop-down icon under Select the Game and choose the game window that you wish to record. Then, click OK to proceed.
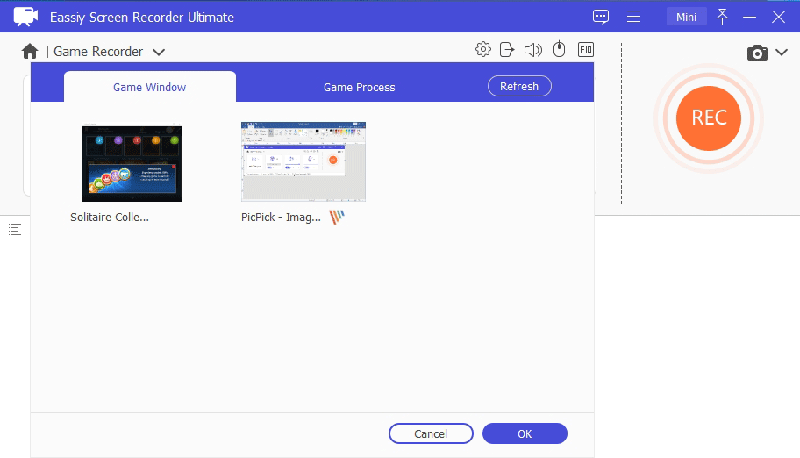
Step 3. Next, you can apply other settings. For example, you can turn on the Webcam, to record the game with the webcam, turn on the Microphone toggle to record the game with microphone sound, etc. After that, click on REC button to start recording the game window in full screen without distraction.
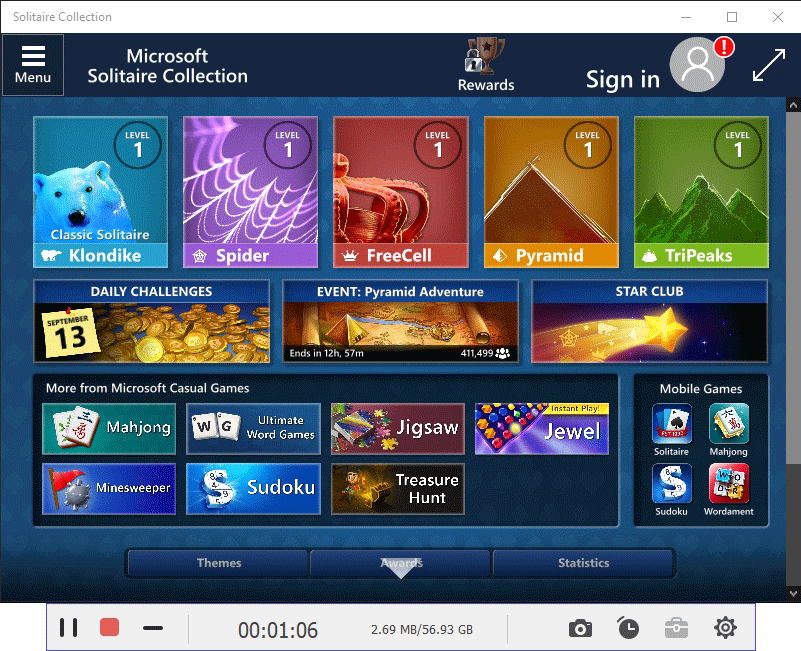
Step 4. During the game recording process, you can perform rel-time annotation by clicking the Briefcase icon at the bottom right corner, then use the relevant tools to highlight important element, add text, and do lots more in the game recording.
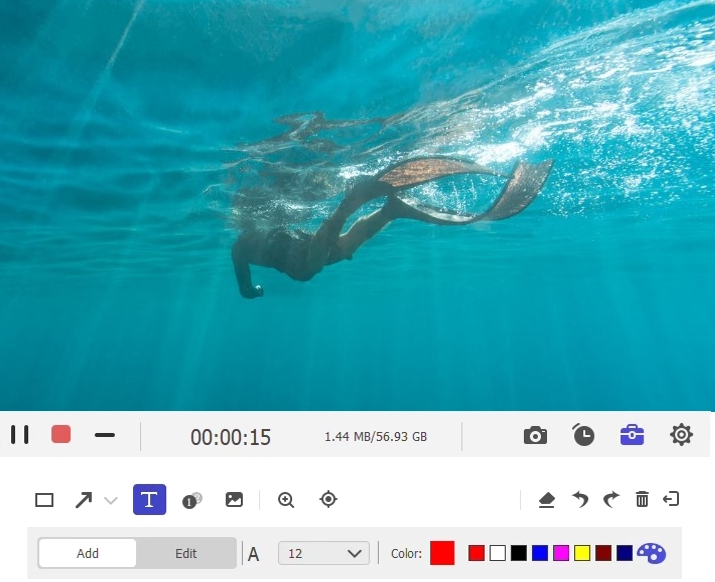
Additionally, Easily supports real-time screenshots during screen recording. All you just need to do is to click the camera icon at the bottom left to take screenshots.
Step 5. Stop Game Recording
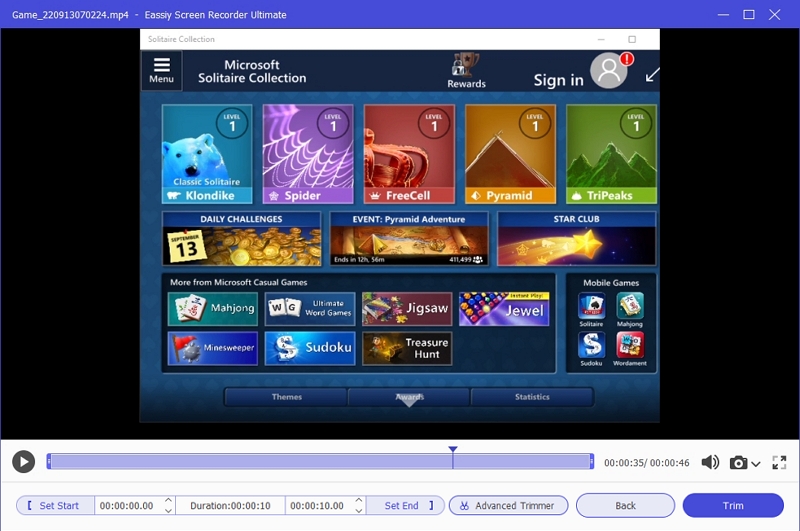
Once you’re done with the Game recording process, click the Stop button to end the process. Doing so will allow Essaiy to take you to the editing screen to apply various edits to the recorded video. You can use the editing tools like trimmer, auto-play, and lots more to edit the recorded game play. Afterward, click Done to proceed.
Step 6. Save or Share Recorded Game Video
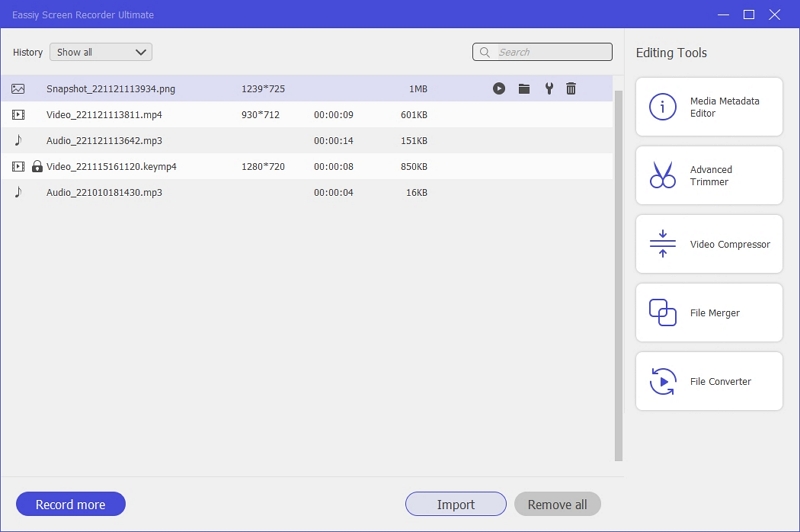
On the new screen, click the Folder icon next to the recorded video file and save it to a preferred location on your computer. Also, you can use the share button to share the video to social media platforms like Twitter, YouTube, Vimeo, etc.
Part 2: Online Method: How to Screen Record Gameplay on PC using Online Tool
Clipchamp is one of the best online video-making software with screen recording options. You can record your screen with an internal/external microphone for voiceover during gameplay. If you want the camera overview, Clipchamp has a dedicated Screen & Camera Recorder that allows you to record both elements intuitively. And Clipchamp will enable you to do all this for completely free. You can also export the clip in 1080p resolution. You can also use stock content to edit the gameplay and share it on social channels like YouTube with no restrictions whatsoever.
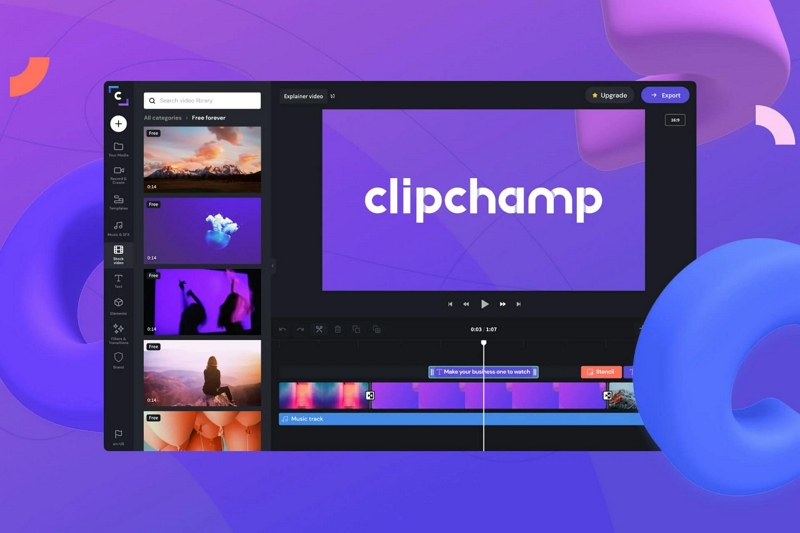
However, you will need the premium version to use logos and watermarks. Moreover, you can use the editor to separate the screen and camera recording and edit them individually after recording the content. The online nature means that it will not consume physical resources whatsoever, and you can register your games without any interruptions or the gameplay being affected by the program. Overall, Clipchamp is valuable for users looking for a simple gameplay recorder that is free and allows 1080p exports. However, you must purchase the premium version if you want the editing tools.
Key Features of Clipchamp:
- Record gameplays in 1080p resolution with webcam overview.
- Resize any video for social channels with custom aspect ratio and avoid awkward positioning.
- Remove all the unwanted parts from your gameplays, and do not miss a beat with the audience.
- Green Screen, Transitions, Graphics, Animations, and other advanced editing tools.
How to Record your Screen and Capture Gameplay with no lags using Clipchamp?
Clipchamp is free. But you have to create your account first. So, head to any browser and visit the official site of Clipchamp. Sign up using your email address or Google account. And register yourself on the site. There are also iPhone and Android apps that you can download via Play Store or App Store. That said, let’s learn how to use Clipchamp:
Step 1. After registering yourself on the Clipchamp.
Navigate to the Record & Create option from the left-menu options on Clipchamp’s interface. Choose Screen & Camera if you want to capture both screen and webcam for the gameplay recording. If you only want to capture the gameplay with no camera, choose Screen Recording.
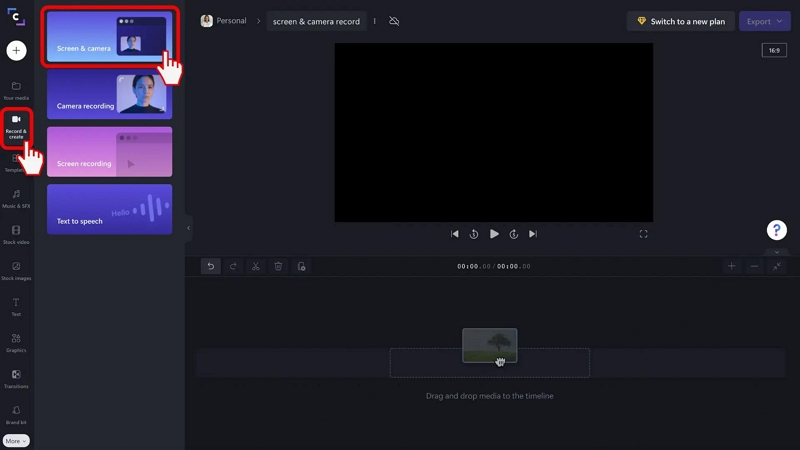
Step 2. Choose the recording area, i.e., entire screen, window, or only the game tab. After choosing the desired tab, click on Share.
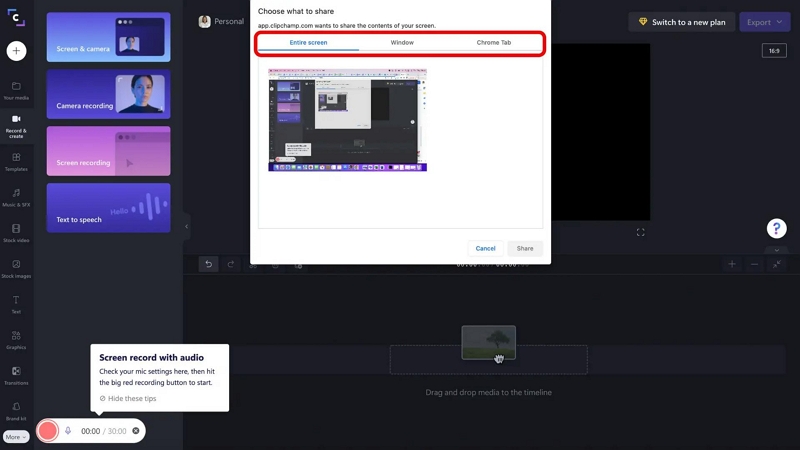
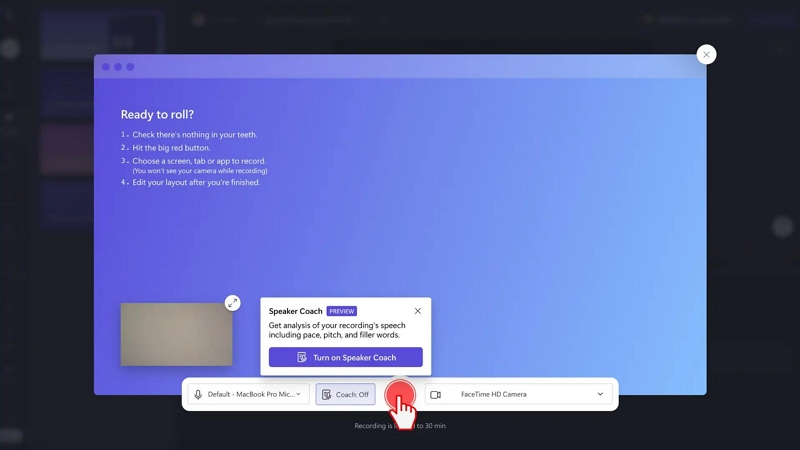
Step 3. Once you click the Share option, Clipchamp will ask you to choose whether you want to include the webcam, mic in the gameplay recording or not. After choosing, click on the Red icon to start the gameplay recording on the PC.
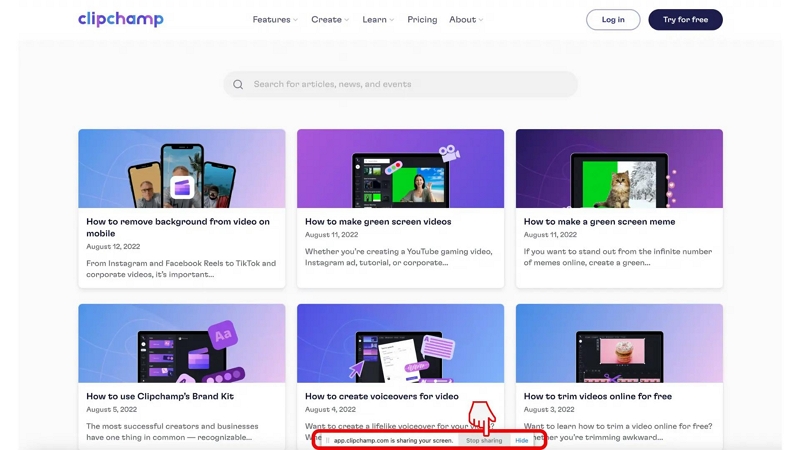
Step 4. Click on the Stop sharing option to end the gameplay recording.
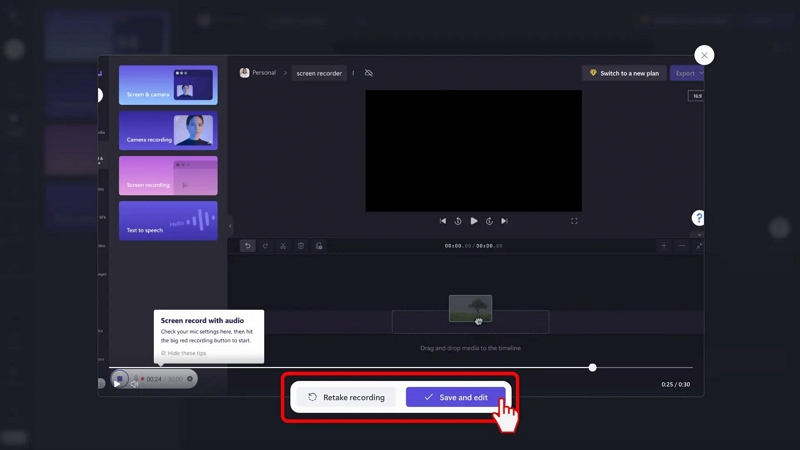
Step 5. Click on the Save and Edit to use editing tools and curate your gameplay recording.
Step 6. Use the editing tools like transitions, animations, and text to edit your gameplay. You can also choose to separate the camera and screen recording and work on individual element. After editing, click on Export to share the gameplay recording on social channels. Or you can also save the gameplay recording to the local storage.
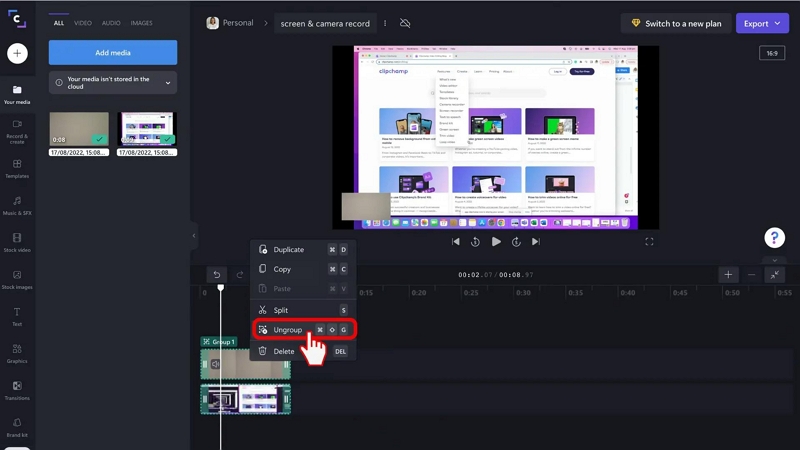
This is a demonstration of the Clipchamp’s free version. You can do more with the premium version, like use animations, video and audio effects to give a professional look to your gameplay recordings.
The Pros of using an online tool like Clipchamp for gameplay recording on PC:
- You can record the screen and camera.
- Clipchamp allows you to record and export the gameplay recording in 1080p.
- You can use the stock content to make your gameplays look professionally-filmed scenes.
- Cloud backup eliminates the needs of storing content on your computer.
- Online nature means little to none physical consumption.
- You can get your hands on the industry-best editing tools like Green Screen with premium license.
The Cons of using an online tool like Clipchamp for gameplay recording:
- Clipchamp has no live annotation tools, so you cannot draw on your videos during gameplay recording.
- You will not find advanced recording tools like in Eassiy; for instance, Around Mouse Recorder or Follow Mouse Recorder.
- You cannot enhance microphone sound or control your audio like in Eassiy Screen Recorder.
Part 3: Free Method - How to Record games on PC Using Built-in software?
Xbox Game Bar is a native screen recording tool available on Windows 10 and above. Some earlier versions of Windows 10 might not have the functions; however, you can update the OS to get your hands on this functionality. Aside from this, Game Bar only works if your computer has one of these video cards: Intel Quick Sync H.264, Nvidia NVENC, or AMD VCE encoders. Coming to recording capabilities, Xbox Game Bar allows you to create custom keyboard shortcuts and start end, and take a screenshot using these personalized hotkeys. You can also manage the sound levels during live recording and include microphone sound in the recording.
Aside from recording features, Game Bar also includes collaborative functions to connect with your friends and play together while chatting. And you will also find the Performance menu to see the physical RAM and GPU consumption in real-time. Overall, Game Bar is also simple to use. However, there is no advanced functionality like using webcam footage. Game Bar does not allow you to record desktop or file explorer and other applications. So, if your game is not downloaded from the Microsoft Store, there’s a good chance it will not allow you to record the gameplay.
Key Features:
- You can record your gameplays in 1080p resolution.
- Include microphone sound and manage the sound.
- Game Bar allows you listen to Spotify songs and manage them during live gameplay.
- View the performance of RAM and GPU during gameplay.
How to Use Xbox Game Bar on PC and Record Gameplay with no lags?
By default, the Xbox Game Bar is not enabled on the PC. Once enabled, you can use the default or custom-created keyboard shortcuts to start and end the gameplay recording.
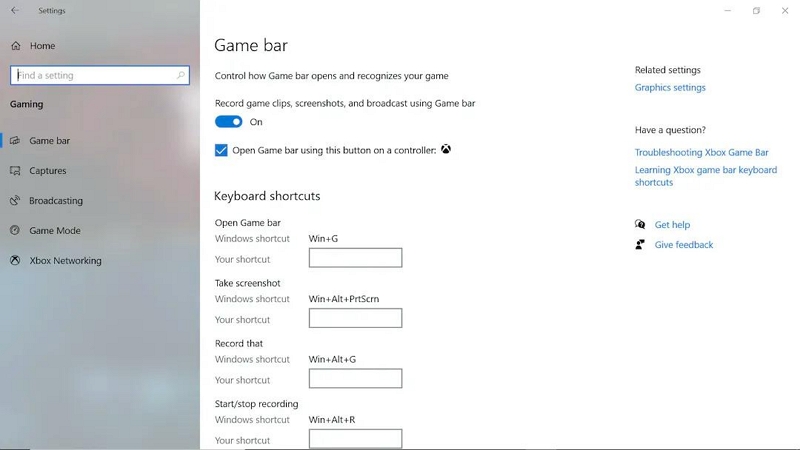
Step 1. Open the Settings menu on Windows. Choose Gaming. Turn ON the toggle assigned to the “Record game clips, screenshots, and broadcast using Game bar” option. At this point, Game Bar allows you to create custom keyboard shortcuts for opening Game Bar, Record that, Take Screenshot, and other options. You can also use default hotkeys.
Step 2. Click on Win+G to open the Game Bar.
- On the menu options, choose whether you want to include the microphone sound or not. Via the Audio panel, you can also manage the audio levels of internal and external sound.
- You can also connect with friends using the Xbox Social function and connect with them before starting the gameplay.
- If you want to remove certain menu like the Performance tab or Audio tab, click on the close icon.
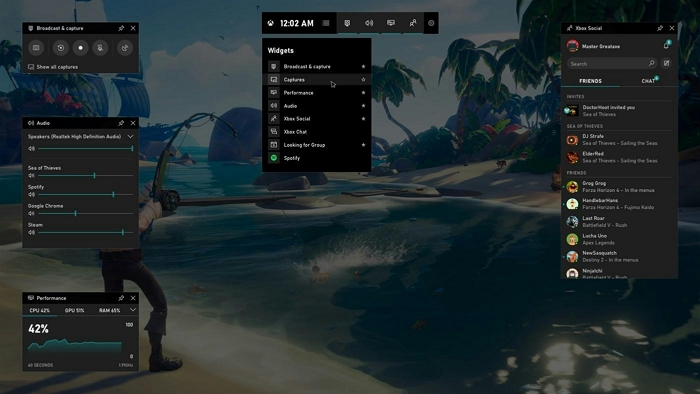
Step 3. Select the White dot icon to start the gameplay recording. Or you can press Win+Alt+R to start the gameplay recording.
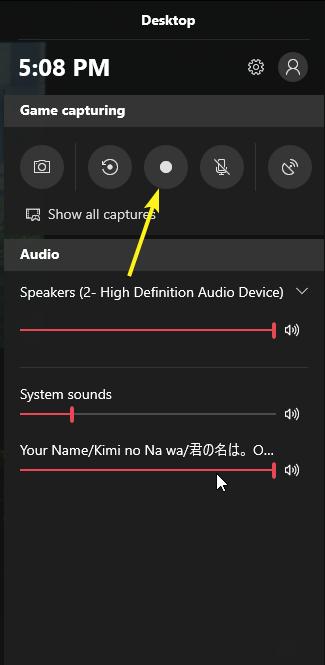
Step 4. Click on Win+Alt+R to stop the gameplay recording.
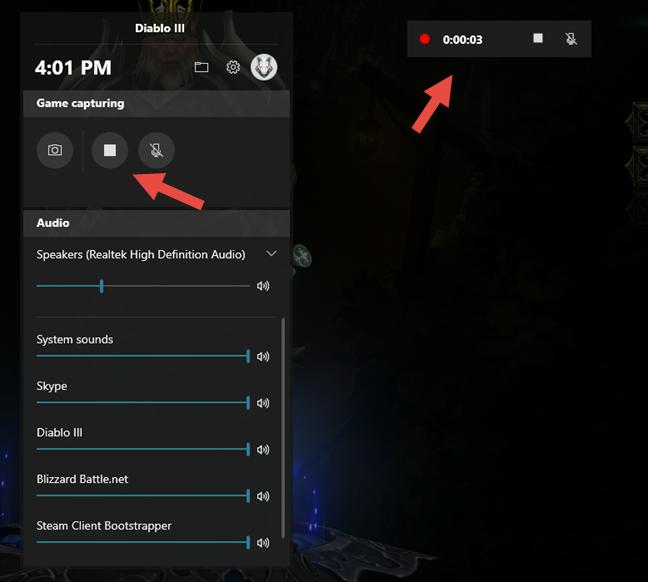
Once you end the recording, you will see a notification saying that the recording is saved. You can access the gameplay recording via the Captures folder. If you have taken any screenshots, you can find them in a separate folder, i.e., Pictures under Captures.
The Pros of Using Native Tool Like Xbox Game Bar to Record Gameplay With No Lags:
- You can record your gameplay in 1080p resolution without downloading tool.
- You can also include microphone sound and manage the sound levels.
- Xbox Social allows you to connect with friends and have fun during the gameplay. And you can include their chatter into your gameplays, making it suitable for recording team games.
- Xbox allows you to listen to Spotify songs while playing games and exclude its sounds in the gameplay.
The Cons of Using Native Tool Like Xbox Game Bar to Record Gameplay With No Lags:
Game Bar is free but comes with its own problems. For instance, Game Bar is limited to recording only certain aspects on the Windows computer. While you can record all the games you open via the Microsoft Store, it might prevent you from recording games you have downloaded via other sites.
- Plus, Game Bar does not allow you to include the webcam footage during the gameplay recording.
- You cannot even annotate during the live gameplay.
- And if you minimize the gameplay during recording, Game Bar will stop the recording automatically.
- Game Bar does not allow you to record the File Explorer and Desktop.
- And there are no options to record partial screens or individual apps like in Eassiy Screen Recorder.
Conclusion:
As promised, we have included a multi-purpose tool with a dedicated Game Recorder, i.e., Eassiy Screen Recorder. Firstly, Eassiy is one of the lightest game recorders with advanced recording, editing, and sharing options. Second, it also permits you to capture other types of videos, like explainer videos and gameplay tutorials, as it includes annotation and Around Mouse recording options. Clipchamp is fantastic in its own right. But it lacks the essential annotation tools; most online tools do not include annotation options. Like any other online tool, Clipchamp is not a Game recorder, so it has limited recording options. So, the only advantage of having it is you can record the gameplay without any lags on the PC.
Coming to the Xbox Game Bar will suit users looking to collaborate with friends. But it doesn’t even allow you to incorporate webcam footage into the game recording. If you are looking for the most sophisticated yet simple tool, go with Eassiy Screen Recorder.


