Updated on 2023-07-06
22 views
5min read
Both Eassiy Screen Recorder and Clipchamp are exceptional in their own way. And both come with advanced screen recording and video-making capabilities. However, there is a clear distinction between these two. For instance, Eassiy is primarily a screen recorder and is influential in recording capabilities. At the same time, Clipchamp is essentially a video maker, so the screen recording characteristics are limited.
Read on to find out the differences between the Clipchamp screen recorder and Eassiy Screen Recorder. Find out which devices they support, their annual prices, their features, and which type of videos you can make using them.
Part 1: Clipchamp Screen Recorder Review
Microsoft Clipchamp is essentially a video-making software that comes with a plethora of editing tools and stock assets. An online tool, Clipchamp also incorporates other tools in its library, like Camera Recorder and Screen Recorder. Focusing on its Screen Recorder allows you to record the computer screen flexibly and include both system and microphone sound in the recording. Alongside that, you can also have a webcam overview. You can later edit the video using the video editor, include elements like logo and watermark, and professionally curate using stock assets like images, sounds, and videos.
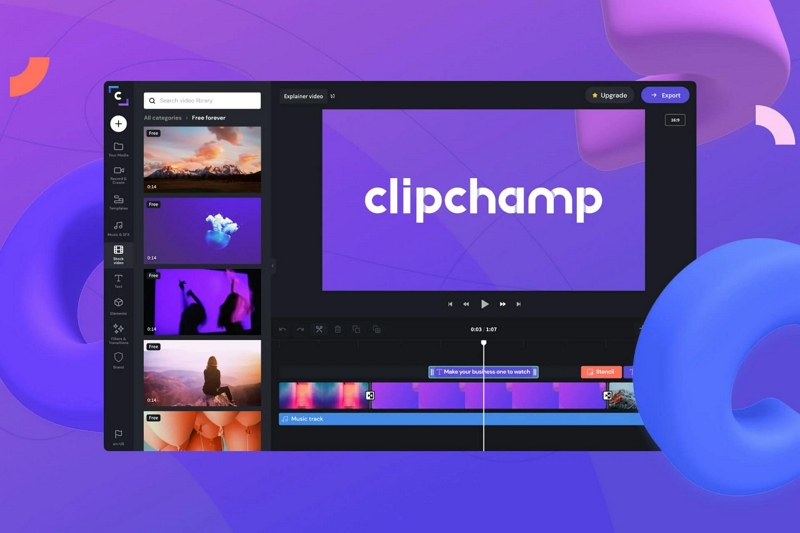
What’s substantial is it lets you do all that for entirely free. You can record the screen without any time constraints, export the video in 1080p and share it on social channels. You can also edit the video for free using editing tools. However, everything else comes with the premium accounts. For instance, you cannot use watermarks or logos for free. Not to mention, Clipchamp does not have any annotation tool options (during recording or post-production). So, it is suitable for users looking for a plain and simple screen recorder. And in case you choose to use the premium version, retain that most of the tools that come with the premium version (are helpful in the video editor).
Overall, Clipchamp is helpful if you are looking for an advanced video editor with screen recording capabilities.
Key Features of Clipchamp:
- HD Screen Recorder. Record clips in 1080p resolution with webcam overview. Export to social channels or download on your computer. Premium plans give you cloud backup (unlimited).
- Video resizer. Resize any video without awkward positioning. Templates are available for all major social platforms, and custom aspect ratio functions to reposition custom dimensions.
- Green Screen. Make magic happen using a Green screen; introduce effects and give a professional touch to any video. Replace the background and give it a new look.
- Audio Visualiser. Waveform representation of your video allows you to work on every bit of the sound. Convert your audio into dynamic animations and reach new platforms without a boring audience with only a banner.
- Video Trimmer. Remove all the unwanted parts, and do not miss a beat with the audience.
- Text to speech. Turn words into lessons and bring life into videos via AI-generated sound. Helpful when creating explainers or tutorials.
- Video memes. Create meme-worthy content using GIPHYs, stock footage, and meme motion titles.
- More than a million stock assets. Get your hands on the most extensive stock library with Clipchamp premium library.
- Audio Management. The advanced audio mixing system controls the sound level at every point in your video. Timeline allows you to work with precision on every audio bit.
How to Record your Screen with Clipchamp?
Clipchamp makes it simple to record the screen. Moreover, the online nature of the software allows you to register on any device, including ChromeOS, Windows, and macOS. Let’s learn how to register your screen with Clipchamp on the computer.
Note: Clipchamp does have iOS and Android applications, however, there are no features to record the screen. In case you want to learn how to record the iOS or Android screen using a screen recorder, skip to next section, given we have also included an alternative to Clipchamp Screen Recorder.
Step 1. Open the Clipchamp program.
Login or signup on the Clipchamp.com. Click on Record & Create to access the computer recorder.
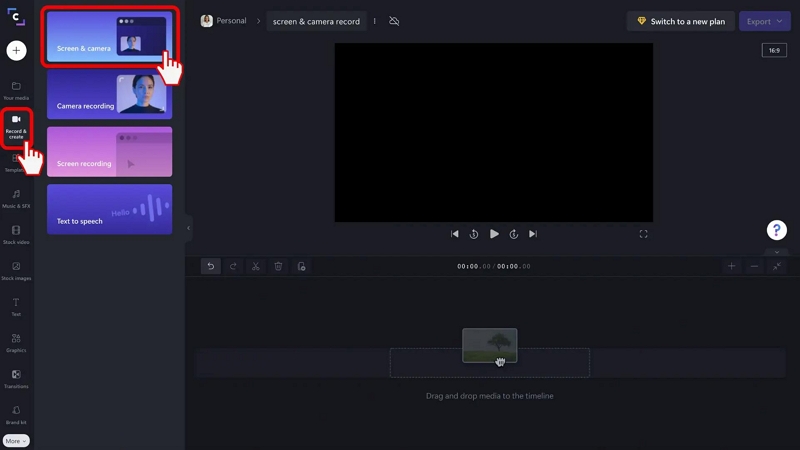
Note: You will find other options like Screen Recording, Camera Recording, and Text Speech. So, choose Screen Recording if you want to record the screen individually. Similarly, select Camera Recording and connect the external device to the computer if you want to record only the webcam or external devices. Text-to-speech allows you to convert text into speech.
Step 2. Customize the Recording Settings.
Once you click on Screen & Camera recording, you will see a window with the Entire Screen, Window, or Chrome tab option. The Entire Screen will record the entire screen. At the same time, the Window option allows you to choose one window specifically and record it. The Chrome tab option will enable you to record only one tab.
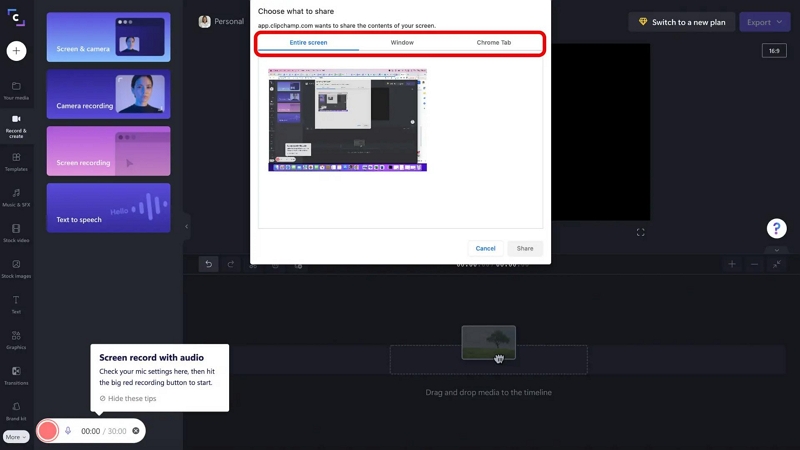
Note: There is no option to record partial screen. However, Clipchamp allows you to change the aspect ratio once you recorded the video via Video Resizer.
Step 3. Record the Screen.
Once you have made the selection and click on Share option, you will see a blue popup screen. On the blue popup, enable/disable the Webcam, enable/disable the Mic. After selecting the parameters, click on the Red button to start recording the screen.
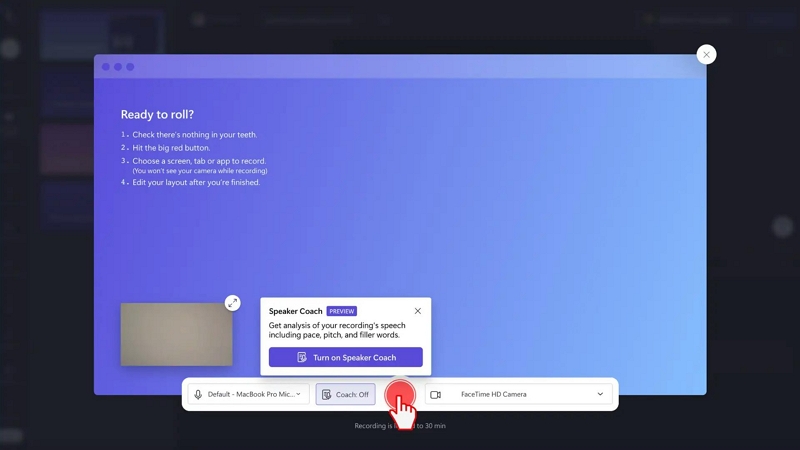
Step 4. End the Screen Recording. Click on the Stop Sharing button to end the recording.
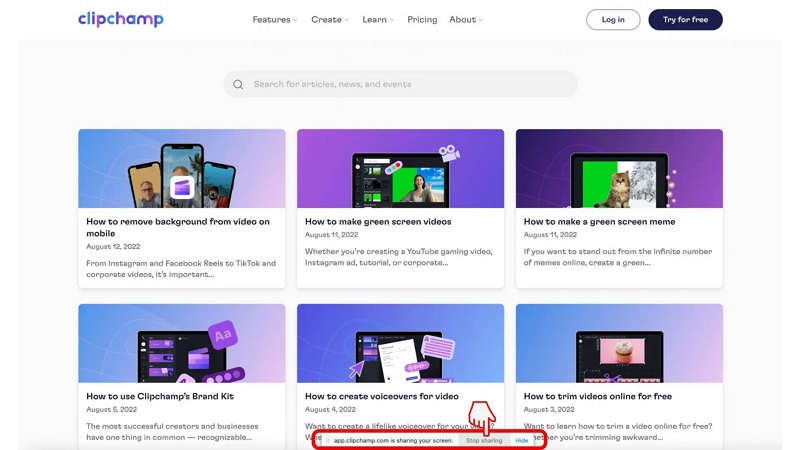
Note: As mentioned earlier, there is no option to annotate or customize any other setting during screen recording. So, everything is left to post-production.
Step 5. Save and Edit the Screen recording.
After ending the screen recording, you will see the option of Save & Edit. Once you click the Save and Edit, Clipchamp will save it in its local library (if you are using the Premium version).
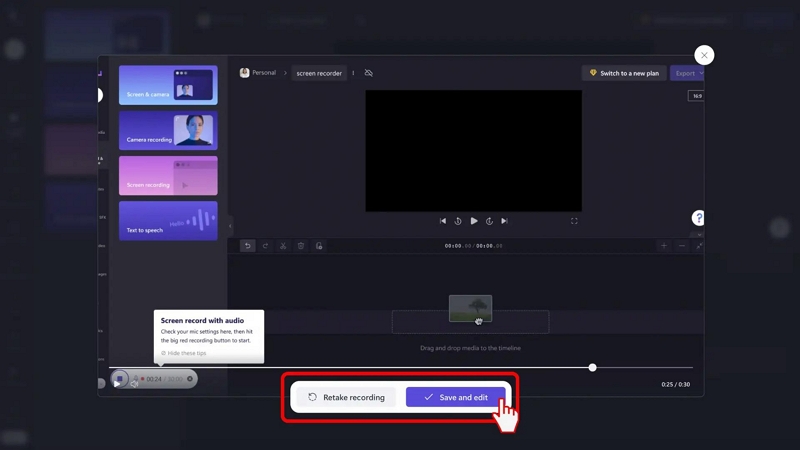
Step 6. Edit the Video.
Click on Your Media. And choose the screen recording from the library.
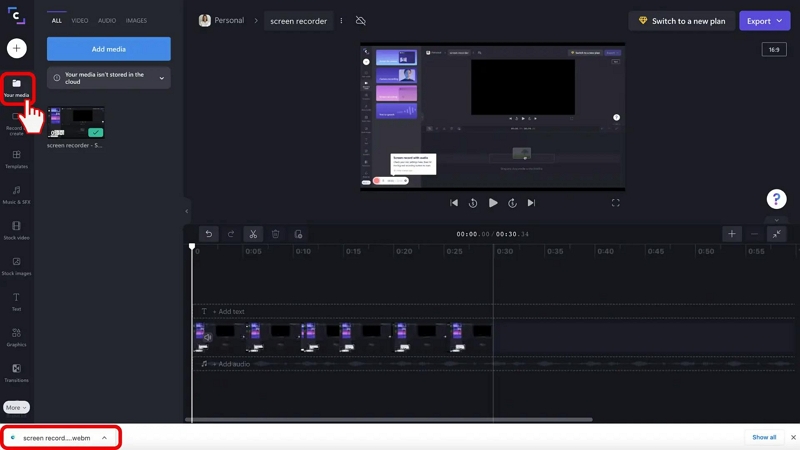
Step 7. Ungroup the video.
Once the video is uploaded to the Timeline, you can click on Ungroup. This will separate the Screen Recording and the Camera Recording. You can also work on them together, but to edit them separately, click on Ungroup.
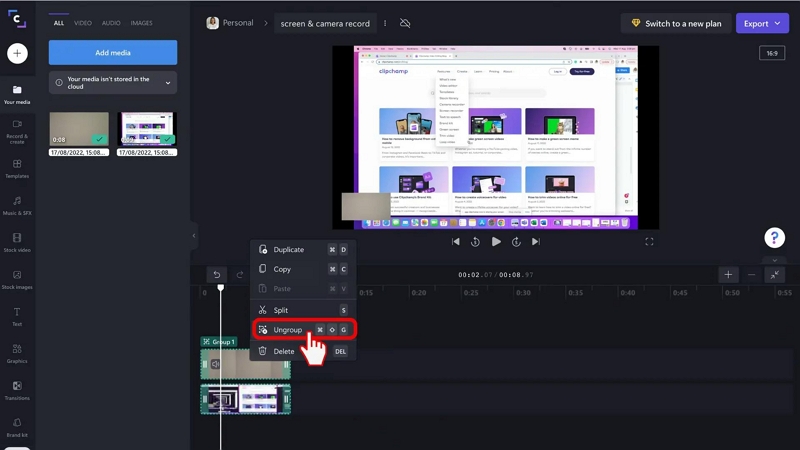
After ungrouping, you can edit the video using the general features available in the Clipchamp. For instance, you can Trim the video. To work on the Audio, click on the Music and SFX. The Music and SFX window allows you to visualize the video and add cool effects via the Stock assets. The same goes for Text, Graphics, and Transitions; you can access these features with the Premium account and professionally curate the video. After completing, you can either save or share the video on social channels.
Compatibility:
- Clipchamp is an online video editor; so, you can sign in via any device and use the editor and screen recorder.
- Clipchamp also has dedicated iOS and Android apps (no screen recorder available).
Pricing:
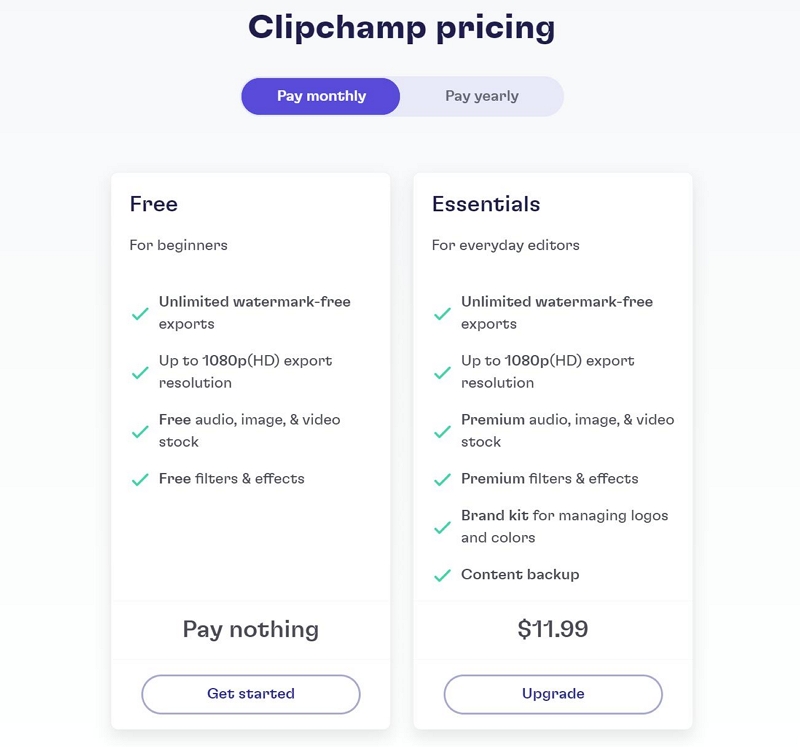
- Free. The free plan of Clipchamp allows you to record without any watermarks and time constraints. You can export the videos in 1080p resolution. Plus, you can use the free stock assets and free features.
- Essentials. The Essential plan comes for 119.99/annually. Most features are locked in the free version, like logos and custom watermarks, so the premium version becomes a must if you want to create professional videos.
The Pros: Why use Clipchamp Screen Recorder?
- Clipchamp allows you to record screens and webcams simultaneously.
- Clipchamp allows you to separate the screen recording and webcam and edit them separately.
- Clipchamp (Premium) includes more than a million stock assets, including audio, images, and videos.
- You can export in HD for free and with no watermarks.
- An online tool means you do not have to download any tools.
- Cloud backup of the recorded videos (Premium).
The Cons: Things to Consider
- No live annotation tools.
- No advanced features like Around Mouse Recorder or Follow Mouse Recorder.
- You cannot record a partial screen.
- No option to manage audio levels beforehand.
- No live settings option to control the screen recording.
Part 2: Eassiy Screen Recorder Review Ultimate
Eassiy Screen Recorder Ultimate, as mentioned, is designed to record the screen flexibly and has many more customizations than Clipchamp. Where Clipchamp allows you to record only the entire screen, a window, or a specific tab, Eassiy takes things to the next level and also will enable you to record a partial screen beside the option available in Clipchamp. Plus, there are advanced recording options, like Exclude Window recording (to exclude some windows and record everything else). Eassiy also has a dedicated Game Recorder that lets you capture gameplays in HD, with a webcam and microphone sound uninterruptedly.
Eassiy also comes with advanced recording functions, like Around Mouse Recorder and Follow Mouse Recorder (record a selected area across the cursor and exclude everything else). The advanced Audio Management system allows you to manage the sound levels (before, during, and after screen recording); plus, you will find professional features like a background noise cutter and microphone sound enhancer to make the audio in the screen recording crystal clear.
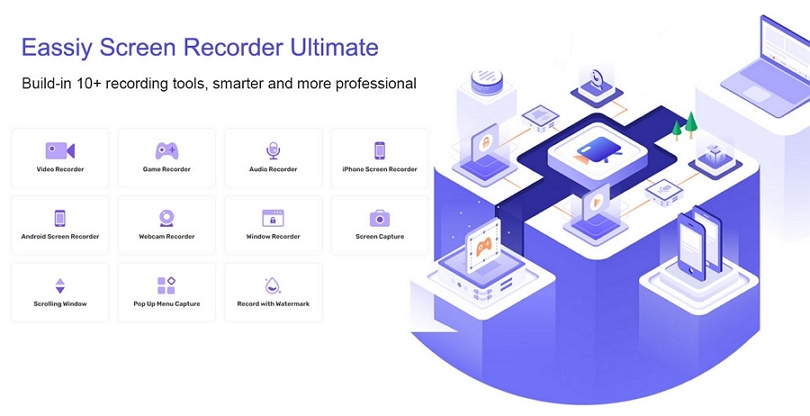
Beyond and above, Eassiy Screen Recorder presents the most simplistic user interface. Yes, it is powerful and has many features, but its intuitive design and modern nature make screen recording straightforward. So, even the least tech-literates can record the screen. Edit it as desired. And export it to social channels conveniently.
Key Features:
- Record the screen flexibly. Record the entire windows or mac screen, and customize the recording area or a specific window. Exclude window recorder and custom aspect ratio.
- Record webcam. Unlike Clipchamp, where you can only record the webcam in the square, webcam overlays Eassiy allows you to use different shapes like circular, rectangular, and more. Capture webcam with screen or individually.
- Advanced Recording Options. Around Mouse recording and Follow Mouse recording to record creatively.
- Advanced Screenshot. Take screenshots like a professional using advanced options like
- Record iPhone or Android. Unlike Clipchamp, Eassiy allows you to mirror your phone and screencast via computer and conveniently record the Android or iOS screen.
- Audio management system. Control internal and computer audio levels. Advanced options like limiting background noises and enhancing microphone sound.
- Audio Recorder. Dedicated audio recorder to capture high-definition audio from YouTube or any other sites. You can also include microphone sound in the recordings.
- Task Scheduler. Start and end a screen recording automatically without any intervention. Eassiy will save it automatically, and you can later edit them using the built-in video editor.
- Auto-Stop Recordings. You can end a recording by setting up the duration for the screen recording.
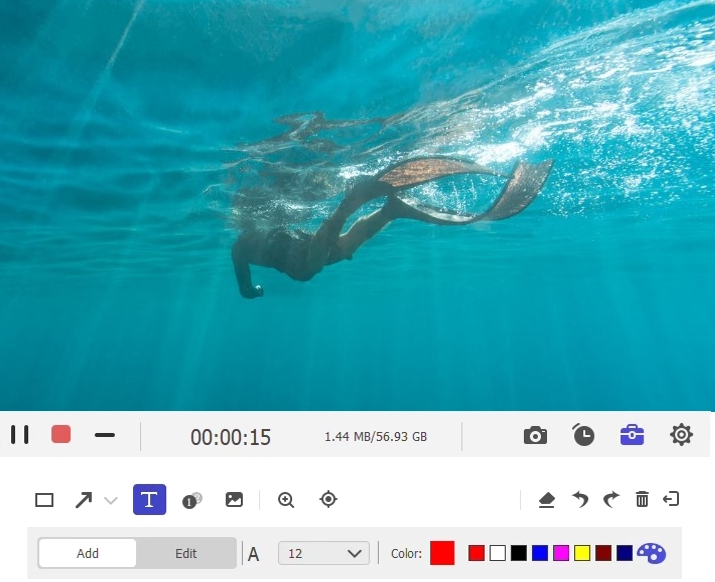
- Real-time annotation. Unlike Clipchamp, Eassiy allows you to draw, scribble, and doodle using airbrush, paintbrush, highlighter, text, arrows, and other annotation tools during the live recording.
- Custom watermarks. Use logos and custom watermarks to brand your videos and make them suitable for a professional environment.
- Numerous Save or Share options. Save in any format of your choice, or share the video on YouTube, Facebook, Vimeo, and more social platforms.
How to Record PC Screen with Audio Using Eassiy Screen Recorder?
Where Clipchamp is an online tool, Eassiy is an offline screen recorder. This means you will have to download the tool to record the screen on Windows and Mac. It also allows you to record the Android and iOS screen via screen mirroring. However, let’s discuss how to record the PC screen only:
Step 1. Download the Eassiy Screen Recorder on your Mac or Windows computer.
Go to the official site of Eassiy. And click on Download. Install the application on your computer. Click on Start Now after installing the tool.
Step 2. Customize the Recording Settings.
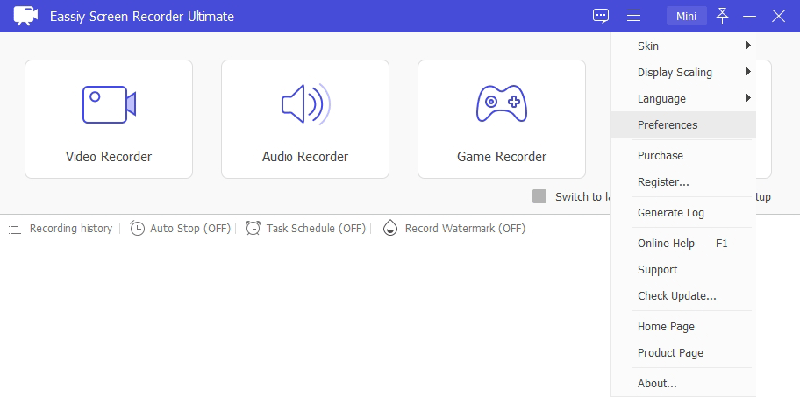
On the main interface, click on the triple bars to access Preferences. Under Preferences, change the recording settings.
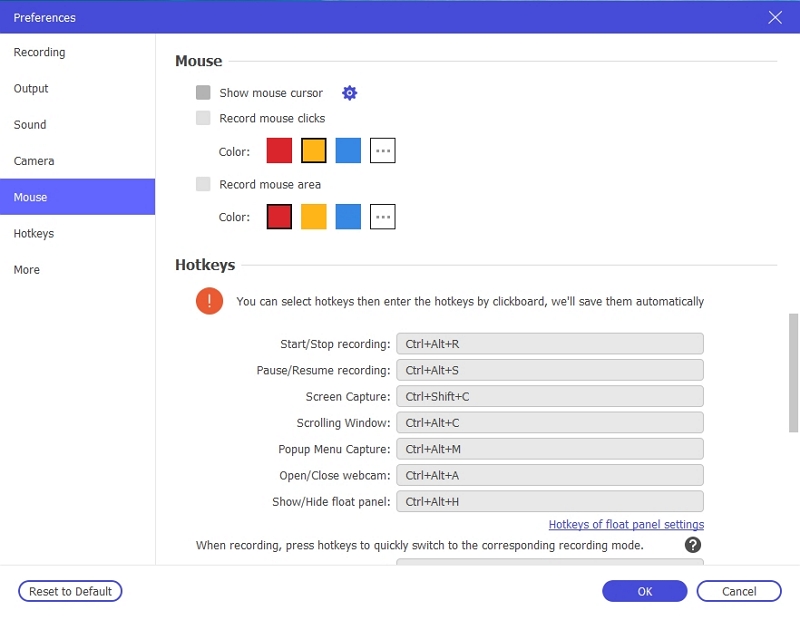
Under the Preferences tab, you can customize the hotkeys (to manage everything using keyboard shortcuts). You can Change the Mouse Color, Camera Settings, Sound Settings, and other options. After Changing the Settings, click on OK and save the Settings.
Step 3. On the main interface, choose Video Recorder. Under the Video Recorder menu, you will see options to include the webcam, microphone, and custom screen. Choose accordingly, and click on the Rec button to start the recording screen.

Step 4. After the countdown, Eassiy will start recording the screen. You can use the Live annotation tool. You can also take a screen during live recording. Plus, you can change the Screen recording parameters like Sound and more.
Step 5. End and Edit the recording.
Click on the Red button to stop the recording. After ending the recording, you can choose to either edit it using the built-in video editor. Or you can share the recording on social platforms.
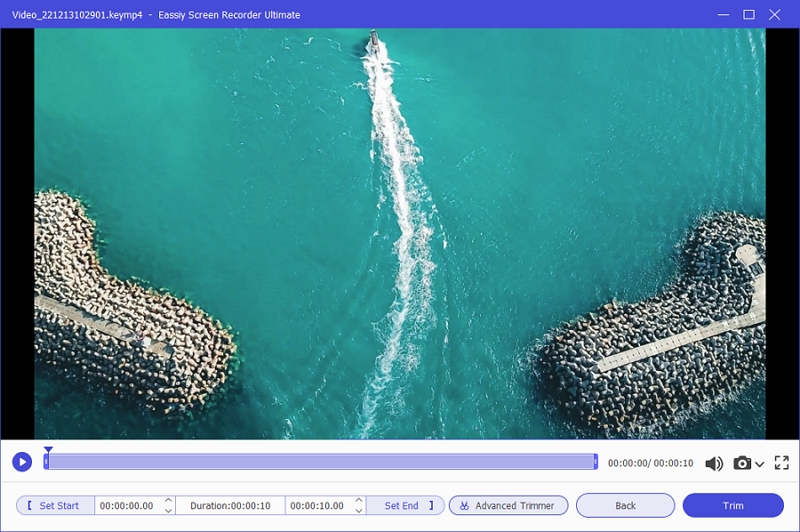
As mentioned, Eassiy Screen Recorder has the most simplest interface of any screencast tool. This is only an introduction to what Eassiy Screen Recorder. There are other cool options like Auto Stop recording, Schedule Recording, Around Mouse Recorder, and Follow Mouse Recording. Besides these, it allows you to mirror the iOS and Android screen and record them via the Windows or macOS.
Compatibility:
- Eassiy is available for Windows and macOS users.
- You can record Android or iOS (any version) devices via the computer.
The Pros: Why use Eassiy Screen Recorder?
- You can record in 1080p resolution with webcam/microphone sound.
- Eassiy comes with advanced recording options including schedule recording, auto-stop recording etc.
- You can annotate during the live recording.
- Almost all essential video editing features like Trim, Audio Mix, and auto-split are available.
- Eassiy allows you take infinitely long and panoramic screenshots.
- You can setup hotkeys and manage everything via keyboard shortcuts.
- You can change the mouse cursor color or make invisible.
- Dedicated Game Recorder and Audio Recorder.
In all, Eassiy Screen Recorder allows you to create any type of video. For instance, if you want to create online tutorials or video lessons, you can take help of the Advanced Recording options like Around Mouse or Follow Mouse to record the lessons creatively. Plus, you can include webcam and microphone to give a human element.
The Cons: Things to Consider
- The free version only allows you to record for up to 3 minutes.
- Eassiy does not have advanced video editing features like Clipchamp. Transitions, Effects, Filters are also not accessible.
Part 3: Clipchamp vs. Eassiy - Let's see which is best for you!
Usability
Both Eassiy and Clipchamp present a modern and clean interface. Everything in both tools is self-explanatory. For its worth, you do not have to follow any guides or go through a learning curve to use them efficiently. However, one advantage Eassiy has over Clipchamp is it allows you to create custom hotkeys and mange the screen recording via keyboard shortcuts.
Winner: Tie
Features
With more than 10+ recording tools, Eassiy dominates when it comes to screen recording. You will find almost every recording tool to create online tutorials, video ads, video lessons, explainer videos, and gameplays like a professional. However, it does not have advanced editing tools. Clipchamp, on the other hand, has advanced editing tools like transitions and graphs, which is suitable to level up an already recorded video. However, when it comes to screen recording, Clipchamp has nothing extraordinary worth mentioning (retain that it doesn't even offer annotation tools).
Winner: Eassiy Screen Recorder Ultimate.
Speed
Clipchamp speed depends on the internet connectivity. In fact, the major difference between their user interface is that Clipchamp is an online tool, and Eassiy is an offline tool. So, it all comes down to your needs. You might already know how an online tool works, but it is essential to retain that the functionality of the online tool depends on the internet connection speed. If you have a high connectivity speed, Clipchamp will work flawlessly; however, if you do not, then it is best to go with an offline tool like Eassiy to avoid lags and connection interruptions.
Winner: Eassiy Screen Recorder.
Output Quality
Both Eassiy and Clipchamp allow you to export in any format and resolution (up to 1080p).
Efficiency
Giving you advanced recording tools, Eassiy eases up the recording process. So, there is no work to go through post-production and manage everything. For instance, it includes the live annotation tools to draw on the videos during live recording. After the recording, you can still edit the video trim and manage the audio level. But everything gets over in almost one go. In contrast, Clipchamp does allow you to do many things while recording the screen. For instance, you can just start recording and leave the rest to post-production.
Winner: Eassiy Screen Recorder.
Conclusion
As mentioned, Eassiy dominates when we talk about screen recording tools. It comes laden with advanced recording tools to create any video in the way you want. However, there aren’t many video editing tools. You can still edit, like using trim, auto-split, and audio functions to manage all the essential things. Nevertheless, you cannot access advanced editing tools like transitions, graphics, and stock assets.
At the same time, Clipchamp dominates when we talk about video editing. You will not find many screen recording options. For instance, there isn’t even an option to record a partial screen. Plus, you will not have access to live annotation tools (like in Eassiy) and draw on the videos. However, Clipchamp comes with professional editing tools. Overall, if you are looking for a video editor, Clipchamp is the tool. However, if you are looking for a screen recording and video-making tool, Eassiy is the way to go!


