Updated on 2023-07-06
22 views
5min read
AZ Screen Recorder is the go-to solution for any recording needs on your smartphone, featured on Google Play Home Page, Business Insider, Android Police, CNET, HuffPost, and more such ruptured sites. AZ Screen Recorder can meet all your recording needs, be it showing the new app you discovered, recording gameplays, or sharing something on your screen. It can also be used on Windows 7 PC, which will discuss briefly in this guide.
Read on to discover everything about AZ Screen Recorder for PC and also learn how to use it on the computer. This guide will discuss the key features of AZ Screen Recorder and show you step-by-step instructions to use it on Windows 7 or 10. And in case you do not like what AZ Screen Recorder has to offer, we have also mentioned an alternative to AZ Screen Recorder for PC.
Part 1: What Is AZ Screen Recorder for PC?
As mentioned, AZ Screen Recorder is primarily an Android device app. Although it is a fully-fledged smartphone screen recorder, almost all of its features are hidden behind a paywall. You can capture the screen and sound with the free version of AZ Screen Recorder. However, the advanced features like recording the screen in HD, Live streaming on Facebook or YouTube, and capturing with a microphone are accessible only to premium users. The advanced users can also manage other recording aspects like the duration of recording in advance, change the timer when starting screen recording, customize the FPS up to 60fps, and so on.
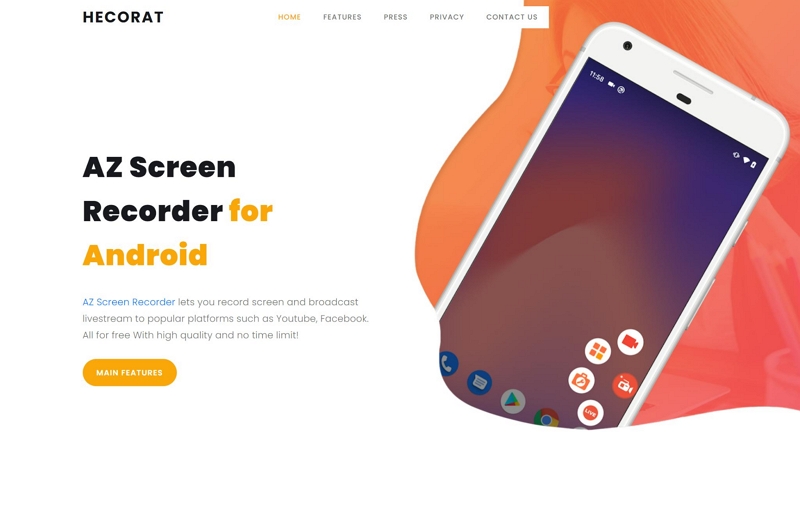
There are even editing features like trim, cut, audio clean, and more such small tweaks to take control of the output video. Another prominent thing about AZ Screen Recorder is its simple user interface that allows even the least tech-literates to record the screen conveniently. And in case you are wondering, you can use AZ Screen Recorder on Windows 7 or 10.
Key Features:
- Record Screen. You can record the Android and Windows screen in HD (1980*1080p) up to 60fps.
- Record Microphone. You can record both internal and external sounds while recording the screen.
- Record the Webcam or Front Camera. You can include your footage via the rearview camera on your phone or computer.
- Edit the Output. Trim, split, audio cleaning, and other small editing features.
- Live Stream. You can share the screen recording on YouTube and Facebook Live in real-time.
- Convert to GIF. You can convert the clip into a GIF and share it on social media apps.
- Replace the audio. You can replace the soundtrack with another on your Windows or phone.
How to use AZ Screen Recorder to Record Mobile and Windows 7/10?
AZ Screen Recorder is available on the Google Play store. Plus, it is primarily used by Android users to capture their screens. So, let’s discuss how to use it on Mobile and Windows. For using the app on the phone, you do not need any external help. However, you will need an emulator to use the tool on Windows.
Step 1. Open the AZ Screen Recorder.
- Install the AZ Screen Recorder via the Google Play store.
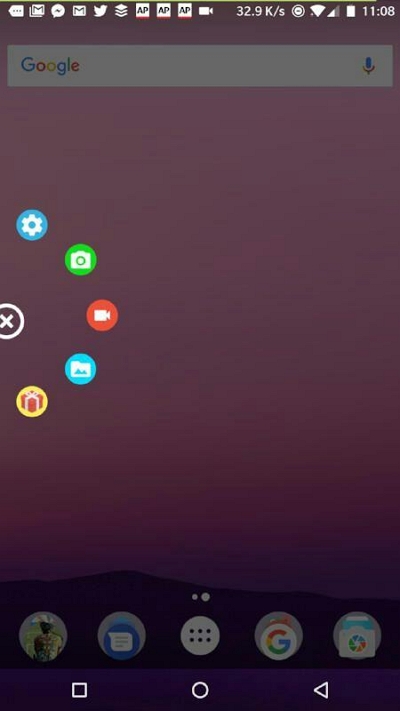
- Once you open the Screen Recorder, you will see five controls on the screen.
- The Settings icon allows you to manage the screen recording settings.
- The Camera icon allows you to take a snapshot of the screen.
- The Recording icon will allow you to record the screen.
- The Gallery icon allows you to access the previous recordings.
- And the Gift icon allows you to go to Play Store.
Step 2. Record the Screen.
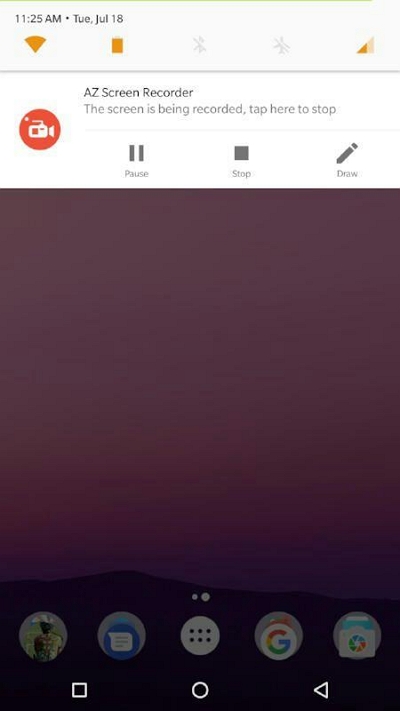
Click on the Record icon to start recording the screen. Once you initiate the screen recording, AZ Screen Recorder will start the countdown timer (to prepare for the recording). You can access the Recording menu via the Notification center (scrolling down on your phone). You can pause or stop the recording. Or click on the Draw icon to annotate the screen recording on your phone.
Step 3. Save the recording.
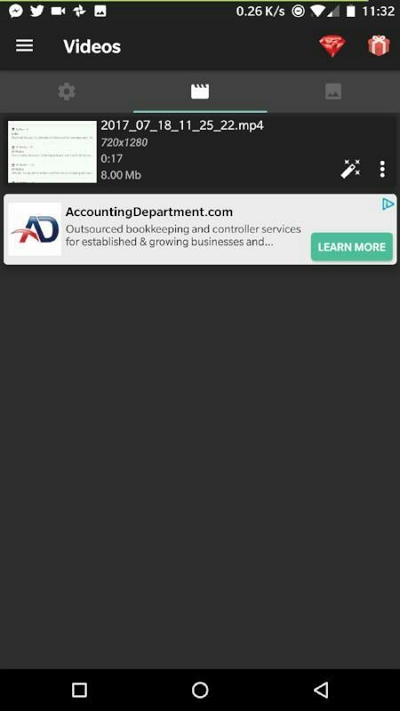
You can access the saved recording via the Gallery app and edit the screen recording as needed.
That’s how to use AZ Screen Recorder on the mobile device. However, you can also record using the AZ Screen Recorder on the computer.
How to Use AZ Screen Recorder to Capture the Computer Screen?
Step 1. Download and Install the AZ Screen Recorder from the Microsoft Store. (AZ Screen Recorder does not have a Mac version).

Step 2. Click Screen Recorder on the main interface.
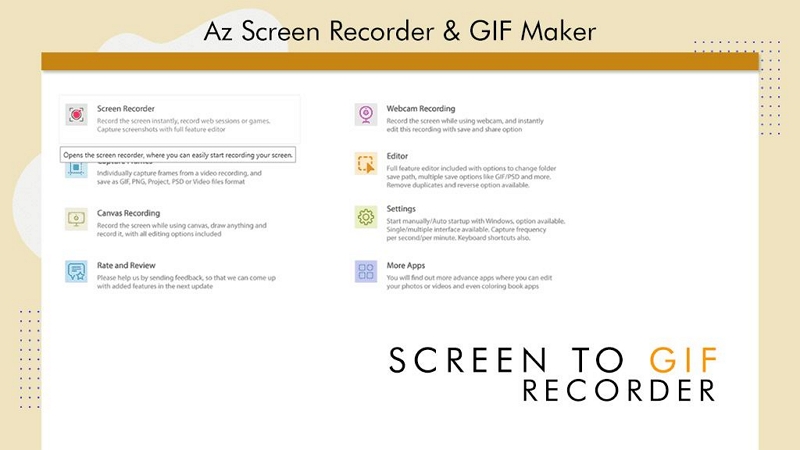
Step 3. Customize the AZ Screen Recorder.
From the main menu options, click on Settings to access all the customizations. You can set keyboard shortcut keys if you want to manage everything using the hotkeys. Similarly, you can change the Recording and other settings.
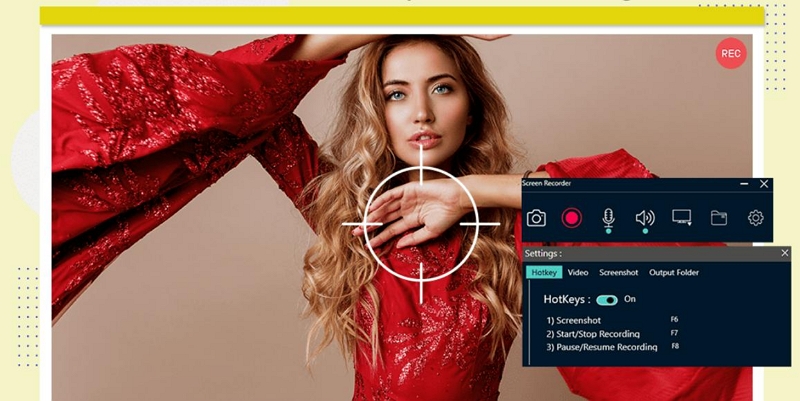
Step 4. Click on the Rec button to start the recording.
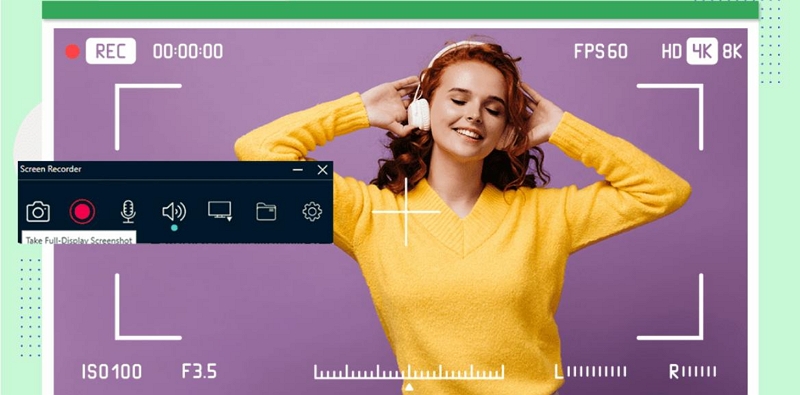
Choose whether you want to record the full screen or define the recording area. You can manage the recording using the menu options. Click on the Camera icon to capture a screenshot while recording the screen.
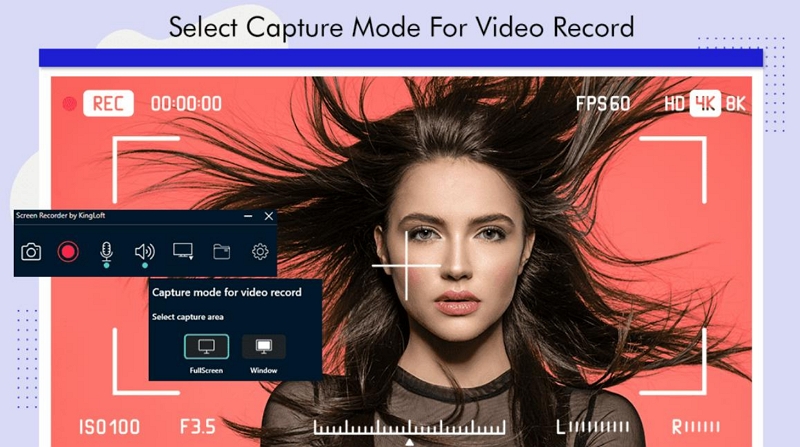
Step 5. Stop the recording.
Click on the Stop button to end the recording. Once you end the recording, AZ Screen Recorder for PC will automatically save the recording to the local storage.
Compatibility:
- Available for Windows.
- Available for Android devices.
Price:
- The premium version of AZ Screen Recorder costs US$ 20.99/annual.
What Are the Advantages & Disadvantages of using AZ Screen Recorder for PC?
AZ Screen Recorder is good in some aspects; for instance, it is a simple-to-use screen recorder that allows you to include microphones and a facecam while recording the phone screen. But there are many drawbacks to using the tool. Here’s a brief discussion of AZ Screen Recorders' ups and downs:
Advantages of Using AZ Screen Recorder
- A simple interface means beginners will not have difficulty using the application.
- You can include both facecam and internal audio in the phone and PC recording.
- Live Stream feature.
- Some basic video editing features.
- Capture screenshots.
Disadvantages of Using AZ Screen Recorder
- No tool to record iOS or Mac.
- The editing functions are limited, and you can create a professional-looking video using the in-app editor.
- The annotation tools are limited. The PC apps lack annotation tools altogether.
- No dedicated Game Recorder to capture games without interruptions.
- The free version leaves a watermark and does not support 1080p recording.
Part 2: Best Screen Recorder for PC Free Download - Eassiy Screen Recorder Ultimate
The disadvantages outweigh the advantages of having an AZ Screen Recorder. That is why we have included an alternative to the AZ Screen Recorder. Given AZ Screen Recorder lacks advanced functionalities to record like a professional, it is suitable for personal use. But to record online tutorials, gameplays, or business presentations like a professional, you will need a screen recorder with advnced recording tools, like Eassiy Screen Recorder.
Eassiy Screen Recorder Ultimate
Eassiy Screen Recorder Ultimate is an all-in-one screen recorder and video-making tool for creating professional-looking online tutorials, gameplays, explainer videos, and business presentations. Available for all major operating systems, Eassiy is the one tool you need to record any device in any way you want. The recording features allow you to capture the entire screen or choose the recording area. Plus, you can record webcam and internal computer or phone sounds while recording the screen.
Capable of recording in 4K up to 60fps, Eassiy comes with live annotation tools to highlight something in the video during screen recording. Besides that, you can schedule the screen recordings to capture the screen when you are away. Plus, it comes with other recording options like the Around Mouse Recorder (to record an area around the cursor) and Follow Mouse Recorder (follows the mouse cursor and records only the desired content). Even though the tool is packed with cutting-edge functionalities, the intuitive and straightforward build of the Eassiy makes it suitable for both experts and hobbyists alike.
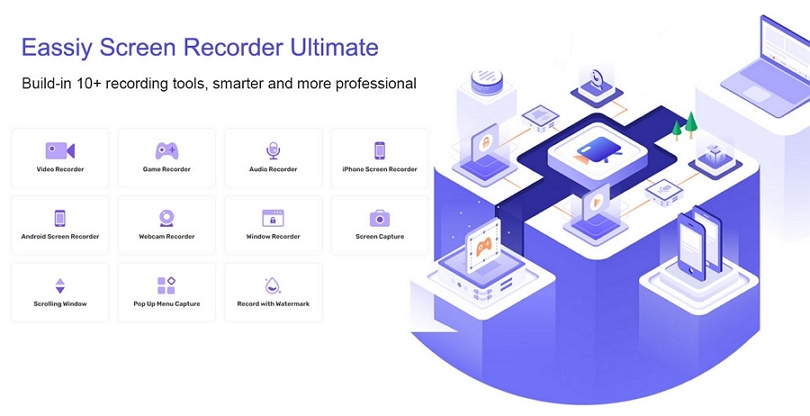
Key Features of Eassiy Screen Recorder:
- Record the full/custom screen on the Windows, Mac, iPhone, or Android phone screen;
- Record in 4K up to 60fps.
- Record gameplay with no lag without any interruption smartly, display or no display facecam as you wish using the dedicated Game Recorder;
- Lock and record a specific window or the exclude window that does not appear in your recording area;
- Schedule recording for live streaming, serials, sports events, etc.;
- Don't have to wait at your computer to record videos with the auto-stop recording feature;
- Real-time annotation while recording;
- Move the recording area around/follow the mouse during live recording;
- Video editing features, including trim, cut, audio cleaning, auto-split, and more.
- Use the dedicated Audio Recorder to capture only audio;
- Use advanced sound management functions, like background noise cancellation and microphone enhancement features;
- Record video with a default image/text watermark;
- Take screenshots while recording and scrolling screenshots quickly.
Compatibility:
- Windows 11, 10, 8.1, 8, & 7
- macOS 10.10 and later.
- All Android and iOS versions are supported.
Pricing:
- One-month plan — US$ 19.99 (1 PC)
- One-year plan — US$ 39.99 (1 PC)
- Lifetime plan — US$ 79.99 (2 PC)
What Are the Advantages & Disadvantages of using Eassiy Screen Recorder?
Eassiy's advanced built and sleek design beats AZ Screen Recorder in every aspect. Still, let’s evaluate the ups and downs of Eassiy Screen Recorder.
Advantages of Using Eassiy Screen Recorder
- An intelligently-built and intuitive user interface to let beginners and hobbyists work alike.
- Live annotation tools to draw on the screen recording using a paintbrush, highlighter, arrows, text editor, and more.
- Use custom-created hotkeys to manage everything using keyboard shortcuts.
- Schedule a recorder to start and end a recording automatically. Auto-end a recording.
- Supports all major formats.
- Numerous social sharing options.
Disadvantages of Using Eassiy Screen Recorder
- The free version of Eassiy Screen Recorder allows you to record up to 3 minutes only.
How can Eassiy Screen Recorder record Windows, Mac, iPhone, and Android screens?
Eassiy functionality and build do not differ regardless of whether it is the Windows or Mac app. The same is the case with the iOS and Android versions of the program. So, follow along to learn how to use the Eassiy program on Windows, Mac, iPhone, and Android. First, let’s discuss how to use Eassiy on Windows or Mac.
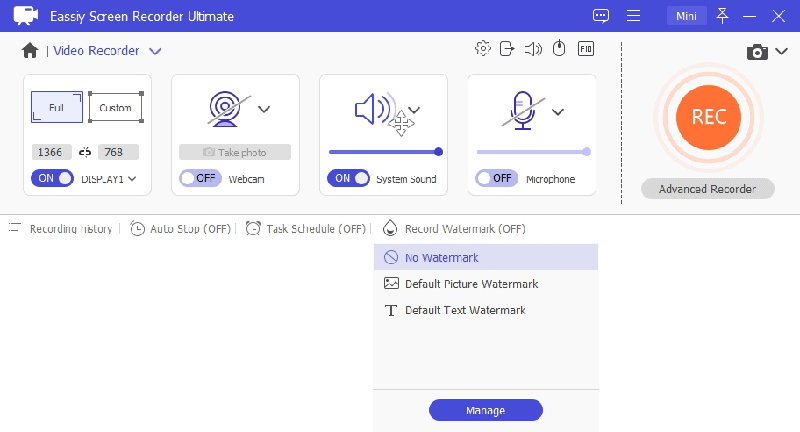
Step 1. Download and install Eassiy’s Screen Recorder on your Mac or Windows device. Launch Eassiy’s Screen Recorder program on the computer. On the main interface of the program, choose Video Recorder. Choose Full if you want to capture the entire screen on the computer. To record only a specific section on the screen, choose Custom and define the aspect ratio.

Note: You can preset the Recording Settings in Eassiy Screen Recorder. Of course, you do not have to edit the recordings every time. Once you save them, the customizations will affect all future recordings. For context — The “Preferences” tab in Eassiy’s Screen Recorder lets you can set up hotkeys and configure advanced options like show mouse cursor or not, webcam resolution, sound options, and so on.
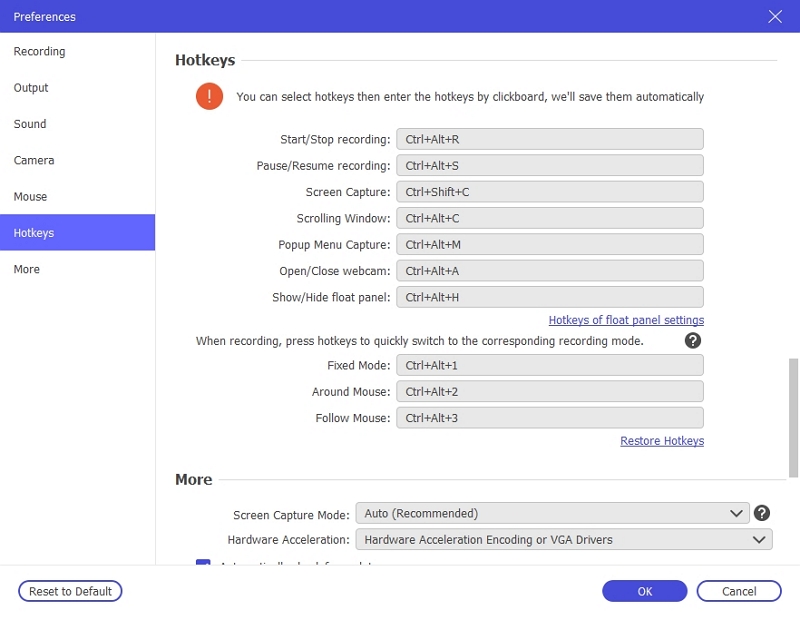
You can also create custom pictures or text watermarks and include them in the recording.
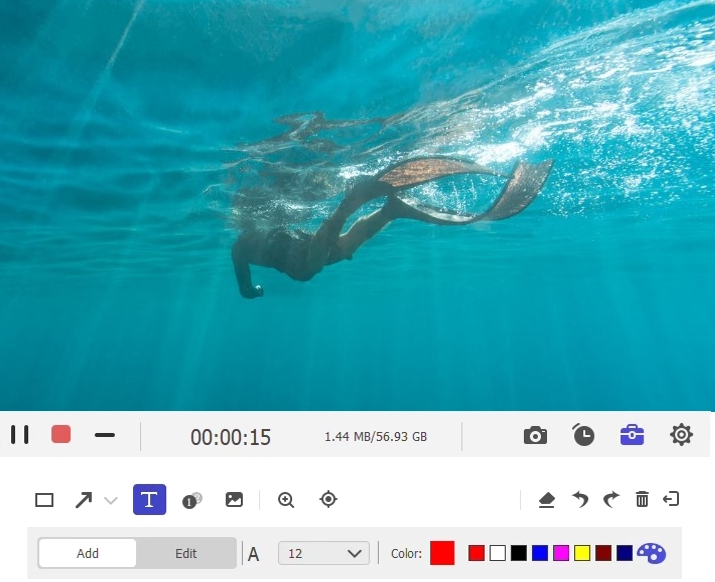
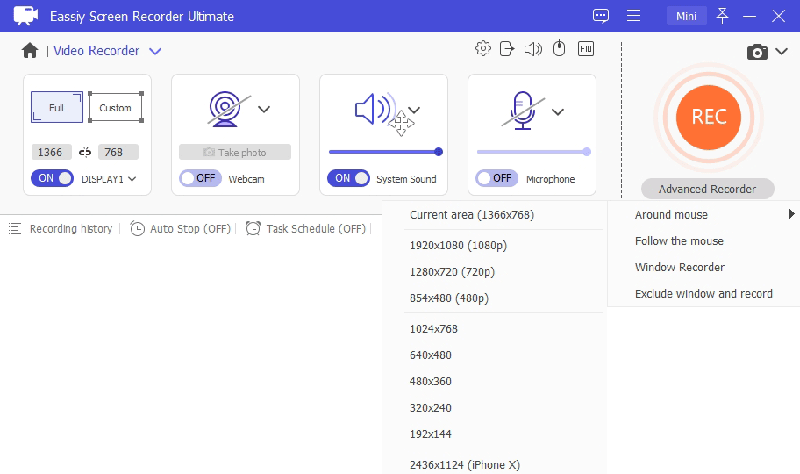
Step 2. Press the REC button to start recording the screen. After starting the recording, use the menu to use annotation during live recording. You can also capture snapshots by clicking on the Camera icon.
Note: Instead of clicking the REC button, you can use the Advanced Recording options by clicking on the Advanced Recorder option under the REC button.
- The Advanced Recorder allows you to access the Around Mouse and Follow the Mouse Recorder.
- The Window Recorder lets you record one window specifically and uninterruptedly.
- Similarly, the Exclude Window and record allows you to run something in the background, but the Eassiy program will exclude that window and record everything else.
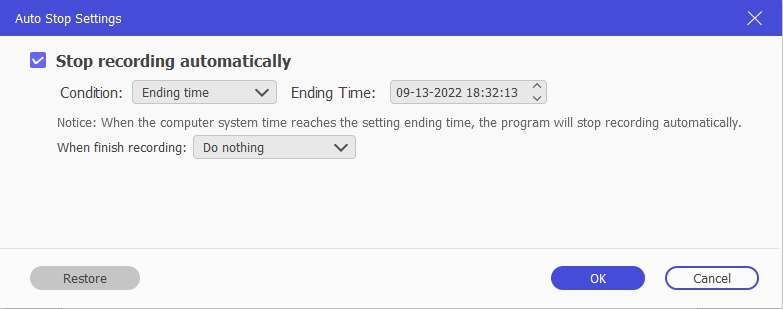
Step 3. Click on the Red button to Stop the recording. Or you can use the Auto Stop function to end a recording automatically. Click on the Auto-Stop function on the recording menu to schedule an auto-stop.
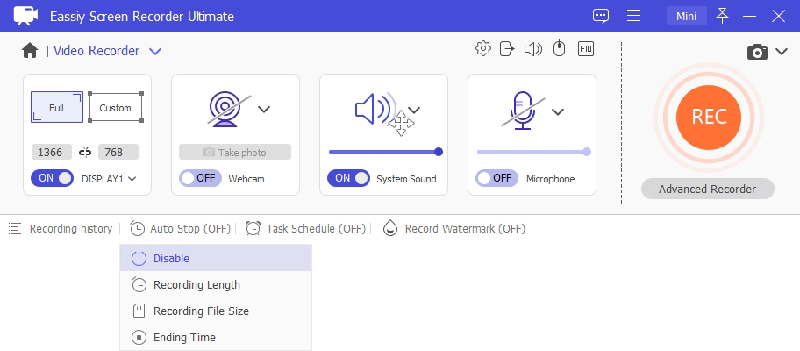
Define the recording file size. Or unselect the option and define the Recording length. You can also define the Ending time, and Eassiy will stop the recording automatically.
Step 4. After ending the recording, Eassiy will save it to the Recording History. You can access the recorded video and captured screenshots via Recording History folder.
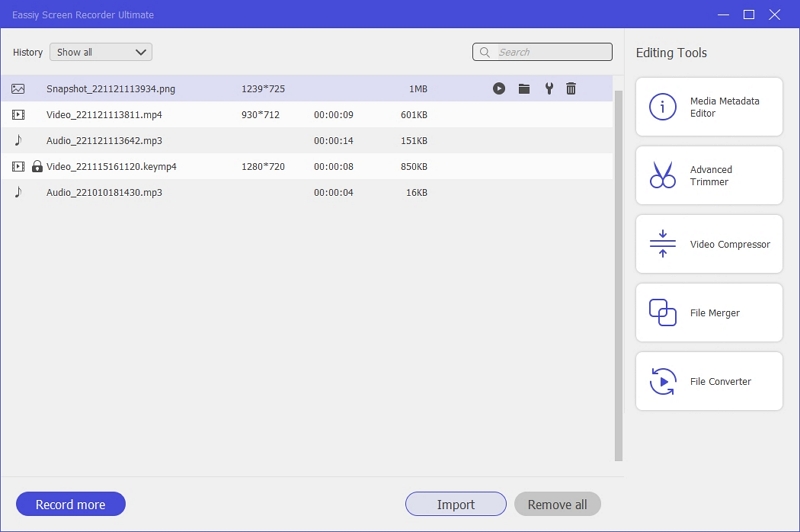
Step 5. Click on the Pencil icon next to the saved video in the Recording History panel to edit the recording. Use the editing tools to make your auto-recorded video suitable for professional use. Click on Done to save the recording to the local storage.
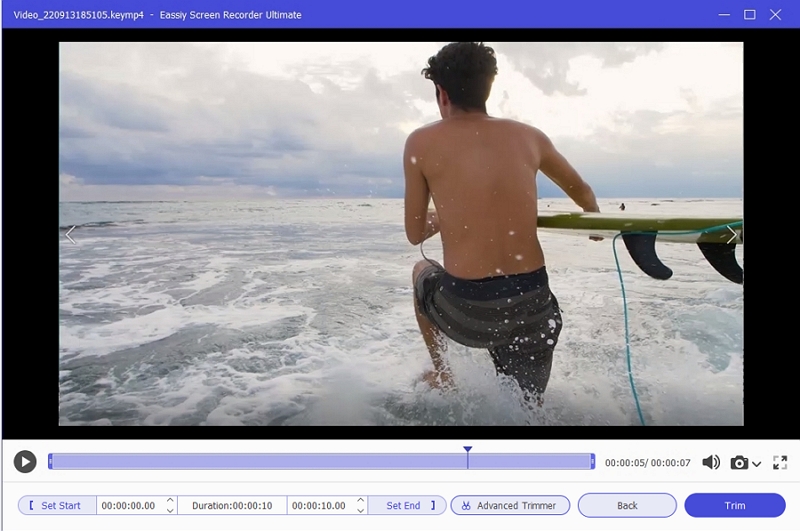
Step 6. You can also share the recording to social channels directly.
There you go! Eassiy Screen Recorder makes it simple for you to record the screen. And you do not have to wait around to stop the recording manually. Instead, you can use the auto-stop function to end a recording automatically. Other advanced functions like Task Schedule automatically start and end a recording with no intervention whatsoever.
How to use Eassiy to Record iPhone and Android screen:
To record your Android screen via Eassiy Screen Recorder via your Android screen, you will need the FoneLab mirror tool. Follow the steps to learn how to record your phone screen using Eassiy Screen Recorder.
Step 1. Download FoneLab Mirror on your Android phone.
Open the Eassiy program on your Mac or Windows device. On the main interface of Eassiy, Choose Phone.

Step 2. On the following interface, choose Android.
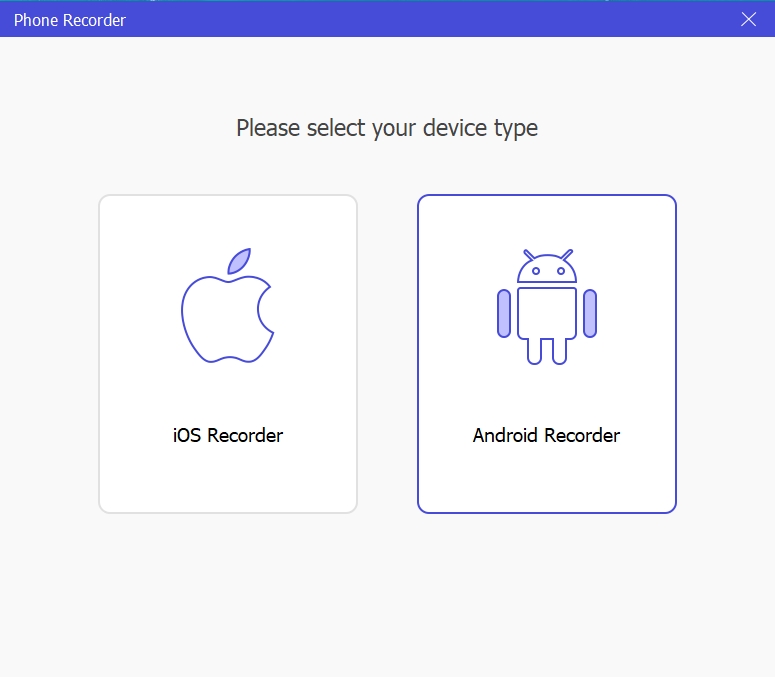
Step 3. Connect the Phone to the Computer.
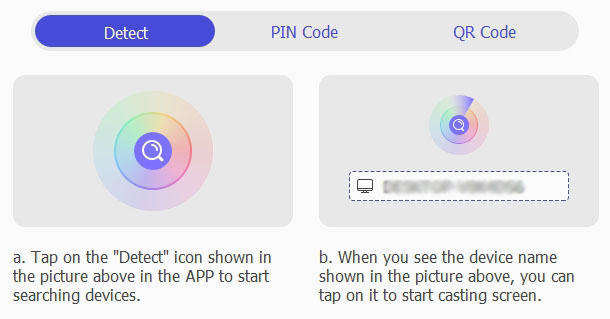
Select WiFi to connect the Android device to the computer. After connecting the device, select the Detect icon. And click on the Device name to connect with the computer on which Eassiy Screen Recorder is installed.
If you have selected the USB option, you will receive a Debugging notitication on your Android screen. In case you do not receive a message, follow the on-screen steps to resolve the issue.
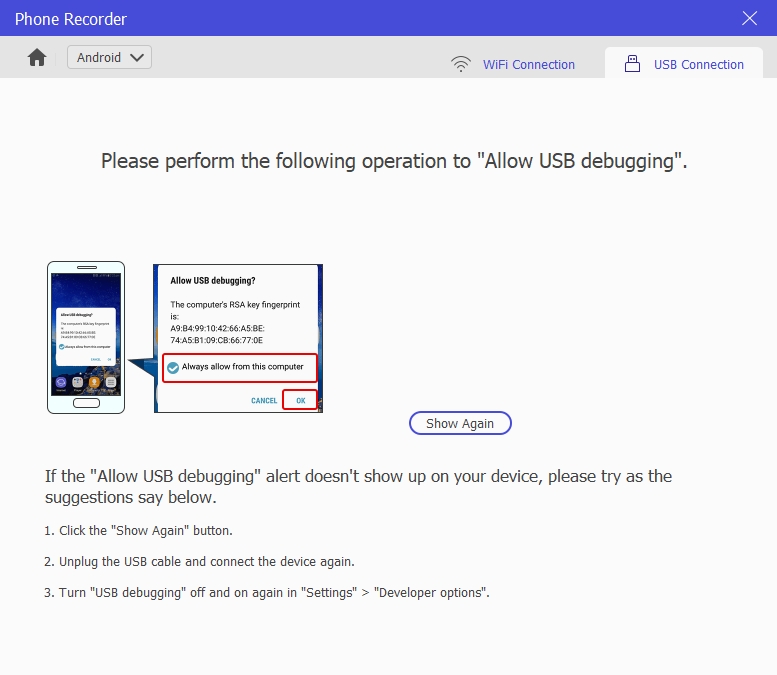
Step 4. Authorize mirroring via the Eassiy program.
After successfully connecting the Android device to the Eassiy program, allow the Android device to mirror the Eassiy program on the computer.
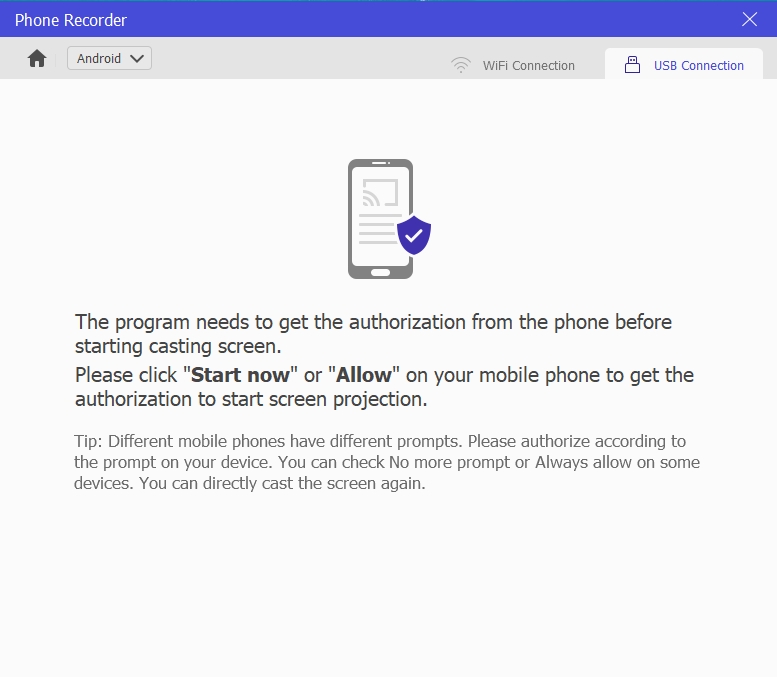
Step 5. Click on the Start button to start recording the Android screen.
You can customize the resolution. You can choose up to 4K.
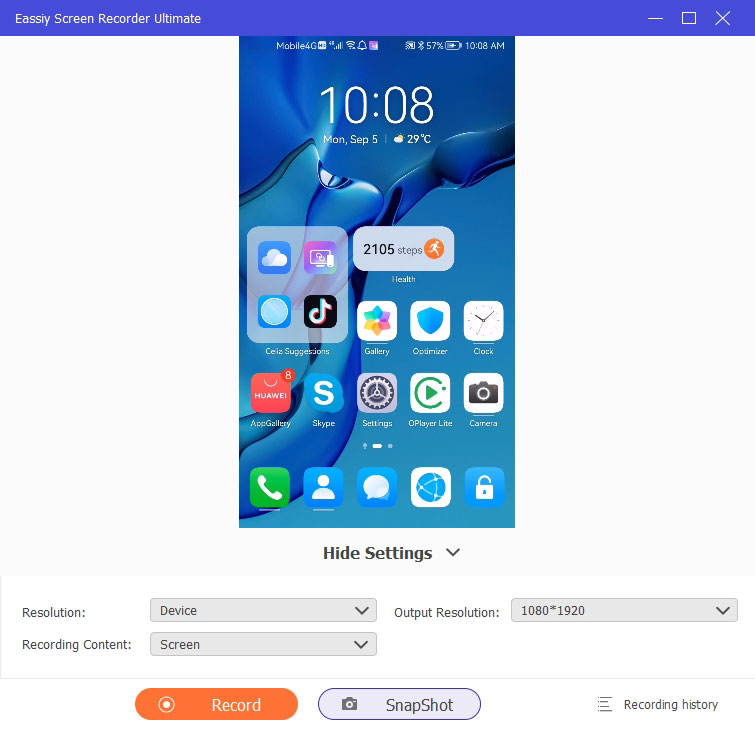
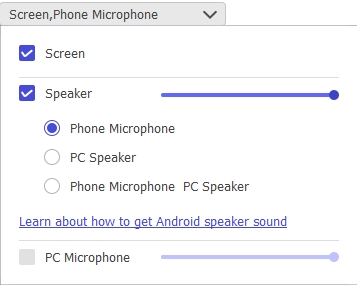
Plus, you can choose which sounds you want to include in the screen recording. You can also change the speaker. For instance, if you want to include internal phone sound, choose Phone Speaker. In case you want to have the computer’s internal sound or voiceover, choose accordingly.
Start Recording the Android screen. You can use the annotation tool to draw on the live screen recording of your Android screen. The Camera icon allows you to capture a snapshot while recording the phone screen live.
Step 6. Click on the Stop button to end the Android screen recording.
You can edit the recording using the editing tools available in the Eassiy program on the computer. Save the recording to the computer’s local storage or share the recording on social channels. All the recordings will be accessible via the Recording History folder on the computer program.
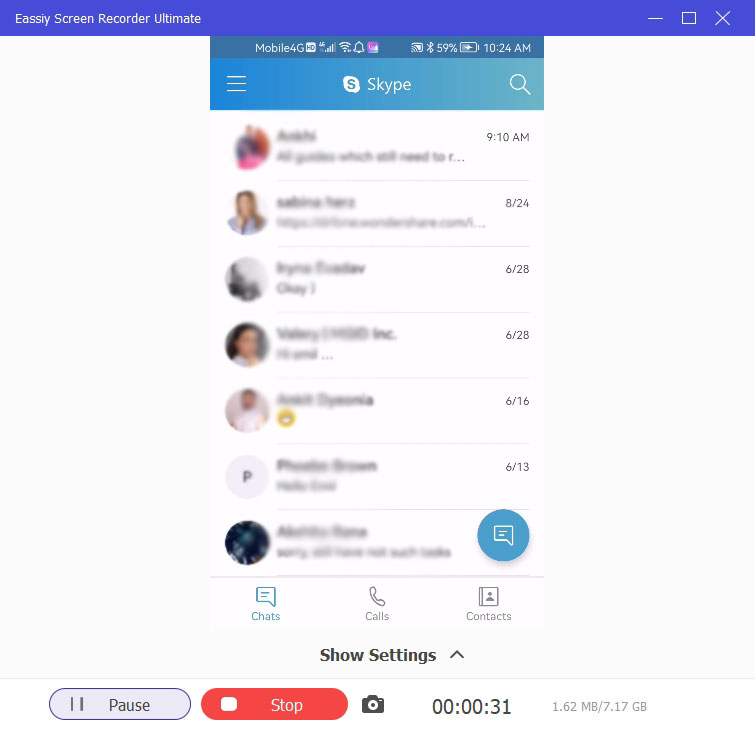
That’s how to use the Eassiy program to mirror your Android device and record it via the computer screen. However, unlike with AZ Screen Recorder, you can also use the Eassiy program to capture your iPhone or iPad. Of course, the steps to record the iPhone record are similar. Just select the iOS when you click on the Phone recording and connect both devices via the Screen Mirroring app.
Part 3: Table comparison between the best screen recorder for PC Eassiy and AZ Screen Recorder
Just to showcase how AZ Screen Recorder fails on many levels, we have compared the AZ Screen Recorder with the Eassiy program based on price, recording options, and so on.
|
Eassiy Screen Recorder Ultimate |
AZ Screen Recorder |
Price |
US$ 69.99 (Lifetime license) |
US$ 20.99 Monthly |
Screen Recording Options |
4K Recorder. |
1080p recording |
Facecam |
Yes. |
Yes. |
Audio Mixing |
Enhance microphone sound. |
No such tools. |
Text Animation |
Yes. |
No. |
Annotation |
Pencil, Arrows, Circle, Airbrush, and more. |
Pencil. |
Advanced Recording Options |
Around Mouse Recorder. |
No. |
Schedule Recorder |
Yes. Set the start and end time to record anything and save it on the computer. Auto-Stop recording features. |
No. |
Game Recorder |
Yes. |
No. |
Sharing Option |
Google +, YouTube, Vimeo, Facebook, and more platforms. |
No. |
Live Stream |
No. |
Yes, you can live stream on Facebook and YouTube. |
Level |
Suitable for Beginners and experts |
Suitable for beginners. |
Device |
Record Windows, Mac, iPhone, and Android. |
Record Android independently or Windows. |
In Conclusion
AZ Screen Recorder is a simple tool to record your Android and Windows tool. As evident, you will not find any advanced recording options in AZ. The comparison table strengthens my case for why Eassiy Screen Recorder is the tool you should choose. Yes, Eassiy is more costly than AZ Screen Recorder. However, if you compare AZ Screen Recorder and Eassiy on the feature-set and pricing basis, i.e., which is the most cost-effective option, Eassiy will outstand. AZ charges you for essential functions that are accessible in any free screen recorder. But that is not the case with Eassiy; it is the industry standard to record any type of video, including online tutorials, professional-looking gameplays, business presentations, and so on.


