Updated on 2024-01-06
29 views
5min read
There are different ways of recording screen on MAC. You can either use their in-built screen recording features or use third-party software. However, what matters is the quality of your captured screen recording. Moreover, it’s vital to go with solutions that let you screen record with sound. Therefore, how to screen record on Mac should depend on the type of quality and audio features you are getting.
Screen recording is an extremely useful way of sharing your entire screen or a region of your screen with others. But why screen recording mac is done? Recording your MAC screen allows you to share a video tutorial, video lectures, gaming activities, or scrolling screenshots. In fact, after the Covid-19 pandemic, screen recording became all the more important because of online classes. Since screen recording has an important function, it is important that the viewers are able to see the screen-recorded video in good quality and hear the audio instructions carefully. Therefore, in this article, we will learn how to screen record on Macbook with sound. So, let’s begin!
Part 1: How to Screen Record on Mac With Sound Without QuickTime
If you are looking for the best screen recording Mac software, Eassiy Screen Recorder Ultimate is the ideal option for you. Eassiy Screen Recorder Ultimate is the best multifunctional screen recording tool that allows you to do screen recording on Mac with sound at high quality. The tool is packed with many rich features that can be used for both basic and advanced Mac screen recording with sound. Yes, from recording gameplay on Mac screen with sound to recording webcam on Mac screen with sound, and lots more. All it takes is just a few clicks.
There's no kind of screen recording activity Eassiy Screen Recorder Ultimate can't help you capture. It even supports a schedule recording feature that allows you to perform a scheduled recording of your computer screen with sound. And you don't necessarily need to always be in front of your PC during the screen recording process as there's an advanced auto-stop feature that can be used to set an automatic stoppage time for screen recording.
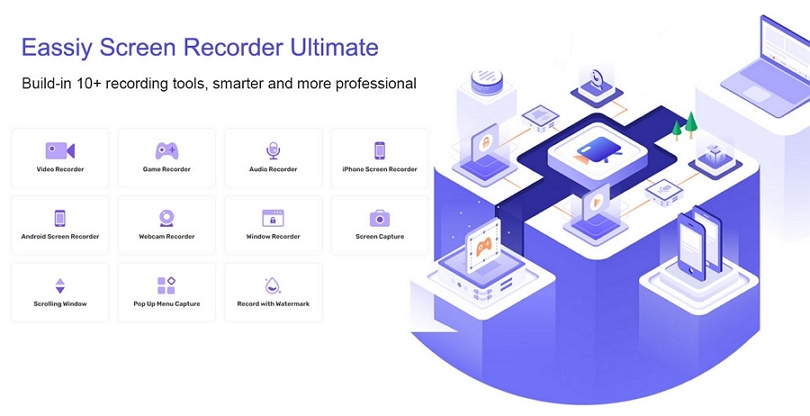
All in all, Eassiy Screen Recorder Ultimate tool supports all you need for a successful Mac screen recording with sound. Let's check out some of the interesting features available on Eassiy Screen Recorder Ultimate before you decide to download this tool.
Key Features of Eassiy
- Fast and Lag-Free: Eassiy allows you to capture high-quality screen recordings without any lag. It is extremely fast and smooth to use in that sense.
- Record Any Screen: You can not only screen record on Mac using Eassiy, but also record screen on iPhone or Android phone.
- Smart Recording: Create schedule recording or auto-stop recording to record videos you like not on the computer screen
- Versatile: Eassiy can be used for webcam recording, desktop recording, video capturing, online meetings, live streaming, etc.
- Noise-Cancellation: This tool comes with a noise-cancellation feature that allows you to Mac screen record with full audio clarity.
- Specialized Game Recorder: It also has a specialized game recorder for recording gaming activities for live streaming.
- Robust Editing Tools: Support tools audio-clean to remove background noise in audio, auto-split to split recorded videos into segments, real-time annotation, cut, trim, and lots more to help enhance the recorded video.
Now, let’s learn how to use this tool in the next section.
How to Screen Record on Mac Without QuickTime?
The best way to screen record Mac without QuickTime is by using Eassiy Screen Recorder Ultimate. It helps you capture the screen with sound in 5 simple steps.
Step 1: Download and Install Eassiy Screen Recorder Ultimate from its official website by visiting this link: https://www.eassiy.com/screen-recorder-ultimate.html
Step 2: Run the application on your Mac. Doing this will take you to the homepage of the recorder. Then click on ‘Full’ or ‘Custom’ to select the recording region.
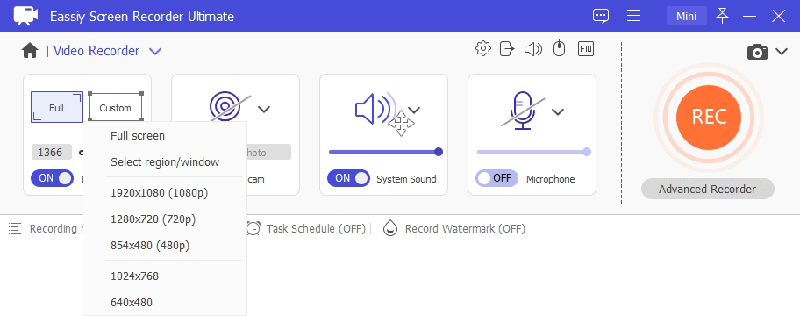
Step 3: You can record the Mac screen with audio by turning on the ‘System Sound’ and ‘Microphone’ toggle, and adjusting them with the relevant buttons.

There's also an option for you to screen record with a webcam. You can turn it on if you want. Tips: You can click on “Preference” to set hotkeys of recording. Video recording will be more efficient.
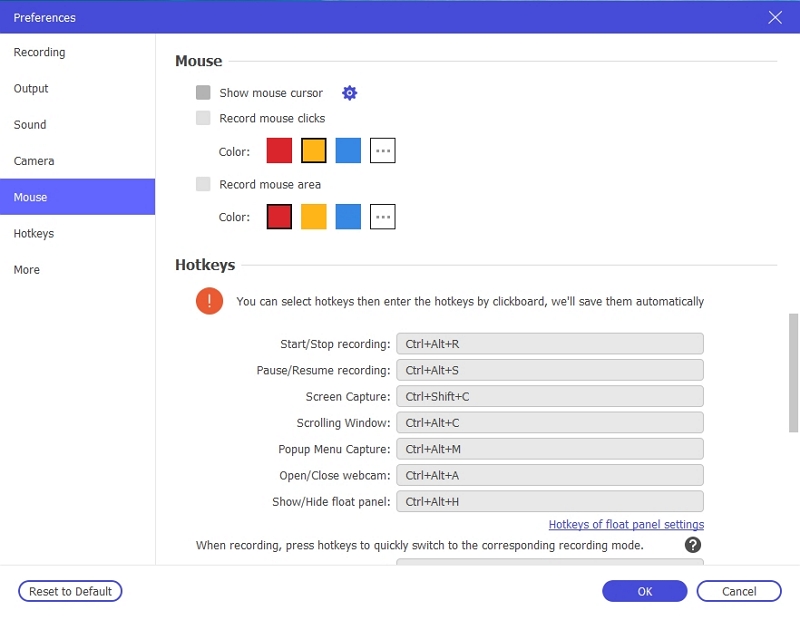
Step 4: After you've completed the settings and all, hit the ‘Rec’ button to begin the Mac screen recording. During this time, you can take screenshots and utilize real-time annotation tools to highlight points in your video.
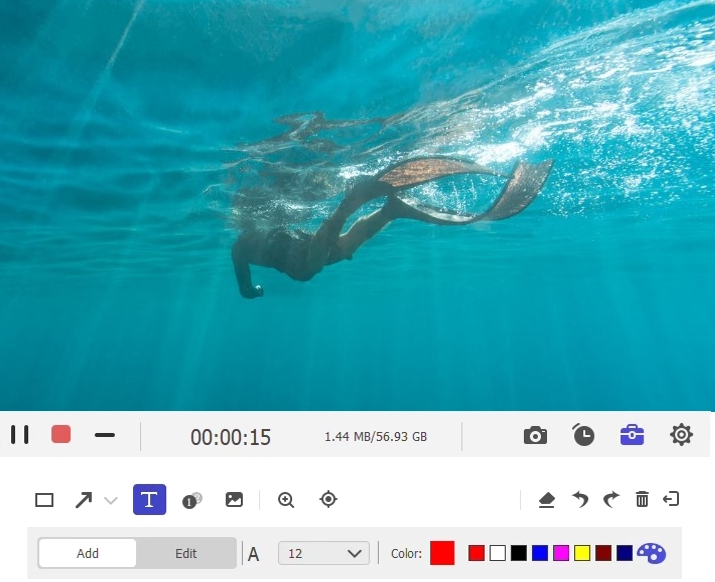
Step 5: When done, simply click on “Stop” to stop recording your screen. You can play, cut, trim, and perform other types of editing tasks on the video in preview mode.
Use the ‘Save’ button to save your recorded video or just export it to social media platforms.
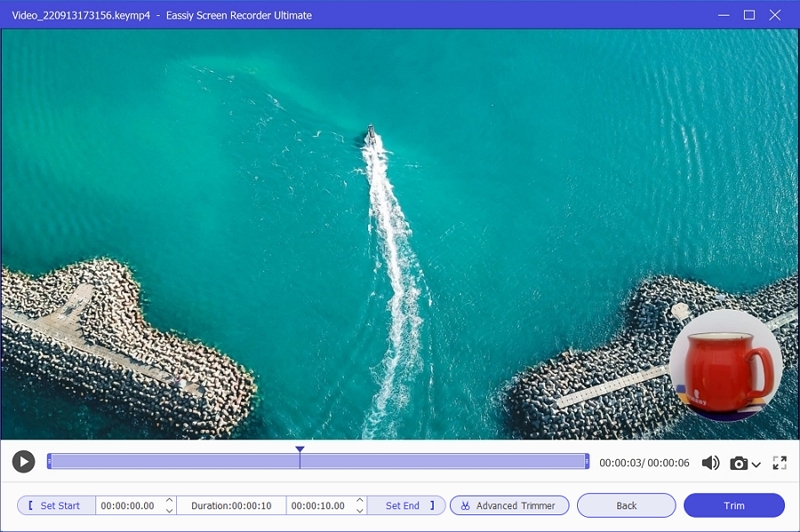
We would suggest you first take a free trial of the app before you go for the paid version.
Part 2: How to Screen Record on Mac Free?
Don’t want to download any external application to screen record on Mac? If yes, you can also use the in-built recording option on Mac for capturing your screen activities for free using QuickTime. QuickTime is a free multimedia framework developed by Apple Inc for its users. This extension helps Apple users to run all sorts of media files without any hassle. Want to know how you can screen record on Mac for free using QuickTime? Let’s learn!
Method 1: Screen Record on Mac With QuickTime
You can record screen on Mac using its native screen recorder QuickTime in simple steps.
Step 1: Go to the Applications folder under Finder.
Step 2: The next step is to open the QuickTime Player app.
Step 3: Choose the New Screen Recording option by clicking on File in the application.
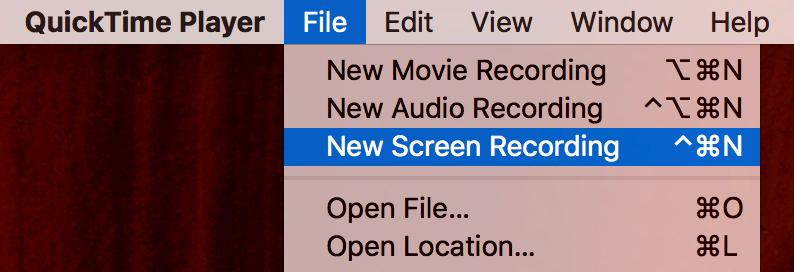
Note: Select an input device or microphone to adjust audio settings.
Step 4: Click on the red Record button to start recording your screen on Mac.
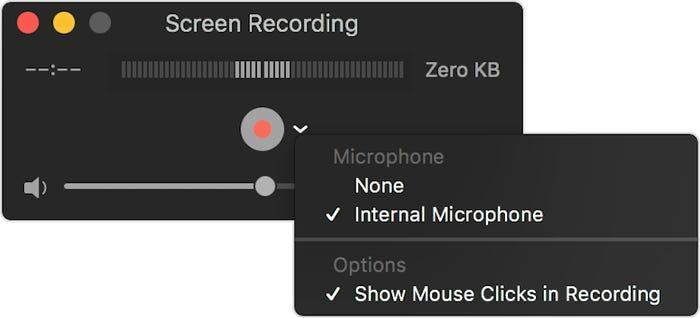
Step 5: Select the area you want to record by clicking on it or by dragging and dropping the specific area to record.
Step 6: Click on Stop once you are done.
Method 2: Screen Record Mac With Screenshot Tool Bar
Another method to record screen on Mac is using the in-built Screenshot Toolbar in Mac. It is an easy and convenient tool that allows you to:
- Capture a screenshot of an entire screen.
- Capture a selected window,
- Capture a portion of the screen.
- Start a video recording of an entire screen.
- Start a video recording of a portion of a screen.
To screen record Mac using the Screenshot Toolbar, follow the below steps.
Step 1: Open the Screenshot Tool Bar on your Mac. Simply press Shift+Command+5 to view the Screenshot Tool Bar. It will appear at the bottom of the screen.
Step 2: You will see different screen capture options in the ToolBar. For video recording, select if you want to record the entire screen or a portion of it.
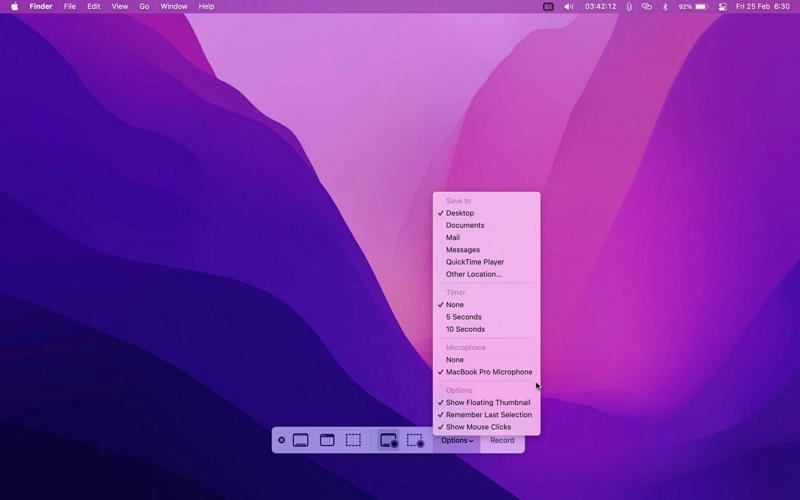
Step 3: Click on the Record option to start the recording.
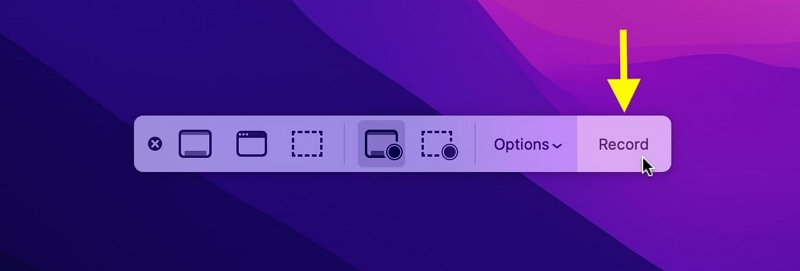
Step 4: Once done, stop the recording by clicking on the square Stop button.

Recording your PC screen using in-built applications and seem convenient and easy, however, they come with their own drawbacks. It’s important to carefully evaluate the disadvantages of using free applications before you make up your mind to not invest in paid screen recorders.
Drawbacks of Using Free Applications to Screen Record Mac
While free applications let you save some bucks, they have their own disadvantages.
- Slow: Most free screen recorders are very slow and loaded with ads. They might make your PC lag or stop working.
- Poor Quality: If you want to record your PC screen in high definition, free screen recording applications are a big no. You won’t get the desired video and audio quality that you would want to share in your video tutorials or online lectures.
- No Noise Cancellation: In most free screen recorders, recording with audio is a hassle. And even if you are able to record with audio, there’s no option of noise cancellation. Hence, the audio quality is very poor.
Part 3: How to Screen Record on Macbook Online
You can also screen record on Macbook online using Vidmore Free Screen Recorder Online. It is an extremely easy-to-use online tool for screen recording Mac.
Step 1: Download the Vidmore launcher by clicking on https://www.vidmore.com/free-online-screen-recorder/#faq.
Step 2: Install and Run the Vidmore extension on your Mac.
Step 3: Now select the area of the screen you want to record.
Step 4: Click on the red Record button.
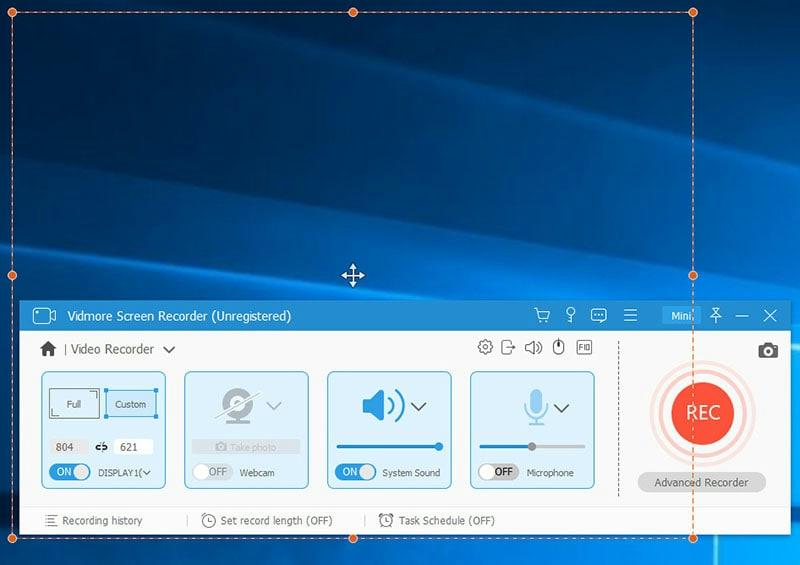
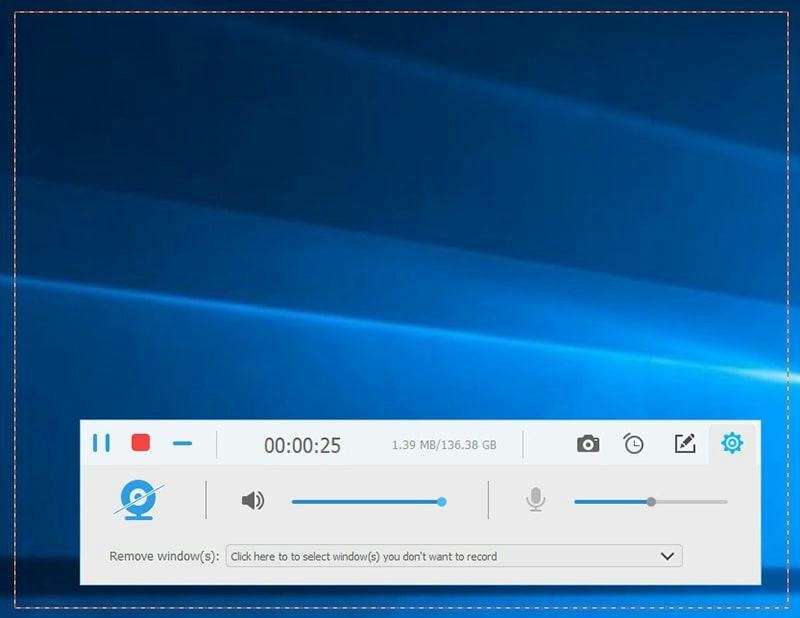
Step 5: Click on the square Stop button once done to save your recording.
Frequently Asked Questions (FAQs)
1. What’s the best way to screen record on Mac?
The best way to screen record on Mac is to use reliable tools that come with multiple features and let you record video in high definition with sound like Eassiy.
2. Can I screen record Mac with audio?
Eassiy, like other paid screen recorders, allows you to screen record Mac with audio. They give you the option to use a microphone or screen audio with lots of other sound settings.
3. How can I screen record Mac for YouTube?
You don’t need multiple apps to screen record different activities if you have Eassiy. Using this single application, you can screen record Mac for YouTube, webcam screening, online lectures, etc.
4. How to stop screen recording on Mac?
To stop the screen recording on Mac, click on the square Stop button or press Command+Control+Escape.
Conclusion
Are you struggling to record screen Mac with sound? If yes, this article is a great place to begin with. In this article, we have discussed some important and useful ways and tools on how to screen record Mac without any hassle. While free and in-built screen recording applications help you save money, they come with limited features and not-so-good quality. To solve this problem, it’s good to invest some money in a high-quality screen recorder like Eassiy to have a smooth and hassle-free screen recording experience.


