Updated on 2024-01-05
26 views
5min read
Excel files can be lost due to various reasons such as hard drive format, program crash, accidental or unexpected device shutdown, unintended deletion, or a virus intrusion. Fortunately, there are recovery solutions available for Mac users. In case the Excel files are unsaved and already lost, the article provides seven fixes that can help recover a significant portion of the data. The following sections provide a more detailed explanation of these solutions. This article will help you to recover unsaved Excel file Mac device that you have either shut down or crashed during work.
Part 1: Why Do You Need to Recover Excel File on Mac?
There are many reasons why you might need to recover Excel file on Mac. Below are listed some of the most common causes:
- The user has recently deleted the document.
- An important Excel file that you accidentally deleted is no longer available in the Trash.
- After a forced quit of Excel, you require file recovery.
- You didn't save the document because Excel froze.
- While working on a document, Excel experienced a crash.
- A virus or malware infection leads to data loss.
- Corrupted or missing files caused by damage to your hard disk or storage device.
Part 2: How to Recover Unsaved Excel File on Mac with Eassiy Data Recovery
Eassiy Data Recovery is a user-friendly yet professional software that can recover a wide range of file types, including photos, videos, Word documents, Excel spreadsheets, and more. This software is capable of recovering unsaved Excel documents on Mac. This program can retrieve lost files due to various reasons, such as emptying the trash bin, virus attacks, accidental deletion, or operating system updates. It supports all kinds of Mac storage devices, such as hard drives, USB drives, SD cards, and digital cameras. Furthermore, Eassiy Data Recovery is completely secure.
Key Features:
- You can easily locate the exact files you require by filtering your search results based on file type, size, and date.
- A variety of files can be recovered including photos, videos, documents, emails, archives, and more by using this tool.
- Compared to other software in the market, Eassiy Data Recovery is more effective and efficient.
- Users can use this software seamlessly on both MacOS and Windows.
- Two different scanning modes are provided to ensure the recovery of your files.
Here are the steps to recover unsaved Excel file on Mac with Eassiy Data Recovery.
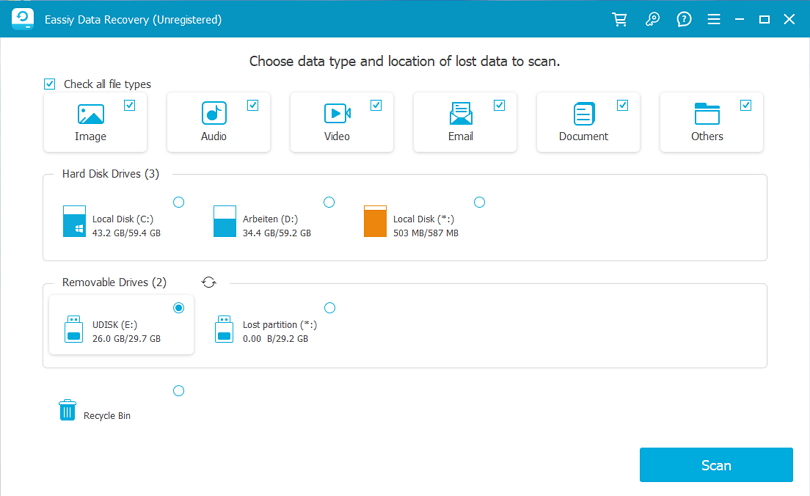
Step 1: Launch Eassiy Data Recovery after installing it on your Mac device. To start the data recovery process, select the data format and the hard drive that you wish to scan. Simply check the corresponding boxes if you want to recover specific file categories.
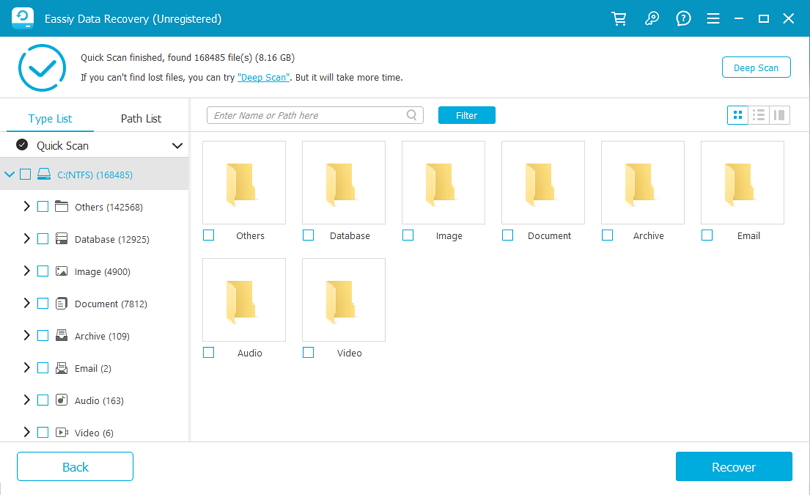
Step 2: Eassiy Data Recovery offers two scanning options, Quick Scan and Deep Scan, to cater to different data loss scenarios. The Quick Scan option automatically starts during the scanning process and is ideal for recent data loss situations. The scan results categorize files by path and type, which can be reviewed for easy identification.
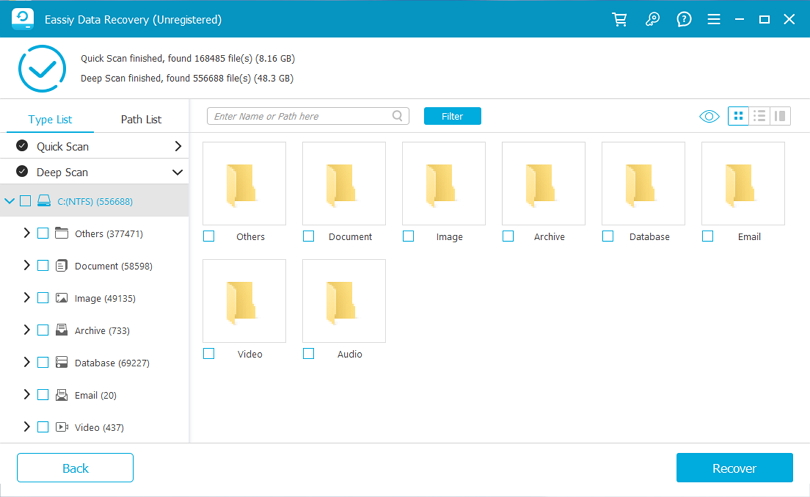
Note: In case the scan results are not satisfactory, you can choose to run a Deep Scan to reveal additional files. However, this process may take longer to complete.
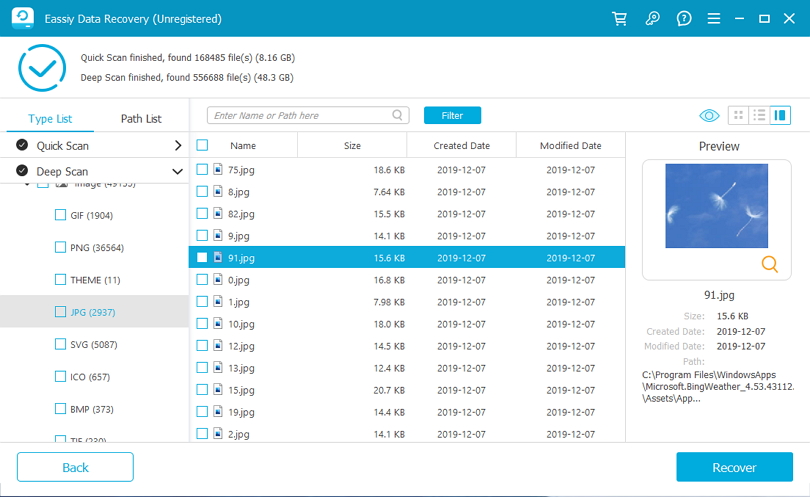
Step 3: Once all data categories are displayed, select the files that need to be restored. You can use the search bar to locate files by name or path and adjust the preview mode by selecting the icons next to the Filter button. Finally, recover the selected files by clicking on the Restore button.
Part 3: Recover Excel File on Mac from Trash Bin
In macOS, if you mistakenly delete a file, you can recover it from the Trash folder. This is a special hidden folder where the operating system stores deleted files temporarily. All files that are sent to the Trash folder will stay there until it is manually emptied or automatically emptied after 30 days. Follow the below steps to recover Excel file on Mac from Trash Bin.
Step 1: Access the desktop of your Mac device and navigate to the Trash folder to search for the unsaved file.
Step 2: To find the correct Excel file, use the search box located at the top left corner of the window. If there are multiple files, you can search for them simultaneously.
Step 3: Once you have located the Excel file you are looking for, right-click on the file and choose the "Put Back" option from the drop-down menu. This will restore the file to its previous location. Alternatively, you can drag the file to a different location for recovery, as per your requirement.

Part 4: Recover Previous Version of Excel File Mac 2011 By AutoRecover
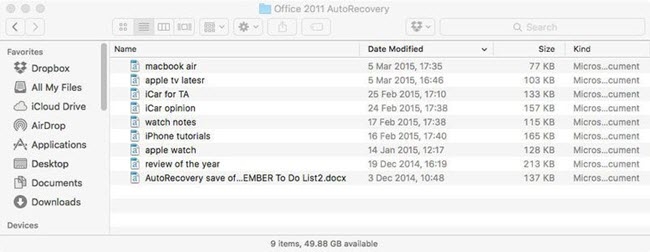
Some office applications offer a useful feature called AutoRecover that can help recover unsaved Excel files on Mac in case of a system or program crash. This feature regularly saves a copy of the file in the background, reducing the risk of data loss. Here are the steps to recover previous version of Excel file Mac 2011 by AutoRecover.
Step 1: Press the Return key on your Mac after clicking on Finder.
Step 2: After completing the previous steps, enter:
"/Users/username/Library/Containers/com.microsoft.Excel/Data/Library/Preferences/AutoRecovery" in the search bar and click the "Go" button to access Excel's AutoRecovery folder.
Step 3: Locate the unsaved Excel file you require and recover it to a different folder on your Mac.
Part 5: Excel Document Recovery Mac from OneDrive/iCloud Backup
If you have backed up your Excel files through services such as iCloud or OneDrive, you can use an online backup service to recover any deleted files. Follow the below steps to perform Excel document recovery Mac from OneDrive/iCloud.
OneDrive:
Step 1: Open OneDrive and log in to your account.
Step 2: Navigate to the "Recent" directory and search for the Excel spreadsheet you are looking for.
Step 3: Choose the spreadsheet you want to retrieve and click on the "Download" option.

iCloud:
Step 1: Access your iCloud account by navigating to https://www.icloud.com/ and signing in with your login credentials.
Step 2: Click on the "Account Settings" option.

Step 3: Click on the "Advanced" option, then select "Restore Files".

Step 4: Choose the desired Excel file that needs to be retrieved and select the "Restore" option to initiate the recovery process.
Part 6: Retrieve Lost Excel File on Mac through Temporary Folder
The temporary folder is a convenient and fast solution for recovering an unsaved Excel document on Mac. It usually contains automatically saved versions of the file you are currently working on. Here are the steps to retrieve lost Excel file on Mac through Temporary Folder.
Step 1: Navigate to the Applications folder, select Utilities and open Terminal.
Step 2: Type the following text on the Terminal screen: "open $TMPDIR" and press Enter.
Step 3: Once you press Enter, you will see the "Temporary" folder, and then select the "Temporary Items" folder.
Step 4: You need to manually locate the unsaved Excel document on Mac by identifying it in the Temporary Items folder.
Step 5: After locating the unsaved Excel file in the Temporary Items folder, right-click on it, and choose the "Open With" option from the drop-down menu. Then, select TextEdit to open the temporary (.tmp) file in an editable format. You can now make any necessary changes to the file and save it to the desired location.

Part 7: Recover Unsaved Excel File on Mac Using Time Machine
If you develop a habit of creating backup data for your lost Excel files, using a Time Machine is another viable solution to recover them on a Mac. Follow the below steps to recover unsaved Excel file on Mac using Time Machine.
Step 1: Attach your Time Machine backup disk to your Mac device.
Step 2: Navigate to the directory containing the erased Excel file, and then select the Time Machine icon from the Menu Bar to access Time Machine.
Step 3: To locate the specific Excel file you require, carefully inspect the Timeline or use the Up and Down arrows to scroll through the files. Once you locate the file, select it and tap on Restore.

Part 8: Recover Excel File on Mac with Recent List
In case your Excel file is missing or left unsaved on your Mac, you can access the Recent list to locate the file's storage location and make necessary edits or save it. Follow the below steps to recover Excel file on Mac with Recent List.
Step 1: Open Microsoft Excel on your Mac device.
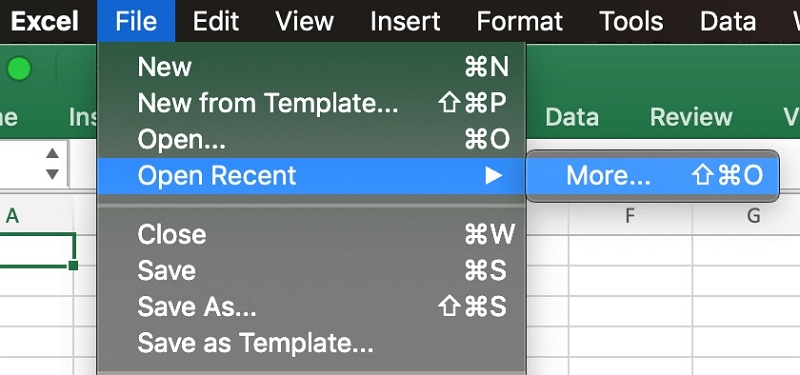
Step 2: Navigate to File > Open Recent or click on More to locate the Excel file.
Step 3: Next, save or save the Excel file on your Mac.
Part 9: FAQ to Recover Unsaved Excel File Mac
1. Is it possible for you to recover an unsaved Excel file?
Certainly, it's possible to retrieve unsaved files. There are several methods to achieve this, and using a tool like EaseUS Data Recovery can be quite effective. It can handle various data loss situations, including unsaved files. To explore its exceptional features, download it now!
2. What will happen if you accidentally click “Don’t Save” in Excel on Mac?
Choosing "Don't Save" in Excel on Mac means your files won't be saved. You can verify this by checking the Recent button in Excel. If you wish to recover unsaved files, select the Show Recovered Files button and search for your files.
3. What is the process for undoing a deleted sheet in Excel?
Undoing a deleted sheet in Excel is simple. You can achieve it by closing the active workbook without saving and reopening it. Another way is to restore an earlier version of the workbook from a local or cloud backup.
4. Can an overwritten Excel file be recovered on a Mac?
Recovering an overwritten Excel file on a Mac is possible, but only if you have a backup of the file. Once a file has been overwritten, data recovery software cannot retrieve it. The only way to recover the Excel file is by utilizing a backup made using Time Machine or another backup software.
Conclusion
Although losing an essential Excel spreadsheet can be distressing, it doesn't necessarily have to be permanent. In this article, we have described how to recover unsaved Excel file Mac. You can choose any of the above-given methods to recover unsaved Excel files on Mac. However, we would highly recommend you use Eassiy Data Recovery. Eassiy Data Recovery is the optimal solution, as it offers a swift and effortless method to retrieve lost Excel files through a user-friendly interface. It ensures all your lost files are recovered in no time.


