Updated on 2024-01-05
25 views
5min read
In the modern age of digital technology, our computers and mobile devices play an essential role in both our personal and professional lives. Unfortunately, data loss can occur due to a range of reasons, such as accidental deletion, virus attacks, system crashes, and more. While the Recycle Bin or Trash folder is a helpful feature for recovering deleted files, what if the files have been permanently deleted from the Recycle Bin?
This is where the best Recycle Bin Recovery software comes into play. It can help you recover lost data from your Windows, Mac, or Android devices. We are proud to present Eassiy Data Recovery as the solution to your data recovery needs. It is a powerful and user-friendly software that can recover files from the Recycle Bin, formatted drives, and even inaccessible partitions.
Part 1: Can I Recover Deleted Files from Recycle Bin?
When you delete a file on your computer, it is moved to the Recycle Bin instead of permanently deleted. The Recycle Bin acts as a safeguard, allowing you to recover the deleted files if needed. To recover a deleted file from the Recycle Bin, simply open the Recycle Bin by double-clicking on the icon on your desktop. Once you have located the deleted file, right-click on it and select "Restore". The file will be restored to its original location on your computer.
However, if you have emptied the Recycle Bin or if the file was deleted using the "Shift + Delete" command, the file is permanently deleted and cannot be recovered from the Recycle Bin. In such cases, you will need to use third-party data recovery software to retrieve the deleted file. It's always recommended to back up your important files regularly to avoid permanent data loss and ensure that you can restore them in case of accidental deletion or any other unexpected event.
Part 2: Best Recycle Bin Recovery for Windows and Mac
Eassiy Data Recovery
With a 98.6% Success Rate, Eassiy Data Recovery offers a Deep Scan option to recover unlimited amounts of data. It can retrieve information from more than 2000 storage devices, including computers, USB drives, SD cards, cameras, hard drives, SSDs, and more. All lost data from your computer or an external device can be quickly recovered with Eassiy Data Recovery. It can be used in a variety of situations, including accidental data deletion, formatting, partition loss, system crashes, virus attacks, and more. A quick scan and thorough scan are the two scan modes offered by Eassiy. You won't have to worry about it because it can recover 1000+ file types in original quality.
Main Features:
- Data Recovery for More Than 2000 Storage Devices
- 1000+ File Types Can Be Recovered in Original Quality
- Retrieve data that has been lost as a result of deletion, formatting, raw partitioning, system failure, virus attack, etc.
- Before beginning data recovery, filter file types, preview, and select the lost data you want to recover.
- Deep Scan with 98.6% Success Rate to Retrieve Unlimited Data
Steps to recover deleted data from recycle bin using Eassiy:
The Recycle Bin is the usual place where files go after being deleted from a computer. Even if these data have been permanently destroyed, users can still recover them with Eassiy Data Recovery. Follow these three easy steps to recover lost files from the Recycle Bin with Eassiy Data Recovery.
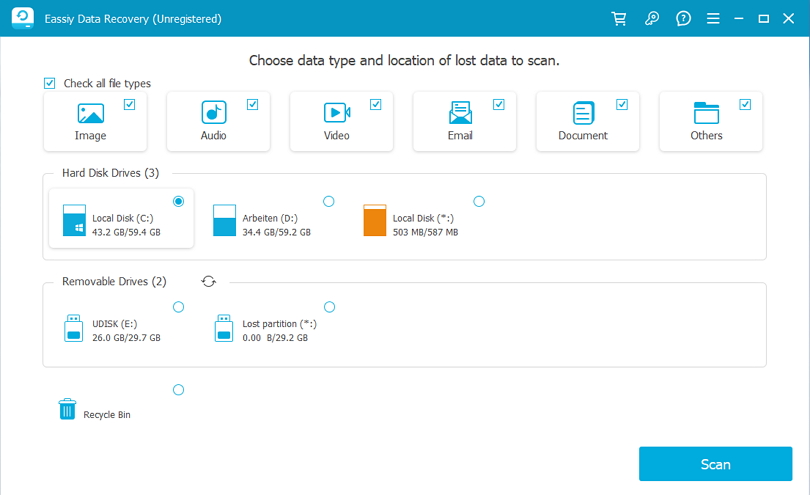
Step 1: Choose the data type and recycle bin.
Open Eassiy Data Recovery and choose the type of data you wish to scan. You can choose the "Recycle Bin" from the disk list and navigate through particular data kinds.
Step 2: Scan and review the findings.
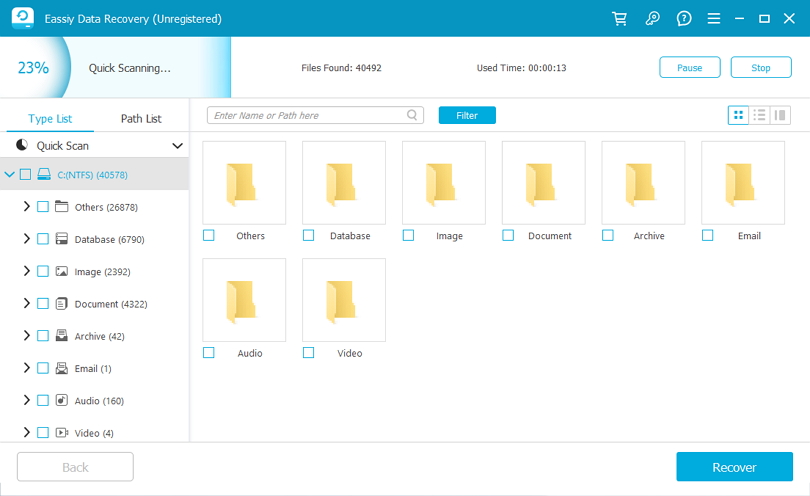
There are two scanning options in Eassiy Data Recovery: Fast and Deep Scan. Use the Fast Scan first because it is quicker and more suited for recent data loss.
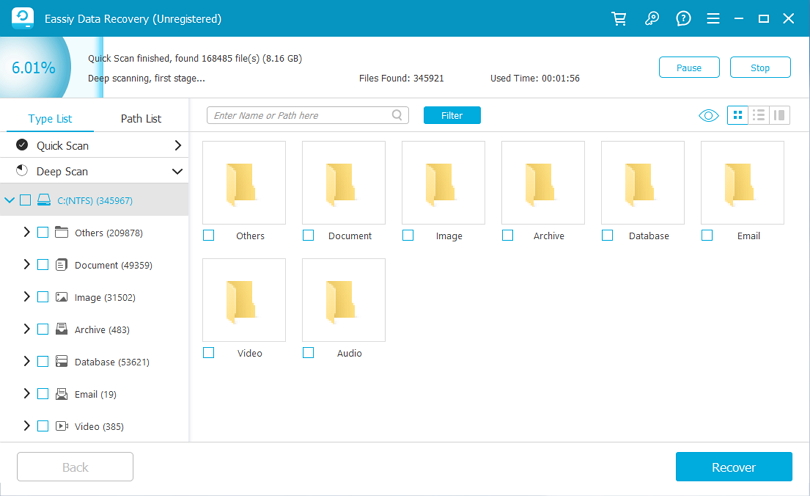
If you are unhappy with the outcomes, you can choose the Deep Scan option, which is more thorough and advised in cases of complicated data loss.
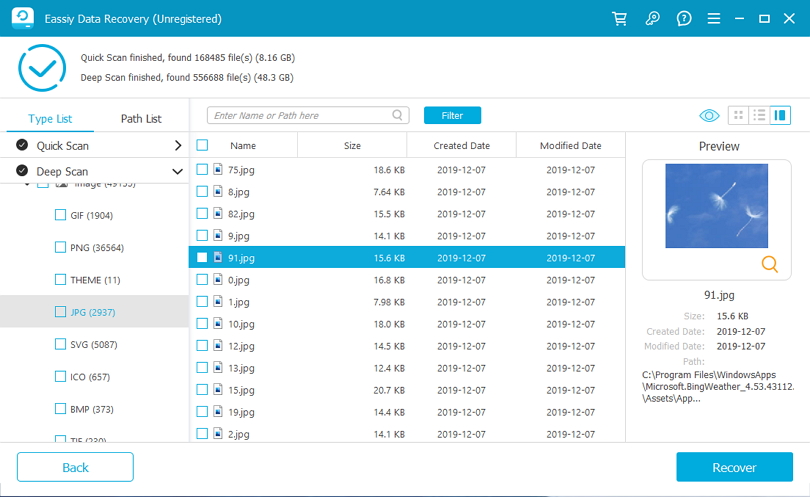
After that, determine if the data you want to backup is available by looking through the Recycle Bin's scanned results by type list and path list.
Step 3: Preview and Recover Data.
Choose the Recycle Bin lost files you want to recover and click "Recover" after the scan is complete.
Save the files you've just retrieved in a secure location. As you can see, Eassiy Data Recovery is a trustworthy and user-friendly program that enables you to retrieve lost items from the Recycle Bin. Anyone who needs to rapidly and effectively recover deleted data should choose it because of its reliable scanning and simple interface.
Part 3: 5 Free Ways to Recover Deleted Files from Recycle Bin Windows 10
Way 1: Recover Files from Recycle Bin Directly Before Deleting
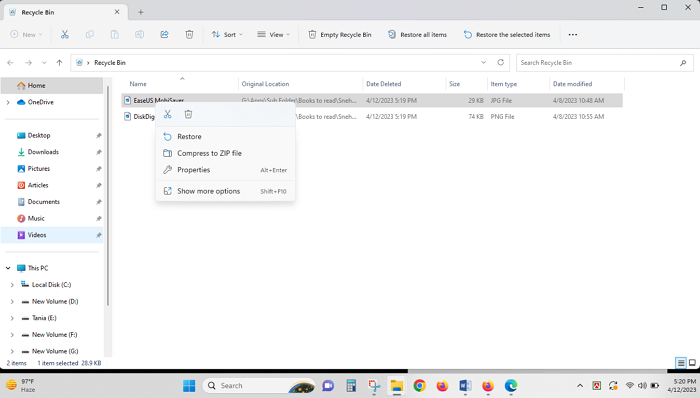
The Recycle Bin should always be your first port of call whenever you unintentionally erase critical data. Unless you manually enable Windows 10 to empty the Recycle Bin after a specific number of days, deleted files remain there eternally. Restoring lost files from the recycle bin requires the following steps:
Step 1: Double-click the desktop's Recycle Bin icon.
Step 2: Find and select the deleted files. When you click on multiple files' names or icons, you can select them all by pressing and holding the Ctrl key.
Step 3: Restore can be selected by right-clicking any chosen file. The chosen files will be immediately put back where they came from.
Way 2: Recover Recycle Bin Windows 10 from the Previous Version
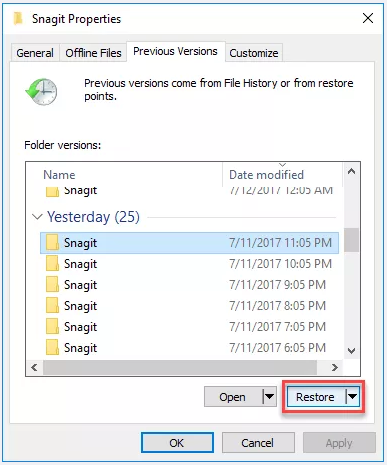
The system protection feature is enabled by default in Windows 10/8/7, and the operating system will create restore points automatically. These restore points allow you to restore files that have been irreversibly deleted to a previous version. Let's examine how to restore files to their earlier versions after emptying the recycle bin.
Step 1: Go to the desktop and start by creating a new file or folder there. Name it the same as the folder or file you just deleted. If the folder was at the root level of a drive, such as C: drive, then from the context menu, just right-click on the disk and choose the “Restore past versions” option.
Step 2: After right-clicking the file, choose "Restore past versions" from the option that displays. With each version having its own distinct time and date, you will see that your Windows is searching and displaying earlier versions of all the files and folders. These files and folders were permanently deleted in this section.
Step 3: To simply restore permanently damaged files or folders, just select the most recent version and then click the "Restore" option.
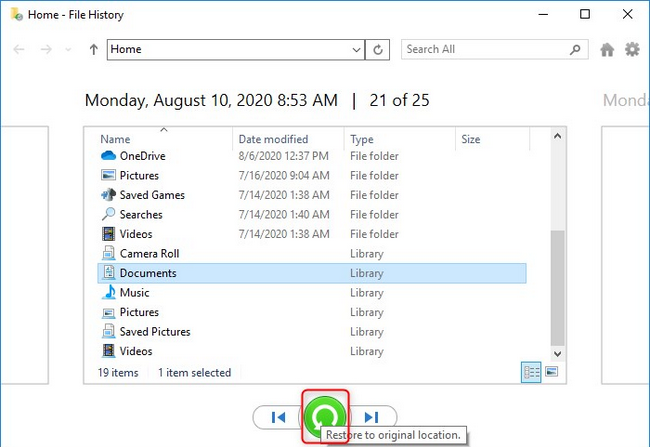
Way 3: Recover Deleted Recycle Bin with File History
The files can be restored to your PC if you have successfully created a backup of your deleted files using Windows File History. Nevertheless, nothing will be discovered if you didn't make a backup. Only users of Windows 8 or 10 can use this technique. The specific steps to recover deleted files are as follows:
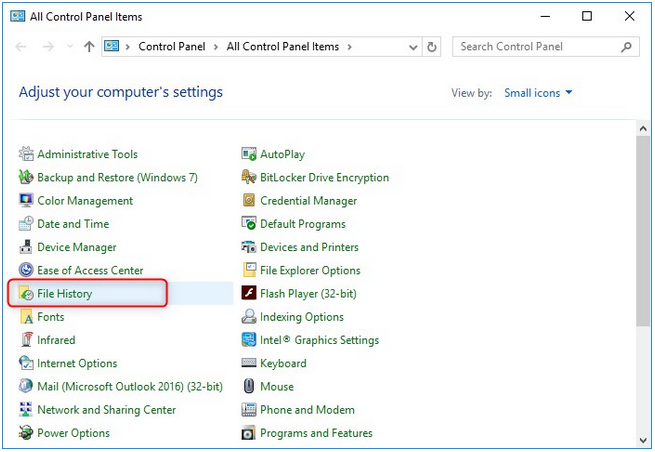
Step 1: Launch the Control Panel and select "File History."
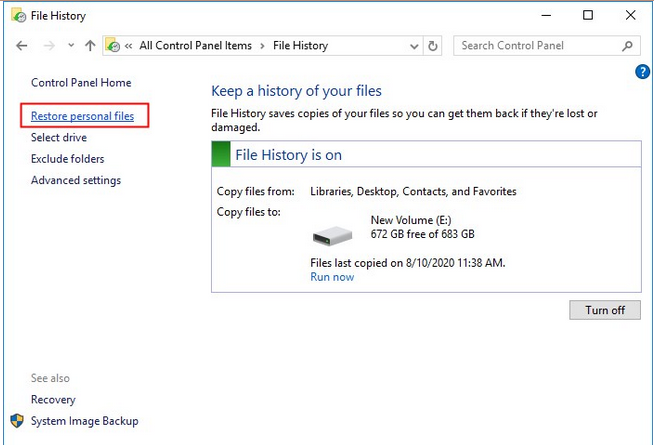
Step 2: To access your backup data, click "Restore personal files" on the left side.
Step 3: Choose the desired files using the left and right arrows, then press the Restore button.
Way 4: Recover Emptied Recycle Bin Using Command Prompt/CMD
The recycle bin can be emptied back into it and any files that were mistakenly deleted can be recovered using the command prompt. Then, using the command line, how may files be recovered after being deleted from the recycle bin?
Step 1: Press the F8 key during the computer's startup process, then select the Safe Mode with the Command Prompt option.
Step 2: To continue, type cd $Recycle and press the Enter key after typing cd../..
Step 3: You need to press the “Tab” key and type cd to read the name of a directory. Press the Enter key after you've viewed this.
Step 4: You can write dir/a to check all of the files; then you need to write copy [file name] [file location]; After that, write cd../.. and write dir and enter, also write ren [file name].
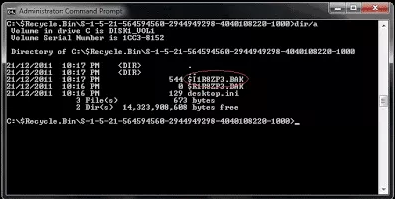
The file names won't show up as they did before if you use Command Prompt to reverse all deletions. It is not advised for anyone who is not an expert to try this process due to the possibility of it going wrong.
Way 5: Recover Deleted Files from Recycle Bin Windows 10 with Windows File Recovery
Use Windows File Recovery, a command-line program that is available from the Microsoft Store, if you are unable to find a missing file in your backup. Use this tool to try to recover deleted files that can't be recovered from the Recycle Bin from your local storage device (including USB drives, external drives, and internal drives). Cloud storage and network file shares are not supported for recovery.
Step 1: From the Microsoft Store, download and install Windows File Recovery on your computer.
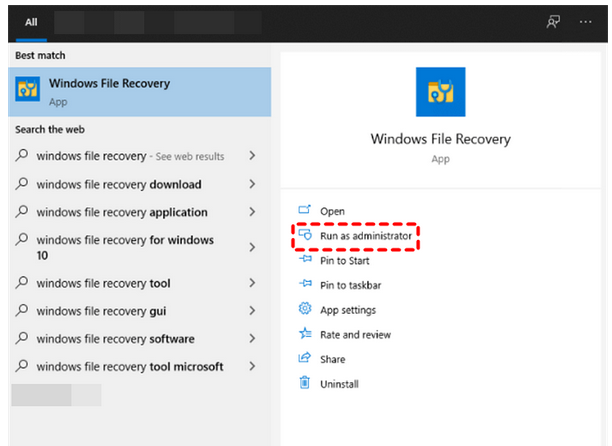
Step 2: You need to go to the search box and write "Windows File Recovery", then select "Run as administrator" option.
Step 3: After examining your file system, choose an appropriate mode.
Step 4: Using standard General and Advanced syntax, you can simulate your command line.
Step 5. Press "y" to proceed, then wait. Your recovered files will then be saved in the drive you specified as the destination.
Part 4: 3 Free Ways to Recover Deleted Files From Mac Recycle Bin.
Method 1: Time Machine Backup
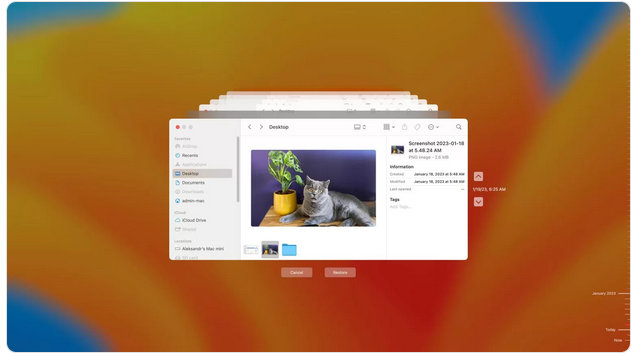
Users of Apple devices should frequently back up their data using the built-in Time Machine backup program. These backups can now be used to restore mistakenly erased files, demonstrating their value.
Step 1: Start Time Machine on your Computer.
By selecting the clock icon on Mac's menubar, you can open Time Machine. You can also utilize the Terminal software, which offers a command-line interface for managing Time Machine. You may control other computers remotely and get a ton of information about the backups Time Machine has taken by using Terminal.

Step 2: Find the file.
The media you use to back up your Mac must be connected and switched on to use Time Machine to recover files. Once Time Machine has started, you can browse through the file system backups that have been created.
Step 3: Look for the required files in their original repositories.
From a backup that was made earlier than the deletion date, locate the data that were unintentionally erased.
Step 4: Choose the file that you wish to restore.
Simply click restore to save the necessary files to your hard disk after you've located them.
Method 2: Using iCloud Backup to Recover from an Emptied Trash
Other than Time Machine, you can be employing backup programs to safeguard the important data on your Mac. If so, you can use those tools to restore any files that were deleted permanently when you empty the Trash. We'll start by looking at how to restore files from Apple's iCloud before moving on to more generic techniques that work with almost any third-party backup and recovery solution. To retrieve files from a cleared Trash using iCloud, follow these steps:
Step 1: Visit iCloud.com and log in using your account information.
Step 2: Under the Account menu, select iCloud Settings.
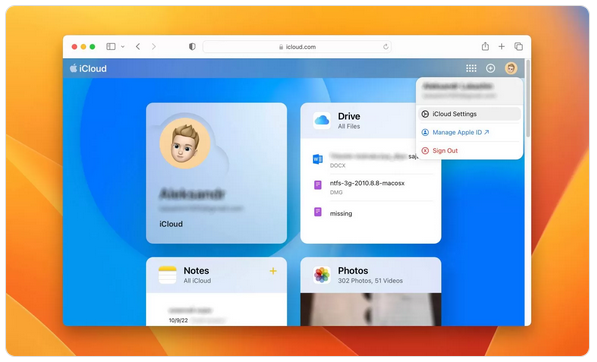
Step 3: Choose the Restore Files option from the Data Recovery section by clicking on it.
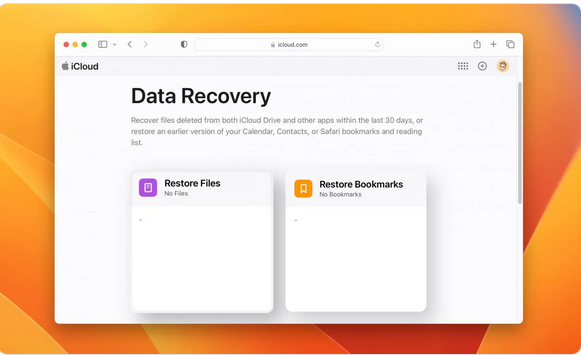
Step 4: Check the boxes to the left of the file names to indicate the files you want to recover. By selecting the Choose All option, everything can be restored at once.
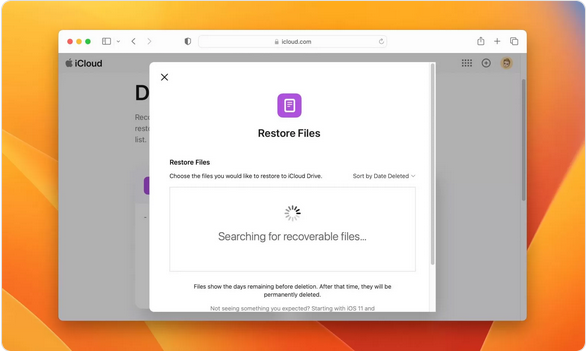
Step 5: To finish the process and recover your lost data, click Restore Files.
Method 3: Restore Using Several Backup and Recovery Programs
There may be distinctive features that set apart other offline and online backup and recovery solutions from the competitors. However, there are general recovery procedures that may be used with just about any recovery tool to restore erased data. Follow the steps listed below as a guide.
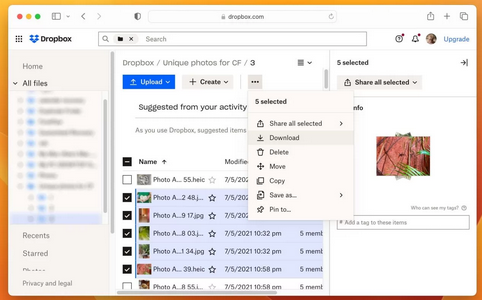
Step 1: By physically connecting the storage device or by visiting the website where your data is hosted, you can connect to the backups that have been saved.
Step 2: Find the files that you want to restore.
Step 3: Choose the files you want to recover and indicate where on your computer you want to save them.
Step 4: Use the tool's distinctive user interface to finish the recovery.
Part 5: Best Recycle Bin Recovery for Android and Samsung.
Eassiy Android Data Recovery
Photos, videos, audios, contacts, messages, call logs, attachments, WhatsApp, WhatsApp Attachments, DOC, XLS, PPT, PDFs, HTML, ZIP, RAR, and many other file types are among the industry-leading file formats that Eassiy Android Data Recovery supports. Eassiy Android Data Recovery currently has the highest recovery success rate in the industry for photos and videos. Hence, regardless of whether your Android phone is jailbroken or not, Eassiy Android Data Recovery will help you simply recover your lost memory card data. Together with memory card data, it is possible to recover lost messages and files on Android and Samsung.
Steps to recover deleted data on android using Eassiy:
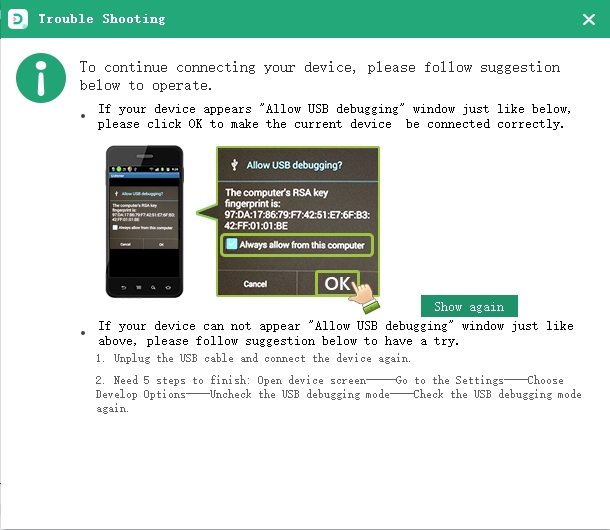
Step 1: Launch Eassy and connect your phone to the computer.
Open "USB debugging" on your Android device after that.
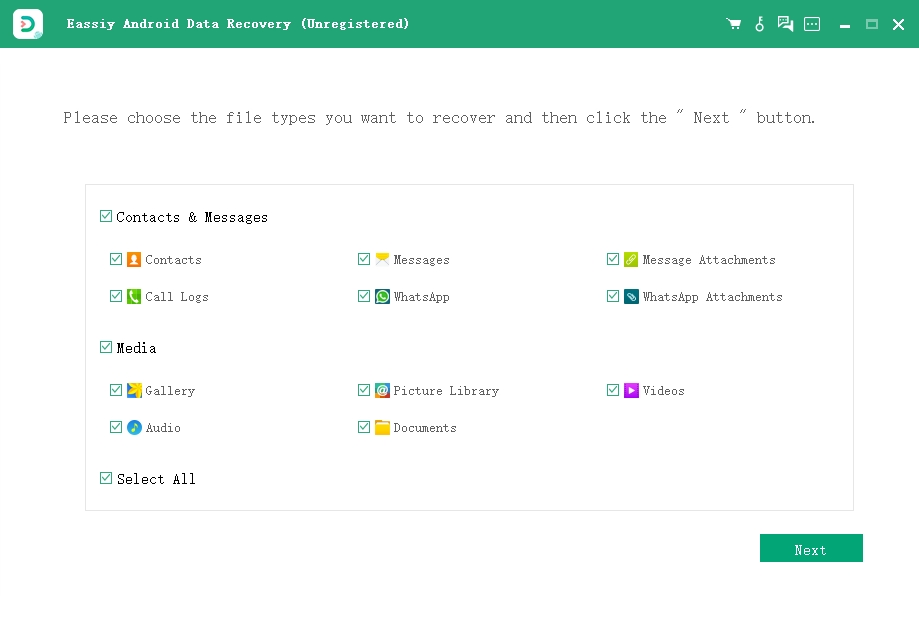
Step 2: Select File Types.
Choose the file type you want to recover. Select your data and then check all the boxes related to that area.
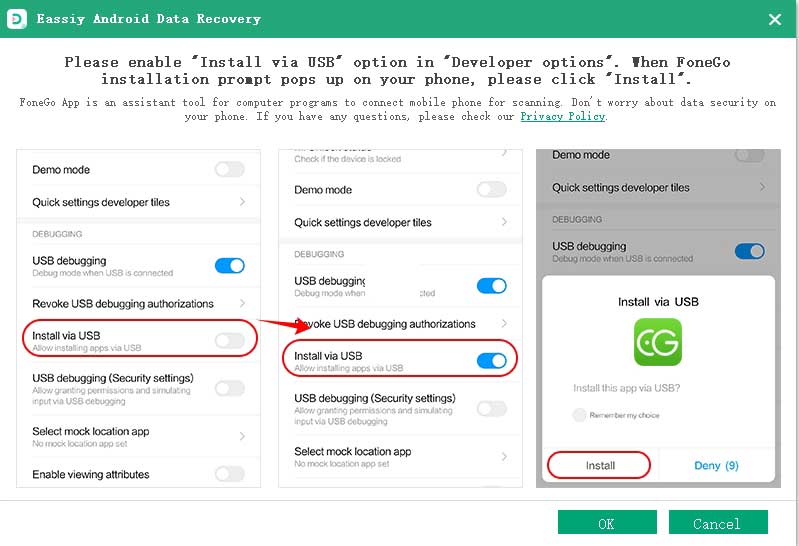
Step 3: Install the Eassiy app the Android device.
To access your Android device using the Eassiy Android Data Recovery program, the application must be installed on your device. Authorize Eassiy to access the memory of the Android device. When the Eassiy pop-up box asks for permission to read data from your Android smartphone, select "Allow". As a result, the software will be able to successfully scan the phone. In order to begin searching for the deleted contact numbers, click “Scan Authorized Files” on the computer software.
Step 4: Recover Android Data
Throughout the system scan, keep your phone connected to the network. After the initial scan, make sure the data you need is there.

Following the deep scan procedure, you can now choose each file type to view the data. Next, choose "Recover" and mark the data you want to recover.
Part 6: 3 Tips You Need Know about Recycle Bin on Android
Here are three tips you should know about the Recycle Bin on Android:
- Enable the Recycle Bin: Many Android devices have a Recycle Bin feature, but it may not be enabled by default. To enable it, open your device's file manager app, go to its settings, and turn on the Recycle Bin feature. Once enabled, any deleted files will be moved to the Recycle Bin instead of being permanently deleted.
- Manage the Recycle Bin: The Recycle Bin on Android has a limited storage capacity, so it's important to regularly check and manage its contents. You can do this by opening your device's file manager app, going to the Recycle Bin, and selecting the files you want to permanently delete or restore.
- Retrieve Deleted Files: If you accidentally delete a file and it's not in the Recycle Bin, you may still be able to retrieve it. There are various Android data recovery apps available that can help you recover deleted files, but it's important to act quickly and not overwrite the deleted data with new files.
Conclusion:
After evaluating the available options, it can be concluded that there are several reliable and effective Recycle Bin recovery software options for Windows, Mac, and Android in 2024. However, Eassiy Data Recovery Software stands out as a recommended choice due to its advanced features, user-friendly interface, and excellent customer support. Eassiy Data Recovery Software offers quick and easy recovery of deleted files from the Recycle Bin, as well as from various other sources. It is also affordable and provides a free trial option to test its functionality. Therefore, if you need to recover deleted files from the Recycle Bin, Eassiy Data Recovery Software is a recommended solution for Windows, Mac, and Android users in 2024.


