Updated on 2023-02-07
views
5min read
Screen Capture options on iPhone allow you to capture a still image of the screen or video record for as long as you want. And you can use the video screen capture iPhone function to show off a new game, create a tutorial, or an explainer video.
Not sure how to take a still snap or video capture the screen on iPhone? Fret not; this guide will show you all the ways to take a screenshot on iPhone (all models: Top Button, Touch ID, and Face ID models). You will also learn how to video screen capture on iPhone and record the entire screen for as long as you want to.
Part 1: How to Video Screen Capture iPhone for Free
Thanks to the built-in Screen Recorder on iOS 11 and later versions, you can screen capture iPhone without downloading any tool or buying any membership. Although unsuitable for professionals and experts, iPhone Screen Recorder allows you to screen capture video on your iPhone conveniently.
You can also capture the iPhone screen with internal and external sound (or both system and microphone, if necessary). After the recording, all the recordings are saved to the Photos app. So, you can even use the built-in video editing tools within the Photos app to trim or apply effects to your screen captures.
Here’s How to Screen Capture Video on iPhone using the built-in tool:
Although the Screen Recording function is embedded in all iOS 11 and later versions, by default, it is hidden. Nevertheless, we will also show you how to access the option and then show you how to screen capture video on your iPhone. Follow these simple steps:
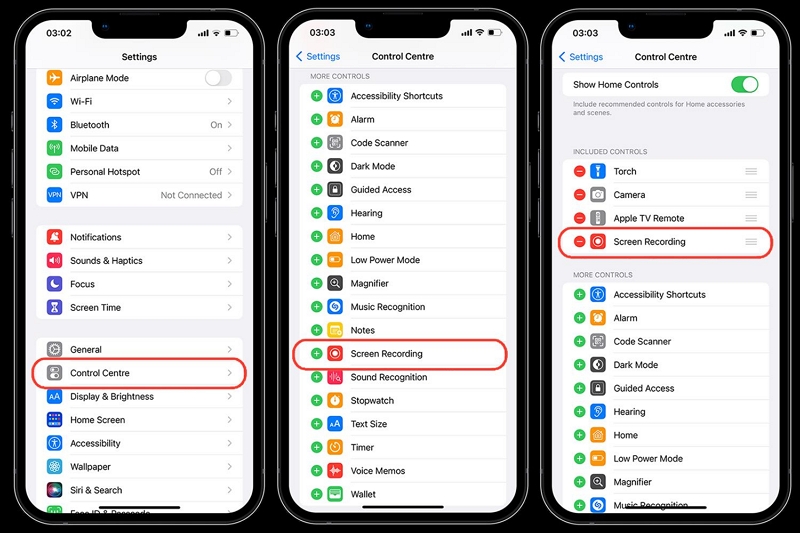
Step 1. Go to Settings to enable the Video Capture function.
- In the third group of the Settings menu, click on Control Center.
- Tap on the toggle assigned to the “Access within apps” option. This allows you to video capture within apps on the iPhone.
- Navigate to More Controls.
- And find the Screen Recording option, click on the “+” icon to add the function to the Control Center.
- Now, you can find the Screen Recording option under the Included Controls menu.
Step 2. Start the Screen Capture on iPhone.
Open the application or tab that you want to capture on the iPhone. Swipe down from the top-right corner of the screen to access the Control Center.
(Note: if you have an iPhone with home button, you have to swipe up from bottom-left corner of the screen to access the Control Center).
Tap and hold the Record button (dot within a circle) to access the Microphone.
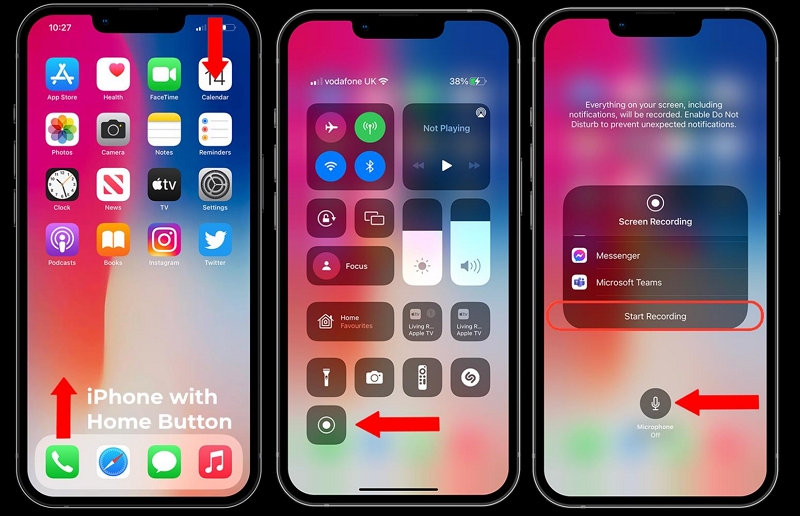
Note: Click on the Microphone to screen capture video with the internal sound and microphone. Leave it if you only want to capture the system sound. Furthermore, turn off the Ringer to screen capture video with only the microphone.
Step 3. Once you start the screen capture, you will see a Timer on the top-left corner of the screen. Click on the Timer to pause or stop the recording. To stop the screen capture, click on the Timer and tap on Stop to confirm.
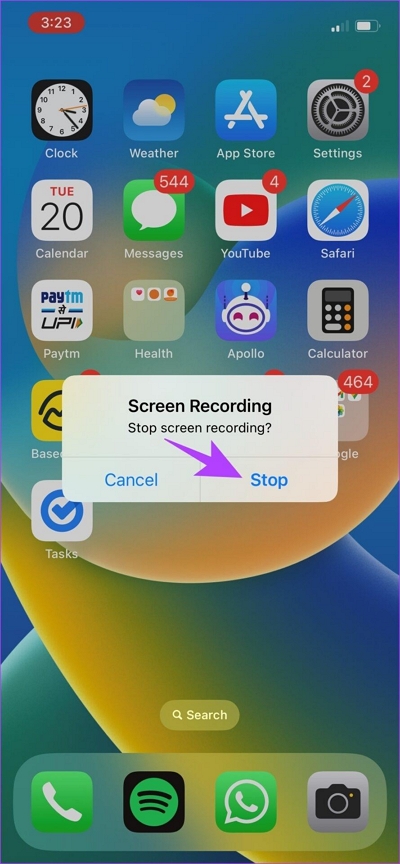
Once you confirm, the screen capture will stop. And you can access the captured screen video via the Photos app. You can also use the built-in editing tools within the Photos app to apply effects, trim, and other settings as desired.
However, the bothersome part of using the Screen Recording function on the iPhone is the recordings occupy a lot of space, to even limiting device performance. That is why we have also mentioned another method to screen capture on iPhone (and save the videos on the computer directly).
Part 2: How to take screenshots on your iPhone
While video screen capture is possible on only iOS 11 and above versions, you can take screenshots on all models. And regardless of the model, you will find the step-by-step instructions to screen capture on iPhone. Furthermore, we have also covered how to take scrolling screenshots, i.e., capture the entire screen on iPhone. That said, let’s see how to take screenshots on your iPhone.
1. Take a Normal Screenshot on iPhone
Scroll down to your iPhone model and discover the steps to take screenshots on iPhone:
How To Take Screenshots on iPhone 13 and iPhone models with Face ID.
To screen capture on iPhone 13 or other iPhone models with Face ID:
- Navigate to the screen that you want to capture. This could be your Home screen or in-app content.
- Press and release the Side button (on the right) and Volume Up button at once.
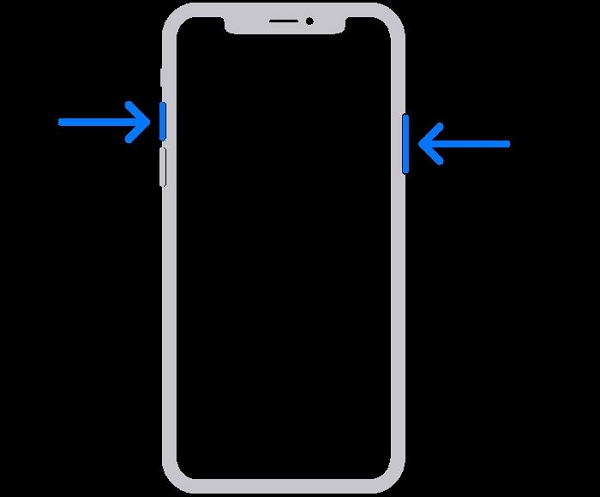
Note: Ensure to tap on both the Side and Volume Up buttons simultaneously. You also have to leave the buttons as soon as you press them.
You will see a flash on the iPhone screen once you press both buttons. Moreover, you will also see a thumbnail on the lower-left corner of the iPhone screen. You can immediately click on the image to access your screenshots, edit them, and share them via messages or social channels.
However, if you want to proceed further and access the screenshot later, just ignore the thumbnail. Or, swipe it left to dismiss it instantly. Needless to say, you can access the captured images from the Gallery (within the Screenshots folder).
How To Take a Screenshot on iPhone with Touch ID and Side Button.
Open the screen that you want to capture.
- Press the Side button (on the right) and Home button at once.
- Quickly release the Home and side button after you see a flash on the screen.
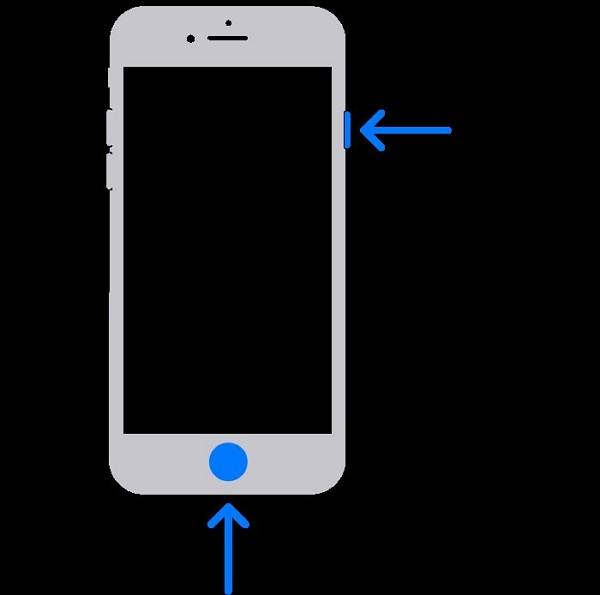
Again, once you take a successful screenshot, you will see a thumbnail in the screen's bottom-left corner. Click on the thumbnail to access the screen capture image immediately. Or ignore it to access the screen capture image later from Gallery (under the Screenshots folder).
How to Take a Screenshot on iPhone with Touch ID and Top button.
To screen capture on an iPhone model with Touch ID and the Top button, navigate to the screen that you want to capture.
- Press the Touch ID and Top buttons on the iPhone simultaneously.
- And Quickly release the Touch ID and Top button after you see a quick flash on the screen.
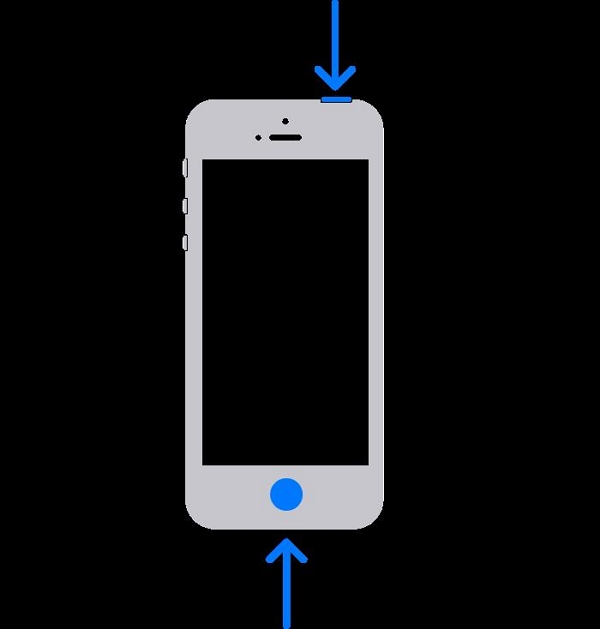
A thumbnail on the bottom left corner of the screen will appear after you screen capture on iPhone with the Top button and Home button. Click on the snap thumbnail to access the captured screen image instantly. Or, swipe left to dismiss it.
2. Take a scrolling screenshot on Your iPhone
Now that you have learned how to screen capture images on iPhone. Let’s discuss how to screen capture the multiple frames (the entire page content) in a single image. The benefit of learning how to take a scrolling screenshot on an iPhone is apparent; you can easily capture all-important things into a single image and share the content conveniently.
How to Take a Scrolling Screenshot on Your iPhone (all models):
Regardless of the iPhone model, taking a scrolling screenshot is similar. Here’s how to capture multiple frames in a single image:
Step 1. Take a Normal Screenshot.
Access the screen that you want to capture in full. Take the screenshot of the page following the solutions (depending on the iPhone model) mentioned above, i.e.,
- Press both the Side button (on the right) and the Volume Up button on iPhone models with Face ID.
- Press the Touch ID and Top buttons on the iPhone models with Touch ID and Top button.
- Press the Side button (on the right) and the Home button on the iPhone models with the Home button.
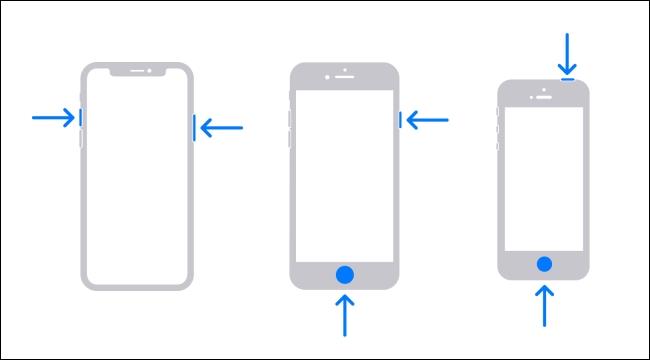
Step 2. Select Screenshot Preview.
- Once you screen capture a page on your iPhone, as indicated, you will see a thumbnail on the bottom-left corner of the iPhone screen.
- Click on the thumbnail to access the screenshot immediately. (Note that the Preview function displays the thumbnail only for about 3-5 seconds, so be quick).
- Accessing the screenshot instantly will present Full Page option on the top-right of the iPhone screen.
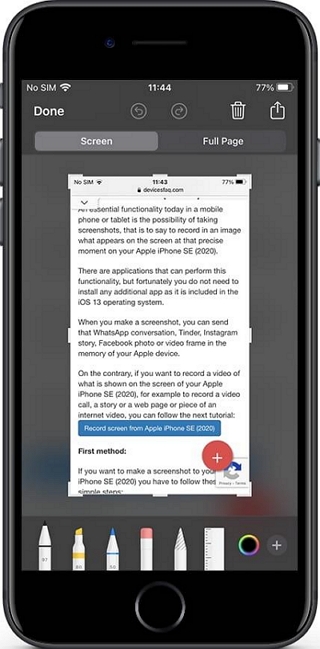
Step 3. Full Page View.
- Click on Full Page to access a single view of the entire page.
- Once you click the Full Page option, you will see a scrolling function on the right of the iPhone screen.
- Use the sliders and highlight all the desired content using the scrolling view on the right.
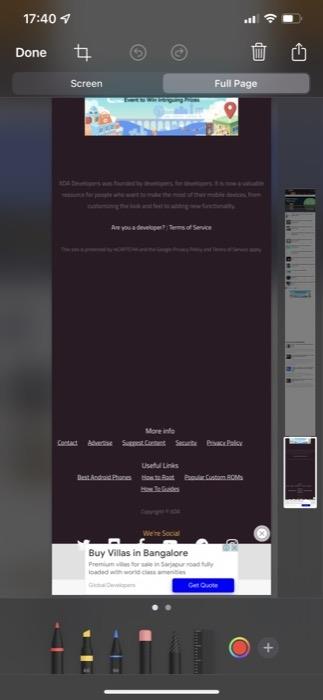
Step 4. Edit the Scrolling Screenshot and Save or Share it.
- Use the crop function to select the desired portion from the page. You can also use other editing functions available like marker, paintbrush to edit the full-page screenshot.
- Click on Done to save the scrolling screenshot to the Gallery.
- Or you can share the scrolling screenshot to social channels via the upload button.
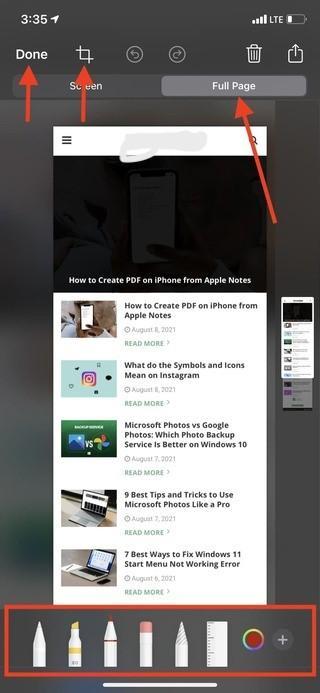
That’s how to take scrolling screenshots on an iPhone (regardless of the iPhone model).
Up till now, you have seen the native functions on iPhone to screen video capture and take a normal or scrolling screenshot on the iPhone. However, there are also third-party apps to video capture screens or take a screenshot on the iPhone.
Of course, you must be wondering why to use a third-party application for screen video capture and take screenshots on iPhone. Well, the functionalities of a third-party application like Eassiy Screen Recorder will impress you when compared to the native functions on the iPhone. In other words, if you want to screen capture on iPhone like a professional, Eassiy Screen Recorder is the tool for you.
Part 3: Best Way to Screen Video Capture iPhone With Advanced Screenshot Tools
Eassiy Screen Recorder Ultimate
To start with, Eassiy Screen Recorder Ultimate allows you to screen capture iPhone in 4K quality, unlike the native iOS Screen Recording tool (decent resolution). Moreover, you do not have to save the recording on the iPhone.
Given that Eassiy allows you to mirror the iPhone screen to the computer and screen capture the iPhone via the computer program, you can save the iPhone screen video capture directly on the computer. But it does not end there; Eassiy also allows you to include both external and internal sound while capturing the screen. Not only this, you can manage the internal and external audio levels during the live recording in Eassiy Screen Recorder to precisely convey the audio message in the video. This function is extremely valuable when you are creating how-to’s or tutorials on the iPhone. Furthermore, if you are doing voiceover, you can use the advanced audio management system to enhance microphone sound and limit background interference.
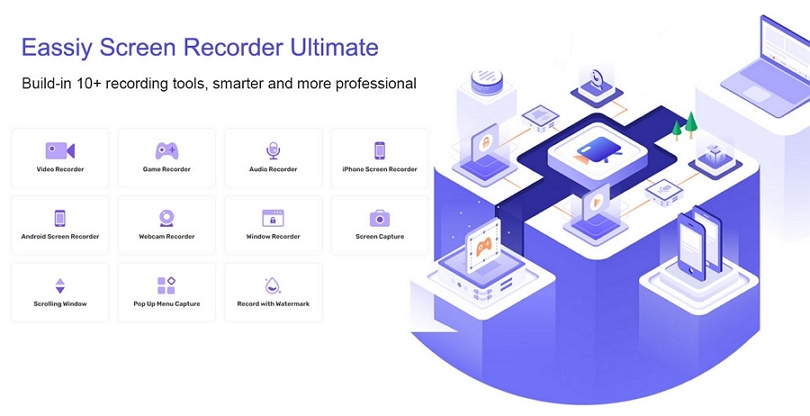
You can also take live screenshots while recording the iPhone screen. Beyond that, Eassiy includes video-making tools like the Trimmer to chop down the unwanted parts from the iPhone screen capture.
Key Features of Eassiy Screen Recorder Ultimate:
- Screen Capture in 4K quality up to 60fps. Mirror the iPhone screen and record in ultra-high-definition.
- Advanced Screenshots. Take full screenshots or scrolling or panoramic screenshots of the iPhone screen or computer screen. Pop-up menu screenshot.
- Annotation tools. Eassiy allows you to draw, doodle, and highlight essential aspects in the iPhone video screen capture.
- Save the iPhone Screen Capture to Computer’s local storage and save iPhone space.
- Create custom hotkeys and manage the recording parameters (start and end as well) using keyboard shortcuts.
- Manage audio levels. Eassiy allows you to increase/decrease the sound levels while you screen capture video on your iPhone.
- Limit background interferences and enhance microphone sound.
- Share the iPhone screen captures and screenshots to social channels directly, like Facebook, Instagram, YouTube, and more.
Aside from allowing you to screen capture iPhone, Eassiy also allows you to capture the computer screen, so you can also record gameplays or create online tutorials from your computer.
How To Screen Video Capture on iPhone With Sound via Eassiy Screen Recorder Ultimate?
Step 1. Download and Install Eassiy Screen Recorder on your Computer
Visit the official website and download the latest version of Eassiy Screen Recorder. Then, install it on your PC. Launch the program and select Phone.

Step 2. Select iOS
Select iOS from the new page and connect your iPhone to the PC at the same wifi.
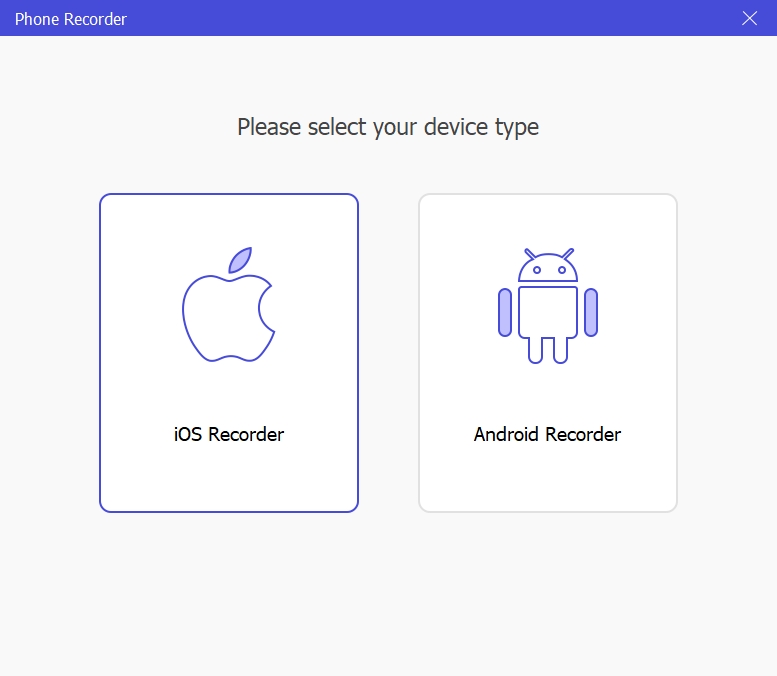
Step 3. Establish Connection
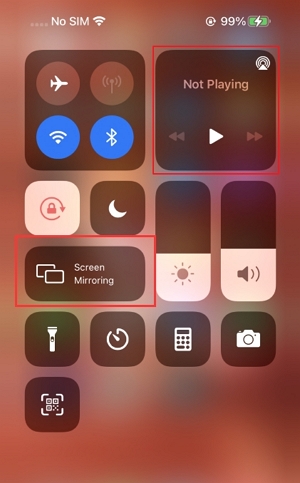
Tap Screen Mirror on your phone and select Eassiy Screen Recorder Ultimate. Once you complete that, Eassiy Screen Recorder will automatically establish a connection between your iPhone and the computer.
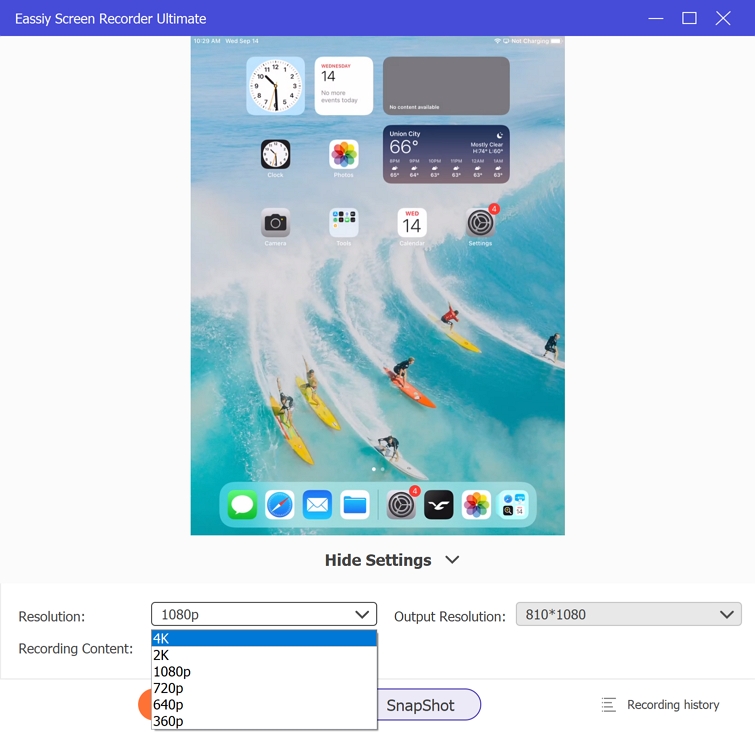
Your iPhone screen should automatically appear on your PC screen. Now, scroll to Resolution and click the drop-down icon next to it to select the resolution at which you want to record your phone screen.
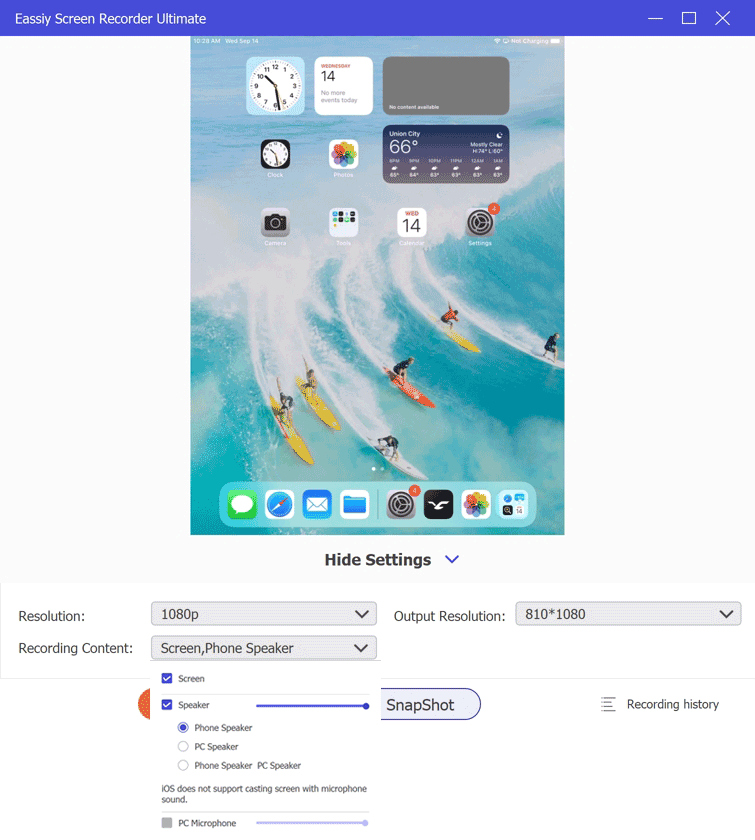
Additionally, you can click the drop-down icon next to Recording Content to select whether you wish to record your iPhone screen with phone speaker, PC speaker, or both.
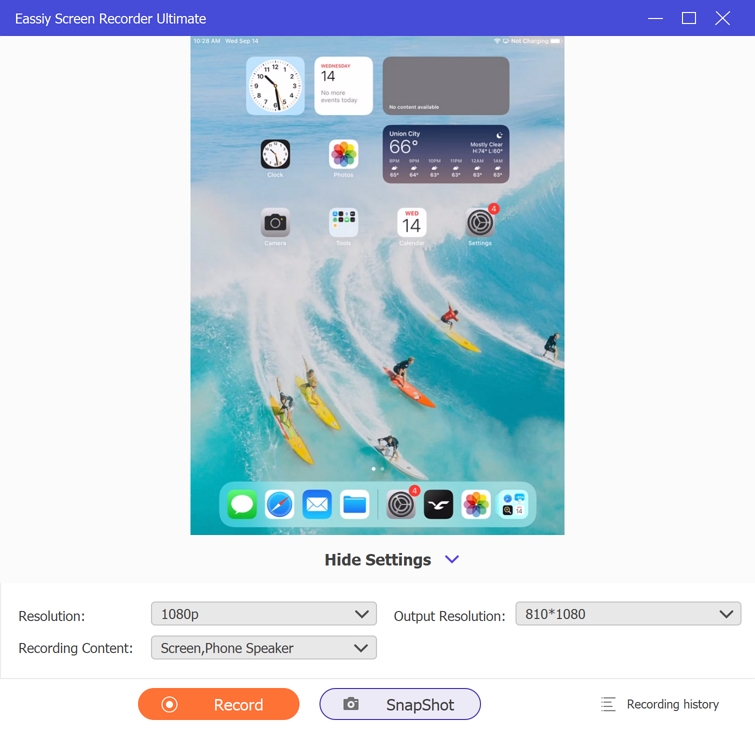
Step 3. Start Recording the iPhone screen.
After you complete the settings, click the Start Record button to start recording your iPhone screen. You can also take screenshot by clicking the Camera icon.
Eassiy Annotation tools can also come in handy during this time to add text, highlight important elements, as do lots more.

Step 4. Stop the recording.
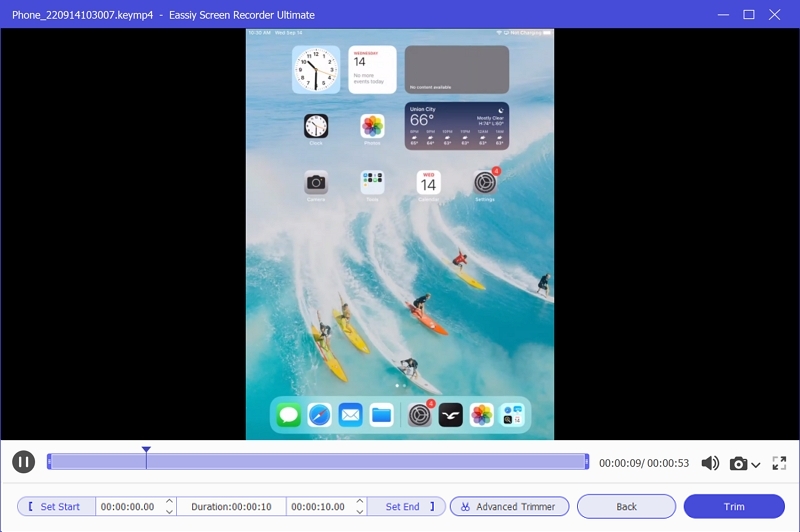
Use the Stop button to end the recording once you're done. After that, you can trim, cut, and apply other preferred editing to your videos. Once you're done with editing, click Done and Save the recorded video to your PC local storage.
Conclusion
As promised earlier, this guide shows you all the ways to screen capture iPhone. And you can choose between the native functions, i.e., Screen Recording function or Eassiy Screen Recorder Ultimate. Both methods do the same job, but their approach is different. For instance, the Screen Recording function on iPhone allows you to capture screens in decent quality. Plus, there are no ways to manage the external and sound levels during live recording; not to forget that it saves everything on the iOS itself.
At the same time, Eassiy allows you to screen capture video on iPhone via the computer, saving tons of space. Plus, Eassiy comes with advanced recording, editing, and sharing features to screen capture iPhone in a professional manner and create stunning online tutorials, how-to’s, gameplays, and explainer videos.


