Updated on 2024-01-06
28 views
5min read
iPhone users can easily cast their phone to a Mac device and record their on-screen activities. However, Apple’s garden-walled ecosystem does not allow you to launch your iPhone on a Windows PC quickly. Nevertheless, foolproof third-party apps will enable you to conveniently record the iPhone screen with a Windows computer. Unlike the native iPhone Screen Recording function, an iPhone Screen Recorder for PC will allow you to seamlessly create professional-looking video tutorials, product demonstrations, business presentations, or explainer videos.
Scroll down to learn how to record an iPhone screen with a Windows computer. In this guide, you will discover two third-party tools that will allow you to mirror the iPhone screen to a Windows computer and record its content. One is a free tool, whereas the other one is a premium tool but cost-effective, so you can create high-quality videos without spending much.
Part 1: What is an iPhone Screen Recorder for a PC?
An iPhone Screen Recorder for PC means you can record the on-screen activities of an iPhone from the computer. As indicated, some iPhone versions, i.e., iPhones running on earlier versions than iOS 11, do not have a built-in screen recorder. Additionally, even the native Screen Recorder on the iPhone does not have enough features to record your screen professionally.
On the other hand, an iPhone Screen Recorder for PC usually has more features than the native screen recorder on iOS 11 offers. For instance, a tool like Eassiy Screen Recorder, as you will find, offers far more features and tools to create professional-looking videos.
Part 2: Best Way To Record iPhone Screen With Windows Computer
As mentioned, Eassiy Screen Recorder Ultimate is one of the finest tools you can get your hands on when recording the iPhone screen from a Windows computer. That is to say. You can seamlessly mirror the iPhone screen to the Windows computer and record your iPhone screen in high-definition. Besides recording the iPhone screen, you can also include both internal and microphone sounds if you are looking to do the voiceover.
But unlike the native iPhone recorder, Eassiy also allows you to manage the sound levels of both the audio channels during live recording or post-production. Not only this, if you are looking to create online tutorials or business presentations on iPhone with voiceover, you can use advanced audio tweaks like enhancing microphone sound and limiting background interferences.
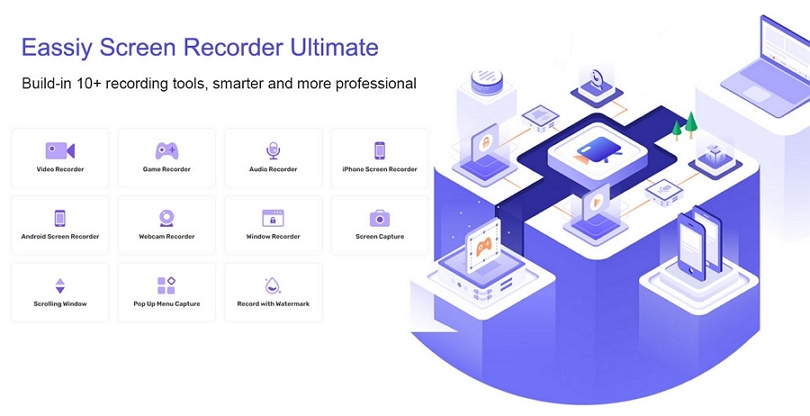
Additionally, you will find live annotation options. For instance, if you are creating tutorials or video lessons, you can use a pen, highlighter, arrows, and other drawing tools to really break down complex topics and explain them conveniently to the users. And then there are video editing tools to curate your normal-looking videos and brush them up for a professional environment.
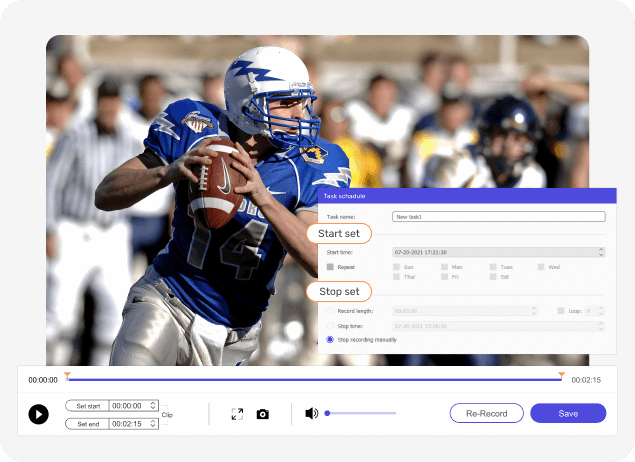
Needless to say, Eassiy also includes sharing options. So, once recorded, you can share the videos to social media platforms, like YouTube, Facebook, Instagram, and more channels, with a single click.
Key Features:
- Mirror the iPhone screen (or Android screen) to the Windows computer and record it in high-definition.
- All the iPhone screen recordings are saved to the computer so that you can save a lot of storage space.
- Use live annotation tools to draw, doodle, or scribble on your iPhone screen recordings in real time.
- The video editing suite is present within the Eassiy program, so you do not have to use other tools to professionally-curate your videos.
- Use social sharing options and share the videos on platforms like YouTube, Facebook, Instagram, and more such channels with a single click.
- Create personalized hotkeys and manage the iPhone screen recordings using keyboard shortcuts.
- Use advanced audio management systems, like enhancing microphone sound and limiting background interferences.
- Record your PC screen in multiple ways. That is, record the entire screen, capture a partial screen, or capture only a specific window.
- Advanced recording functions like Follow Mouse Recording and Around Mouse Recording.
Here’s How To Use Eassiy Screen Recorder Ultimate:
Eassiy Screen Recorder Ultimate is so straightforward that anyone can follow the subsequent steps and learn how to record the iPhone screen from a Windows computer. You do not have to download any tool on the iPhone and can use the AirPlay option to mirror the iPhone screen to the computer.
Step 1. Open the iOS Recorder.
Download and Install the Eassiy Screen Recorder Ultimate on your computer. Open the program and choose Phone from the main interface.

Note: There are also options to change the Preferences. You can do this by clicking on the three horizontal bars at the top-right corner of the screen. This will allow you to tweak audio settings for iPhone screen recording on the computer in advance. Plus, you can manage advanced options like Mouse Cursor Color and other such functions.
Step 2. Connect the iPhone to the Computer.
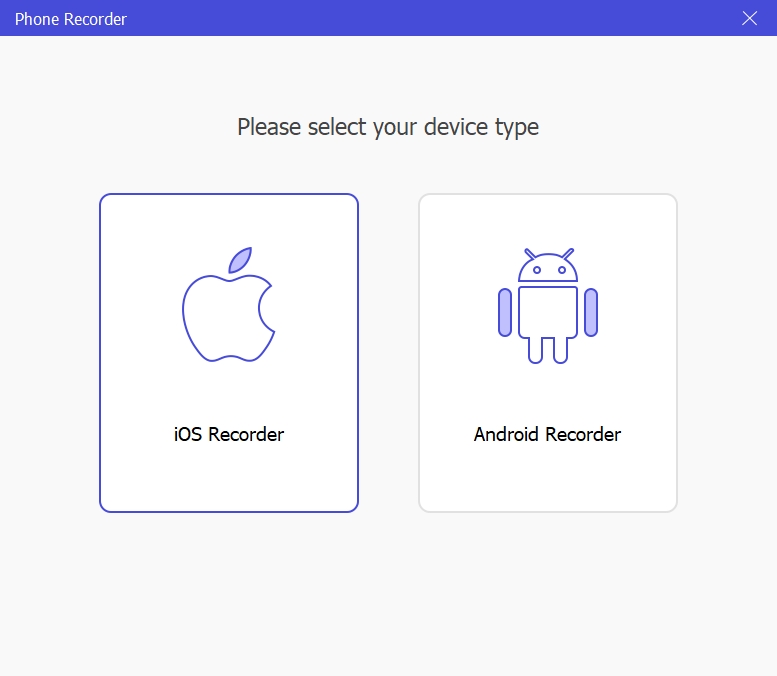
Once you click on the Phone on Eassiy’s main interface. You will see two options on the next screen, choose iOS Recorder to continue and connect the iPhone to the computer.
Step 3. Enable Screen Mirroring and Connect the iPhone to the Windows computer.
- Swipe down from the top-right corner of the iPhone to access the Control Center option.
- Click on Screen Mirroring. And choose Eassiy from the list of options.
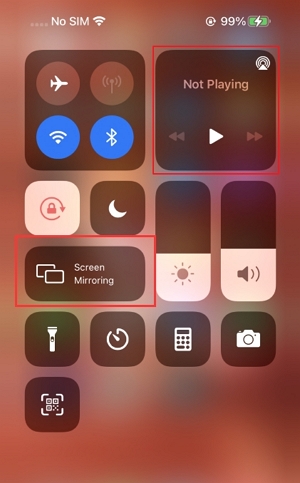
This will mirror the iPhone screen to the computer. If this doesn’t work, ensure that both iPhone and the Computer are connected to the same Wi-fi network. Once connected, follow along to learn how to record the iPhone screen on the computer with Eassiy.
Step 4. Record iPhone Screen.
- Choose the recording resolution. Eassiy allows you to set the resolution up to 4K. You can also choose the sounds that you want to include in the recordings.
- Under the Recording Content menu, you can choose the sound channels. As mentioned, Eassiy allows you to record PC sound and iPhone sound, either of the two or individually. You can also choose to record the iPhone internal sound and microphone sound on the iPhone.
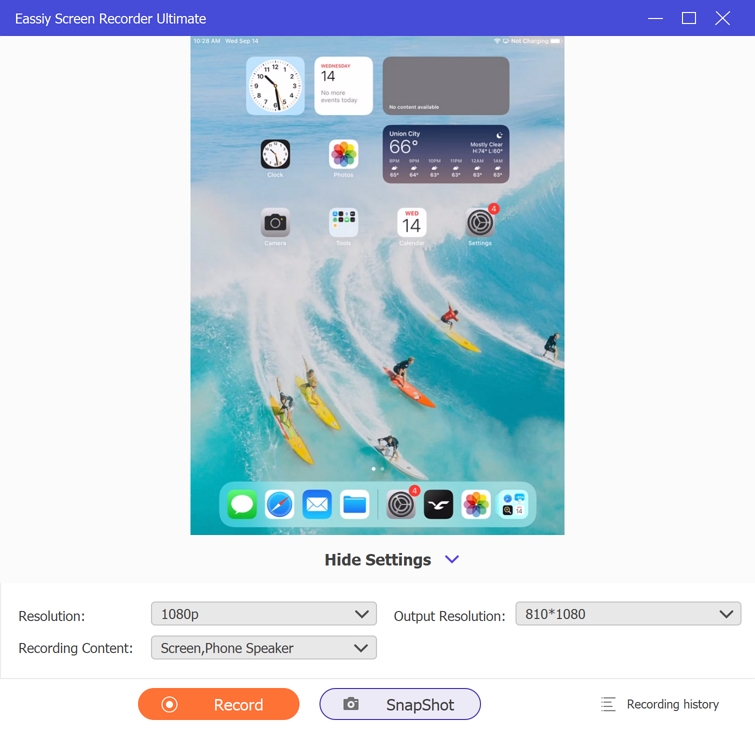
- Click on the SnapShot option to take a screenshot during the iPhone screen recording.
- Click on the Record icon to end the iPhone screen. Once Recorded, access the Recording History to access the iPhone screen recording.
- You can click on the Edit icon to edit the recording, like remove unwanted parts using the trimming tool. Or, you can use the annotation option to draw on the iPhone screen recording.
- Click on the Share icon to share the iPhone screen recording to social channels like YouTube, Facebook, or Vimeo.
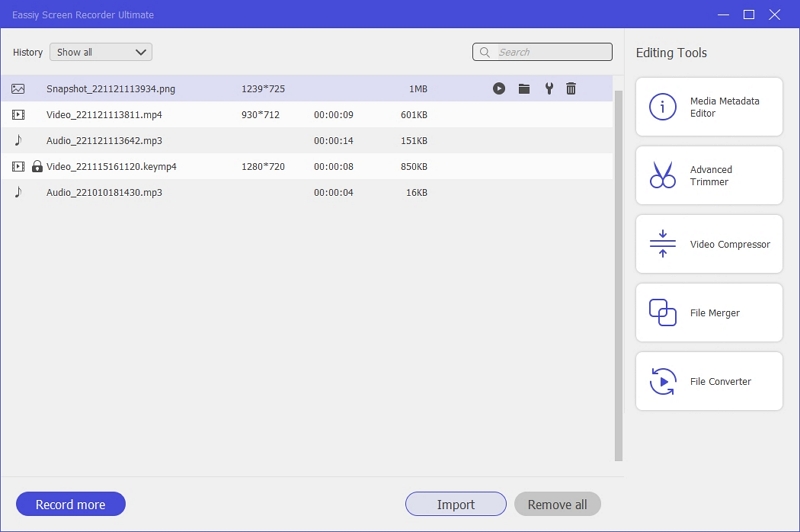
That’s how to use Eassiy Screen Recorder to capture iPhone screen with computer. However, as can be seen on the main interface of Eassiy Screen Recorder, you can do a lot more with the Eassiy program. For instance, you can record the Windows computer itself in high-definition and create professional-looking video lessons, online tutorials, and more such things.
Part 3. Free Method to Record iPhone Screen on Computer
While this method is free, you will still have to download a third-party tool to screencast your iPhone to the computer. Yes, the iPhone does not allow you to mirror your iPhone to other operating systems. Nevertheless, apps like LonelyScreen allow you to screencast your iPhone to the screen and then you can use the built-in screen recorder in Lonely screen to capture your screen.
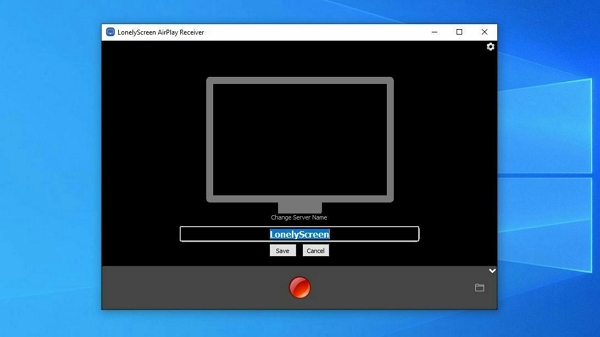
LonelyScreen tricks the iPhone into thinking that your Windows computer is the Apple TV, allowing you to mirror the iPhone screen to the windows seamlessly. The Personal license of LonelyScreen comes at US$ 14.95/Year. And there is a 60-day money-back guarantee. It’s a lite program and is available for all major Windows versions (there’s no Windows 11 version at the time of writing this).
Still, if you are using Windows 10 or earlier variants of Windows and have to record the iPhone screen via the computer, LonelyScreen is the ideal program for you.
Be that as it may, LonelyScreen does not include video-making tools like in Eassiy Screen Recorder. While the LonelyScreen costs less than Eassiy, you will be left with a means to record the iPhone screen. Retain that, LonelyScreen only will enable you to capture the iPhone screen, and there are no advanced features like annotation tools, editing tools, or audio management tools.
How to Record iPhone Screen With Computer using LonelyScreen:
You have to download the program from the LonelyScreen official page. Once downloaded, you have to sign up and use a credit card to pay for the subscription. There is no trial. Still, there’s a 60-day money back guarantee during which you can claim your money back.
Step 1. Download and Install the LonelyScreen program on the Windows PC. You do not have to install anything on the iPhone.
- Go to the official page of LonelyScreen and download the tool for Windows depending on the OS version.
- Once downloaded, right-click on it and choose Run from the list of options.
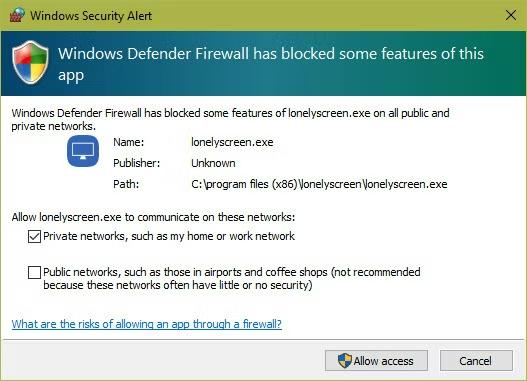
- You might see a Firewall prompt asking your permission to whether to allow LonelyScreen on the Windows computer or not. Click on Allow access.
Once installed, you will see an option to change the name of the application. By default, it will show as LonelyScreen on AirPlay. But you can change it with your name.
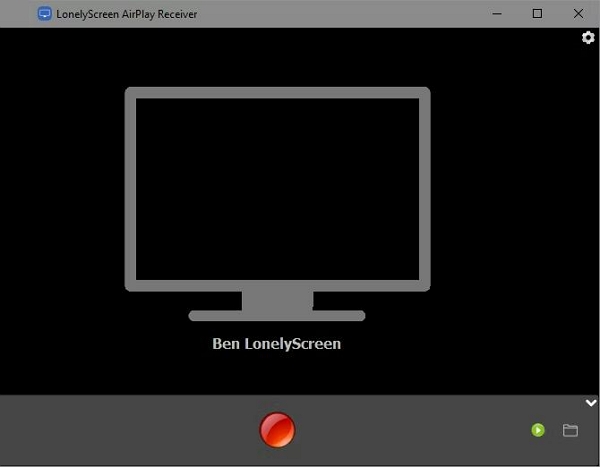
Step 2. Connect iPhone to Windows.
- Open the iPhone that you want to mirror to the PC. And swipe down from the top-right corner to access the Control Center.
- Choose Screen Mirroring from the Control Center options. If you still haven’t enabled Screen Mirroring, navigate to Settings and follow the steps shown above in the Eassiy guide to include Screen Mirroring in the Control Center.
- After enabling the Screen Mirroring option, click on it to connect the Windows PC to the computer.
- Click on the LonelyScreen option to link both the devices.
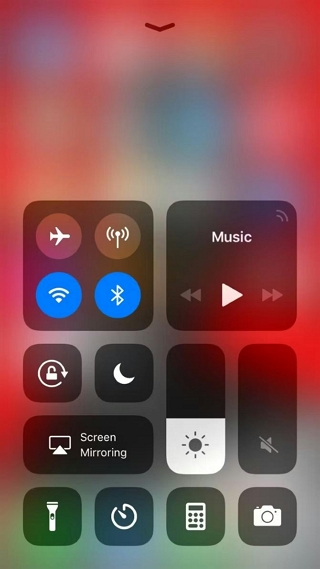
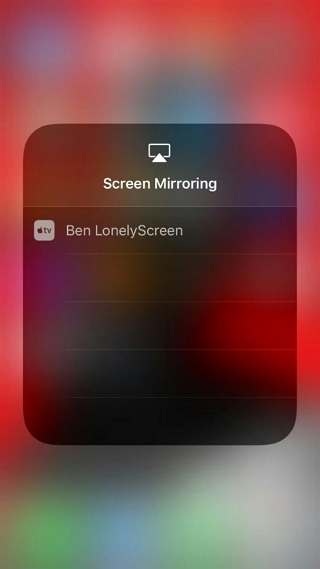
Once you do this, your iPhone will mirror the computer. And whatever you do on the iPhone screen can be seen on the LonelyScreen Program on the computer.
Step 3. Record the iPhone with Computer.
- Click on the drop down menu on the main menu and choose Record from the list of options.
- Click on the Red dot to start recording the iPhone screen.
- You can end the iPhone screen recording by clicking on the Red Record button again.
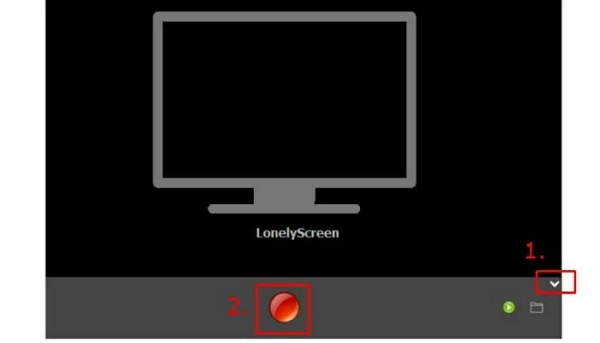
You can access the recordings via the Videos folder under LonelyScreen. Needless to say, you will have to use another video making tool to edit the recording, like removing unwanted parts or drawing on the recordings. So, it is best to use tools like Eassiy Screen Recorder which allow you to record the iPhone screen via the computer and also offer other video-making options.
Pros of Recording iPhone Screen on Computer With LonelyScreen:
- You can record the iPhone screen with a click of a button.
- All the recordings are saved on the computer, so this saves a ton of space on the iPhone.
- No need to download any tool on the iPhone to mirror it to the computer.
- A simple tool, means even the least tech-literates can use it seamlessly.
Cons of Recording iPhone Screen on Computer With LonelyScreen:
- You can only record the iPhone screen.
- There are no audio management systems to manage sound levels, like seen in Eassiy Screen Recorder.
- You will not find any annotating options to draw, doodle, or scribble on your recordings. This means, you will have to use other video making tools to create video lessons or business presentations.
- Even for this simple feature, LonelyScreen charges you a subscription.
Conclusion
That is the two best ways to record the iPhone screen with a computer. LonelyScreen is suitable for people who want to simply record the iPhone screen and store the content on the iPhone screen. Whereas Eassiy is suitable for users looking to create online tutorials, video lessons, or business presentation. Or the users who want to record the iPhone screen and share the video in a professional environment.
As far as simplicity is concerned, both LonelyScreen and Eassiy Screen Recorder have a simple interface and allow both novices and hobbyists to work alike.


