Updated on 2023-02-07
23 views
5min read
Be it social media platforms or broad content providers; we are bombarded with live streams covering all the aspects we love. Of course, no one has the time to process all the information at once. And that’s why you should learn how to record a live stream, given you can save the live streams, webinars, and video feeds for later.
This guide will discuss five ways to record a live stream on iPhone. So, regardless of whether you want to record a live stream on your iPhone without using any third-party tool or without consuming iPhone’s storage space, you will find a method that suits your needs. In addition, you will also find out how to use the online tool on iPhone to record a live stream or record live streams automatically.
Part 1: How to Record a Live Video on iPhone - Free
iPhones with iOS 11 or later versions come with built-in screen recorders that allow you to capture just about anything happening on the screen with internal sound. You can also include microphone sound in the screen recording; for instance, this option is valuable if you want to do a commentary on the live stream.
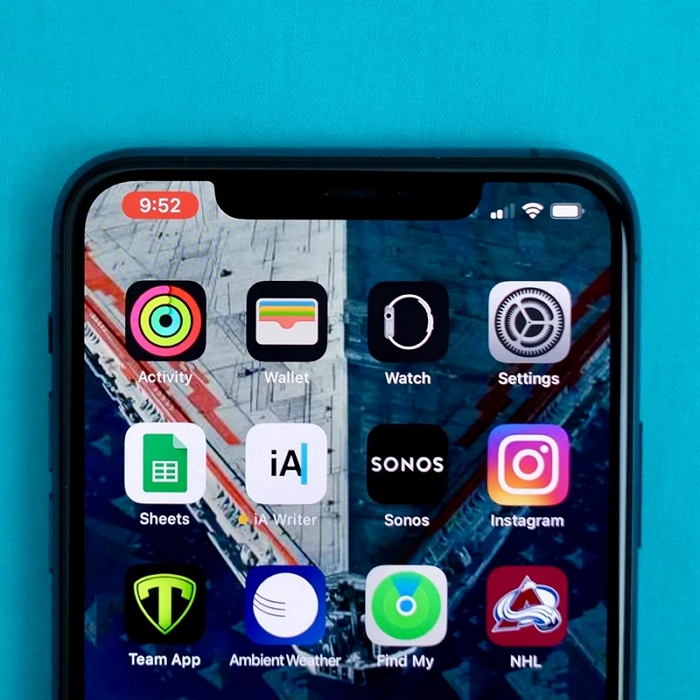
iPhone screen recorder is simple-to-use; however, it is essential to note that it is no-frills because it lacks advanced recording functionalities, like annotations tools and more. Still, if all you want is a screencast tool to record live streams on iPhone, iPhone Screen Recorder does make sense.
Pros of iPhone Screen Recorder:
- You can record the live stream on your iPhone without downloading any tool.
- You can include both internal and external sound in the live stream recording.
- Use the Photos app to edit your live stream recordings.
- Share the recorded live stream with your friends and family via Shared Albums.
- You can save the recorded live stream in multiple formats, including HEVC, MP4, QuickTime, H.264, and MPEG-4.
Cons of iPhone Screen Recorder:
- Recording live streams take up too much space on the iPhone, retain that storage causes lag.
- Even during live stream recording, iPhone lags, and you cannot perform any further operations.
- The built-in screen recorder lacks advanced audio management options, so do not expect clear audio (when doing voiceovers or using a microphone).
- You cannot record for more than 3-4 hours (according to users).
Here's how to record a live stream on iPhone using the built-in screen recorder:
You can access the iPhone's built-in screen recorder via the Control Center. However, if you cannot find the Screen Recorder option in the Control Center menu, you have to include the option via Settings. That said, here's how to record a live stream on iPhone:
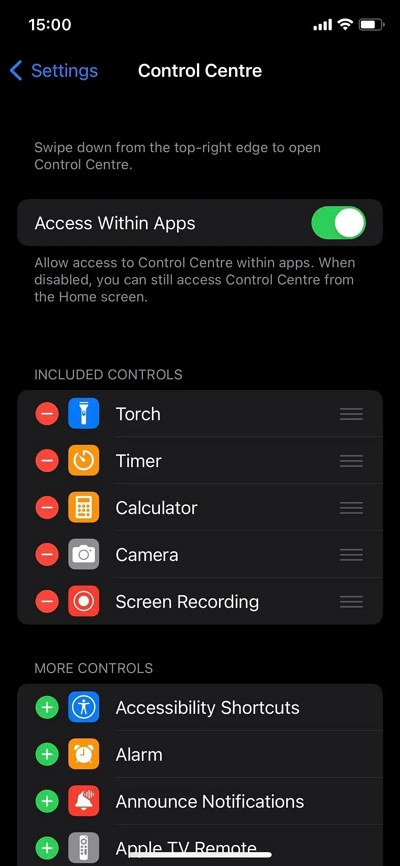
Step 1. Customize the Control Center options.
Open Settings. Scroll down to Control Center. Open it, find Screen Recorder, and click on the + icon to include it in the Control Center menu.
Step 2. After including the Screen Recorder, navigate to the Control Center. And choose the Record icon from the list of options to record the live stream.
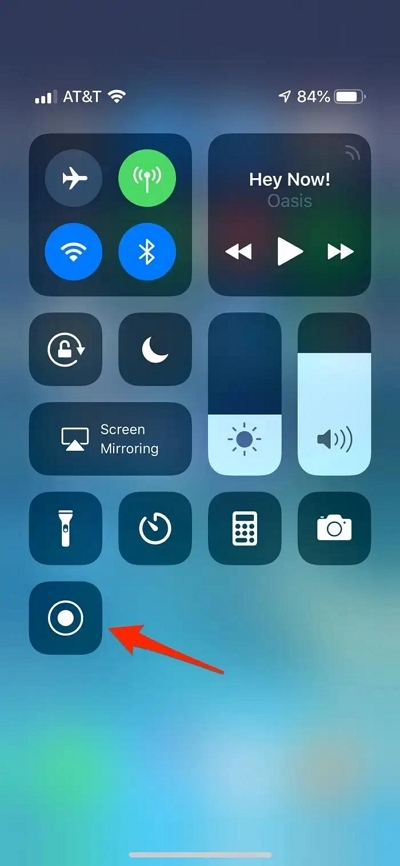
Note: Instead of one-tap on the Record button, you can long press the option to access Microphone settings. So, if you want to capture microphone sound while recording the live stream, ensure to long press and turn your Microphone On.
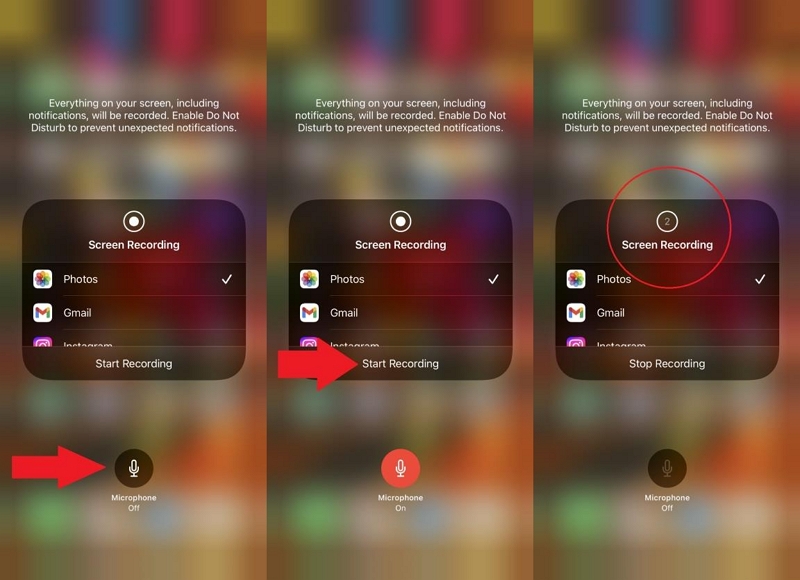
Step 3. After a 3 second countdown, iPhone Screen Recorder will start recording the live stream.
- You can see the active recording via the Timer on the top-left corner of the screen.
- After recording the desired part from the live stream, click on the Timer to stop the recording.
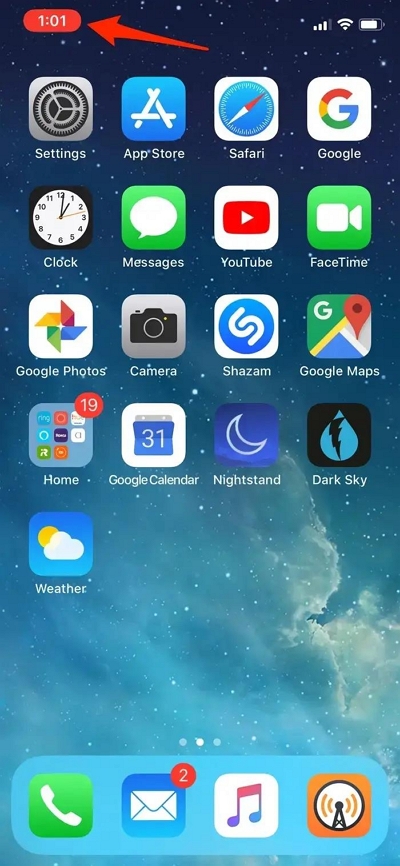
Once you end the recording, it will automatically be saved to the Photos app. You can access the live stream recording and edit it using the built-in editing tools available in the Photos app.
As hinted already, this is not the best way to record a live stream on iPhone, given it consumes too much storage space. Plus, as tested personally and confirmed by several users, you cannot record a live stream for more than 3-4 hours using the iPhone’s built-in screen recorder. So, let’s check out other methods of recording the screen.
Part 2: How to Record Live Stream on iPhone without Occupying Any iPhone Storages and Lag
If you still want to record the live stream on your iPhone but do not increase your storage space, you can choose to record the iPhone via a computer. There are third-party tools like Eassiy iPhone Screen Recorder, which allow you to mirror your iPhone screen to the computer (Windows or Mac) and capture everything happening on the iPhone screen.
Eassiy Screen Recorder Ultimate
Eassiy Screen Recorder Ultimate is an all-in-one screen recording solution to capture any device, including iPhone, macOS, iPad, Android, or computer. Unlike the iPhone screen recorder, it allows you to mirror your iPhone to the computer (Windows or Mac) and capture everything, saving you tons of storage space on the iPhone.
In addition, you can record live streams with microphone sound. However, it includes an advanced audio management system like noise cancellation technology and a microphone enhancer so that you can record clear voiceovers for commentary. Besides the audio system, you can also use video editing tools, like a trimmer, to remove unwanted parts from the live stream recordings and auto-split to separate long live stream recordings into small pieces.
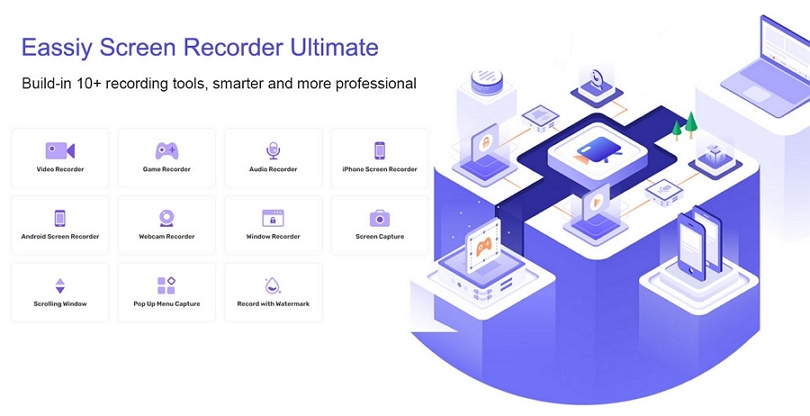
After recording, you will also find social sharing options to upload the recorded live streams to social platforms like YouTube, Facebook, and more. And what’s substantial is you can use custom watermarks and logos when publishing live streams in a professional environment.
Key Features:
- Mirror your iPhone screen and record live streams in high-definition (up to 60fps).
- Incorporate both external and internal microphone sound in the live stream recording.
- Edit the live stream recording using trim, auto-split, and other editing tools.
- Enhance microphone audio and limit background interferences (powered by AI technology).
- Boast additional editing functionalities, including media metadata editor, advanced trimmer, file merger, video converter, and video compressor, which are not available in regular screen recording software.
The Pros: Why use Eassiy to record live stream on iPhone?
- The live stream recordings will be saved to the computer storage, saving tons of space.
- Thanks to Eassiy’s cross-platform support, you can mirror your iPhone to both Mac or Computer devices.
- A simple, clean, and intuitive interface allows even beginners to record live streams like a professional.
- Incredibly amazing editing tools, including media metadata editor, video converter, advanced trimmer, and many more.
- Use custom watermarks and logos on the live streams before publishing them to social platforms.
- Save the live stream recording in any format, or share it to social channels like Facebook and YouTube.
- Smart functions including schedule recording, auto-stop recording of live stream
The Cons:
- The free version only allows you to record up to 3 minutes (no watermarks).
How to Record Live Streams on iPhone via Eassiy Screen Recorder?
Step 1. Download and Install Eassiy Screen Recorder on your Computer
Visit the official website and download the latest version of Eassiy Screen Recorder. Then, install it on your PC. Launch the program and select Phone.

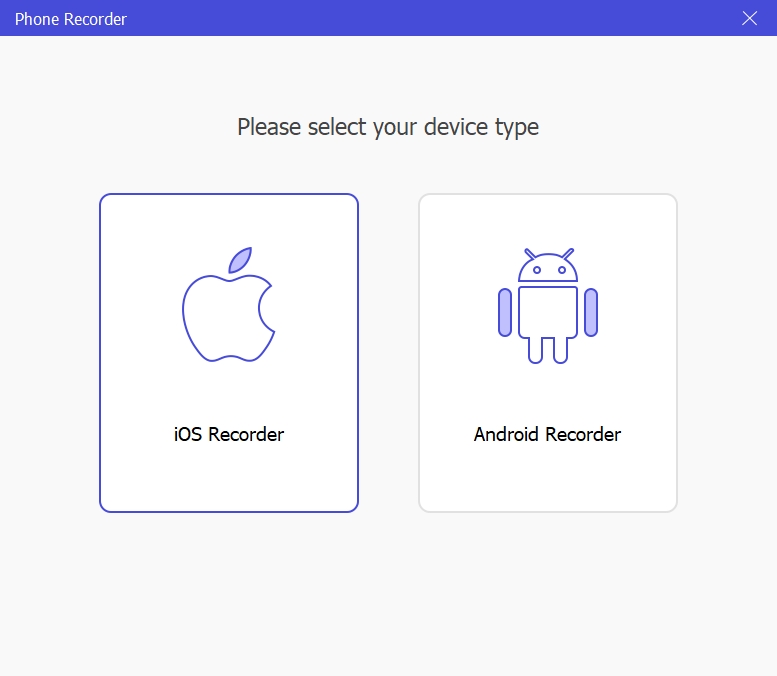
Step 2. Select iOS
Select iOS from the new page and connect your iPhone to the PC using its USB cable.
Step 3. Establish Connection
On the new screen, you'll be asked to setup screen mirroring on your iPhone by following the on-screen instructions. Once you complete that, Eassiy Screen Recorder will automatically establish a connection between your iPhone and the computer.
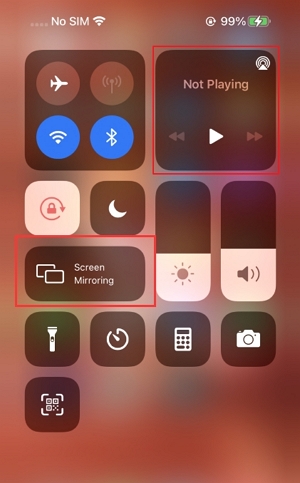
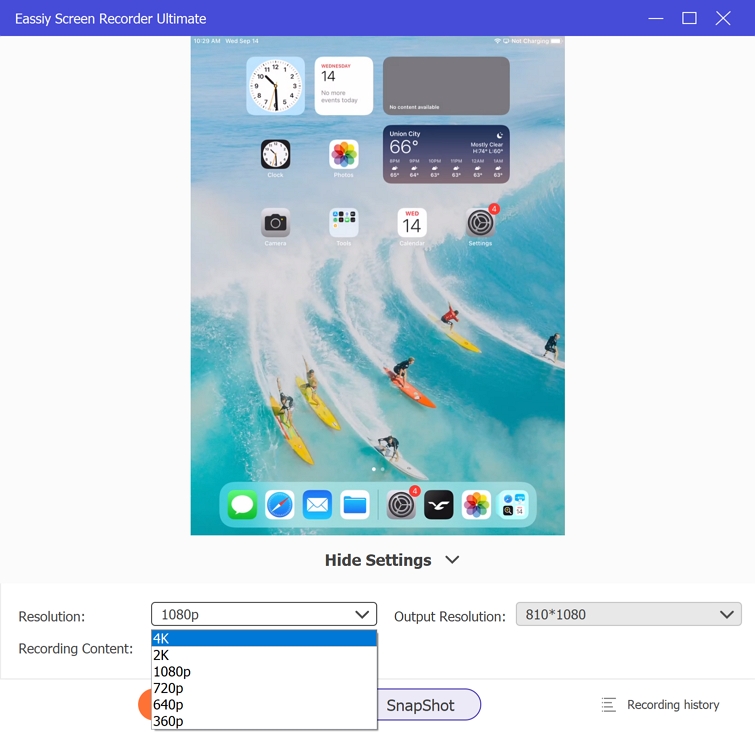
Your iPhone screen should automatically appear on your PC screen. Now, scroll to Resolution and click the drop-down icon next to it to select the resolution at which you want to record your phone screen.
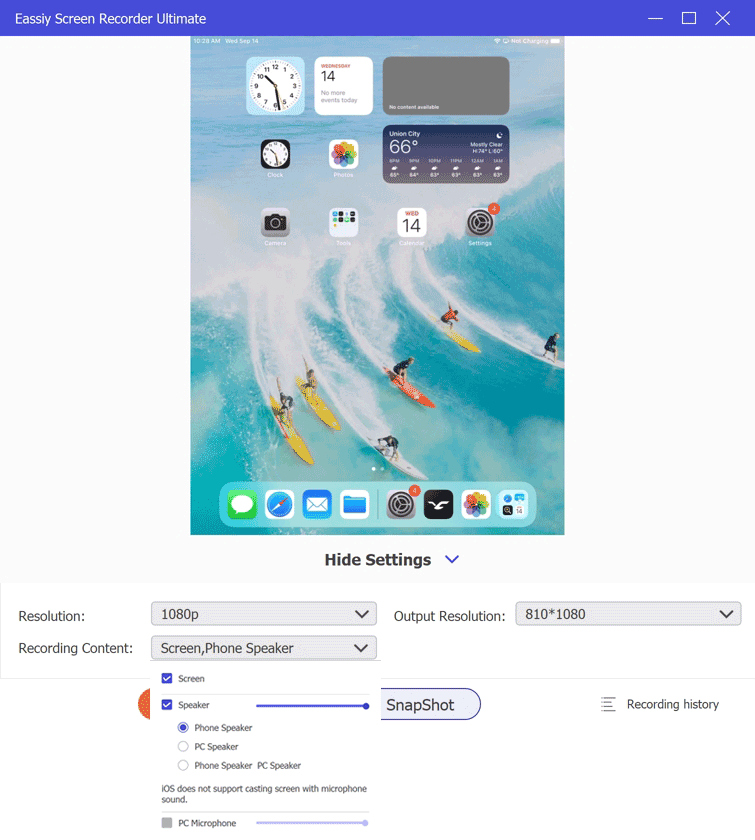
Additionally, you can click the drop-down icon next to Recording Content to select whether you wish to record your iPhone screen with phone speaker, PC speaker, or both.
Step 3. Start Recording the iPhone screen.
After you complete the settings, click the Start Record button to start recording your iPhone screen. You can also take screenshot by clicking the Camera icon.
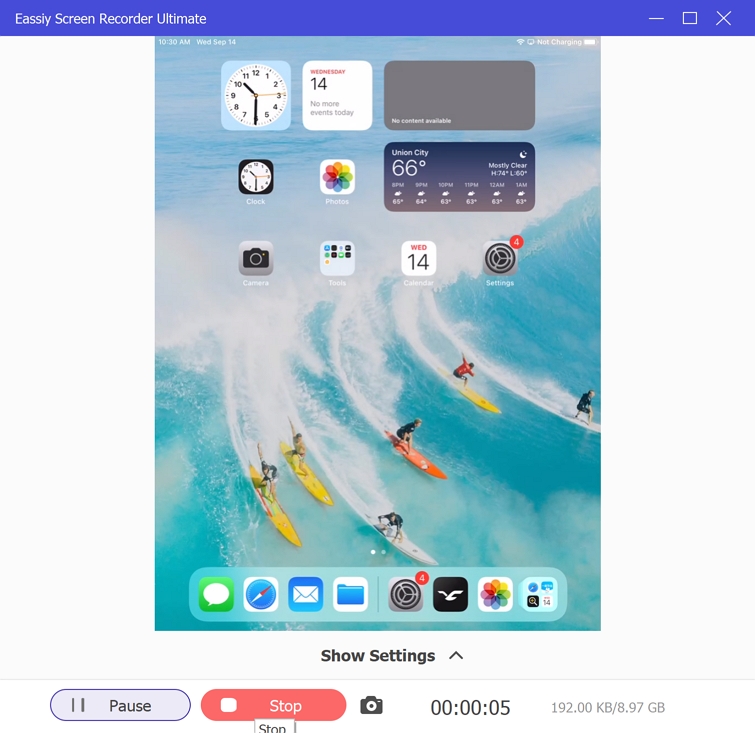
Eassiy Annotation tools can also come in handy during this time to add text, highlight important elements, as do lots more.

Step 4. Stop the recording.
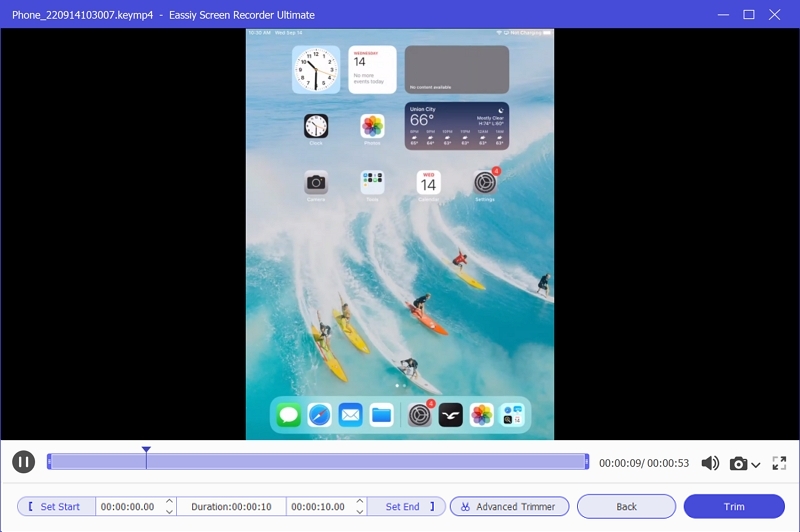
Use the Stop button to end the recording once you're done. After that, you can trim, cut, and apply other preferred editing to your videos. Once you're done with editing, click Done and Save the recorded video to your PC local storage.
Part 3. How to Only Record Live Stream Window without Any Distraction?
Instead of mirroring your iPhone, you can directly record live streams on Windows or Mac devices. The benefit of recording the live stream on your computer is you can use advanced recording options available in Eassiy and can also record uninterruptedly.
For instance, Eassiy Screen Recorder Ultimate has numerous recording modes, including full-screen, partial-screen, or window-specific. The window-specific option allows you to lock the window and record only one tab; regardless of what you do, Eassiy will keep recording only that screen. So, you can minimize the recording and move it to the side while working on other things on your computer. You can also include webcam overlay in the live stream recording.
The Pros: Why use Eassiy to record live stream on Computer?
- Record live stream without any interruptions while working on other projects on the same computer.
- You can customize the recording area and capture only the desired part of the live stream.
- Include webcam overlay and microphone sound in your live stream recordings.
- You can use microphone sound (with audio management system options) as well as use custom stamps to brand the live stream recordings for professional use.
- In addition, you can also use annotation tools like pencils, arrows, paintbrush, and a text editor to draw and doodle on the live stream recording in real-time.
The Cons:
While Eassiy allows you to record live streams on your iPhone (as discussed above), the “uninterrupted recording feature” is available only when using the tool on the computer. Still, given that you can work on other projects on the same PC while Eassiy records the live stream in the background, it will not come between you and other work.
How to Record Live Stream Without Any Interruptions on Computer?
Step 1: Launch the Eassiy Screen Recorder on your PC and select Windows at the left side from the main interface.

Step 2: Click the drop-down icon next to Window Recorder and select the Live Stream window that you wish to screen record. Eassiy will automatically lock the screen. Afterward, tick the checkbox next to System Sound and Microphone.
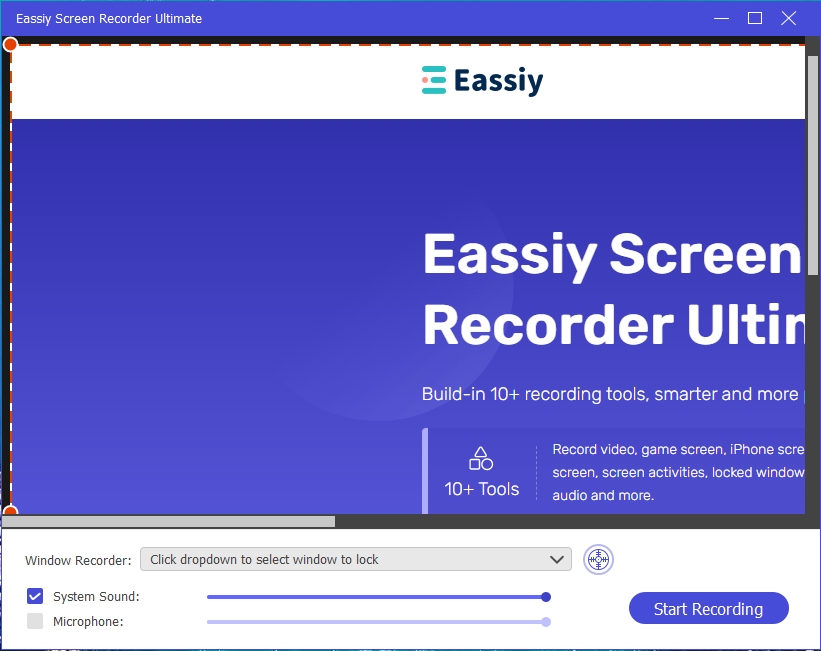
Step 3: Click Start Recording to begin the screen recording operation. During the screen recording operation, you can minimize the Windows and focus on other things you’re doing. Also, you can take real-time screenshots using the camera icon.

Eassiy also facilitates real-time annotation. So, you can take advantage of this feature to highlight important elements in the live stream.
Note: You can set the recording length/ending time to end screen recording operation automatically. All you just need is to click the clock icon next to the camera icon as shown in the screenshot. Then, tick the checkbox next to Stop Recording Automatically to set the recording length.
Step 4: If you turn on the auto-stop feature, the recording will end automatically. You don’t necessarily need to wait in from of your computer. But if otherwise, then use the Stop button to end the process.
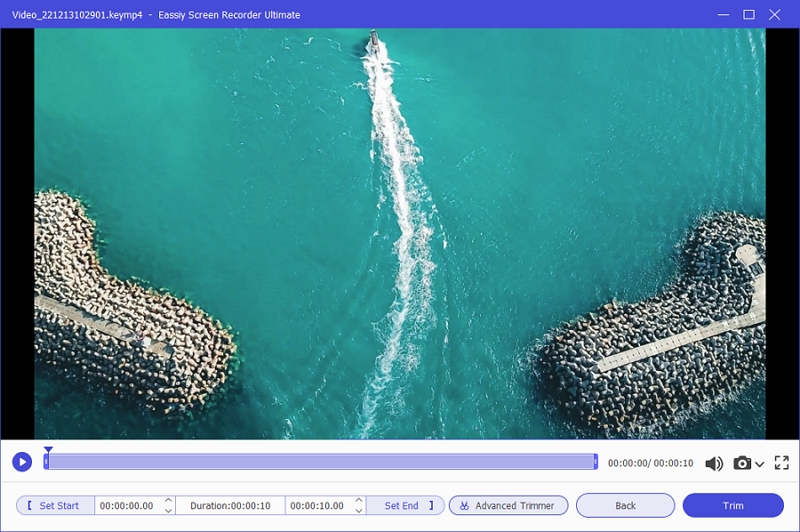
Step 5: Click Done once the recording operation is complete. Then, you'll be automatically prompted to the Recording History window. You can save the recorded video it to a preferred location on your PC from there.
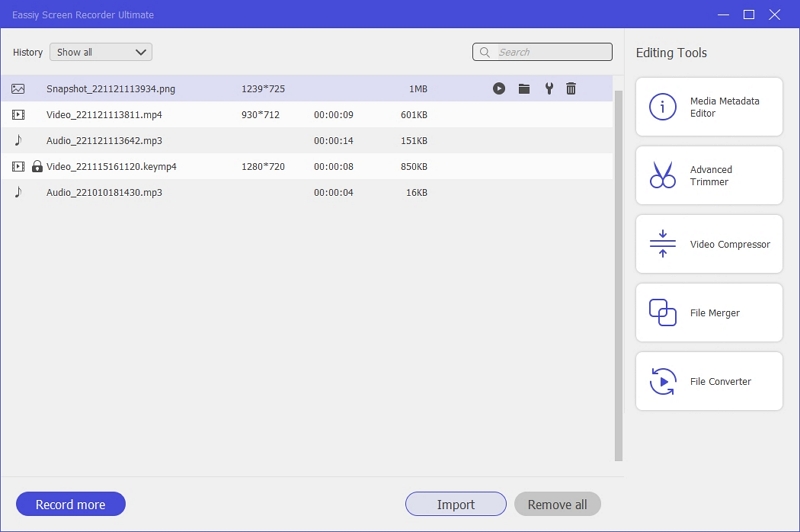
Also, you'll be able share the recorded video to social media apps from there.
Part 4. How to Automatically Record Live Stream without staying on Computer?
Many of you might be looking to automate the live stream recording on your computer. And why not? After all, all the sporting, mega-events, or TV episodes feature the live stream time beforehand, so doing this process manually does not make much sense. And guess what? There is a way to automate your live stream recordings with Eassiy.
Eassiy Screen Recorder comes with the Task Scheduler function that allows you to set the time, date, and recording quality (HD available) in advance and record the live stream without intervening. Once registered, Eassiy will save the recording automatically. You can see the live stream recordings via the Recording History tab within Eassiy. Plus, you can even edit and annotate the recording later. As mentioned, Eassiy has an intuitive interface, so even this process is not difficult to follow through, scroll down to learn how to schedule your live stream recording.
How to Schedule the Live Stream Recording Via Eassiy Screen Recorder Ultimate?
Step 1: Launch Eassiy Screen Recorder Ultimate. Then, from its main interface, click Task Schedule.

Click the big plus icon that appears on your screen. Then enter the name of the task and click OK.
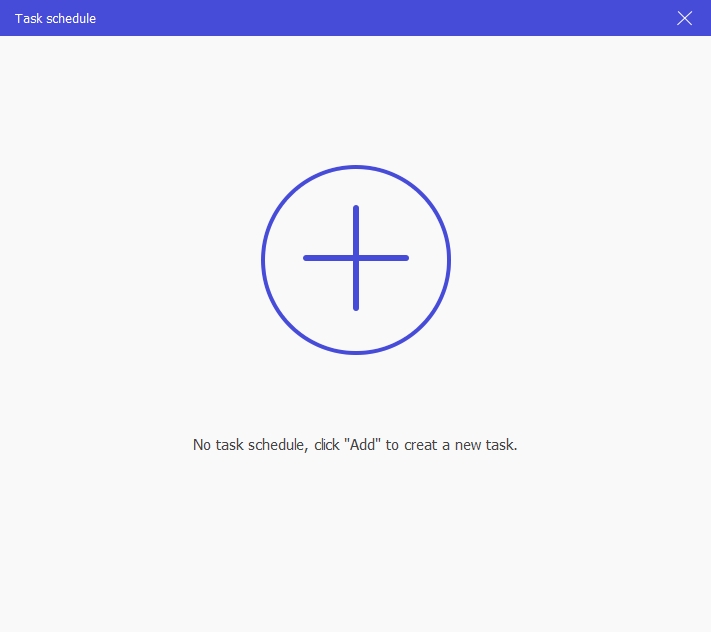
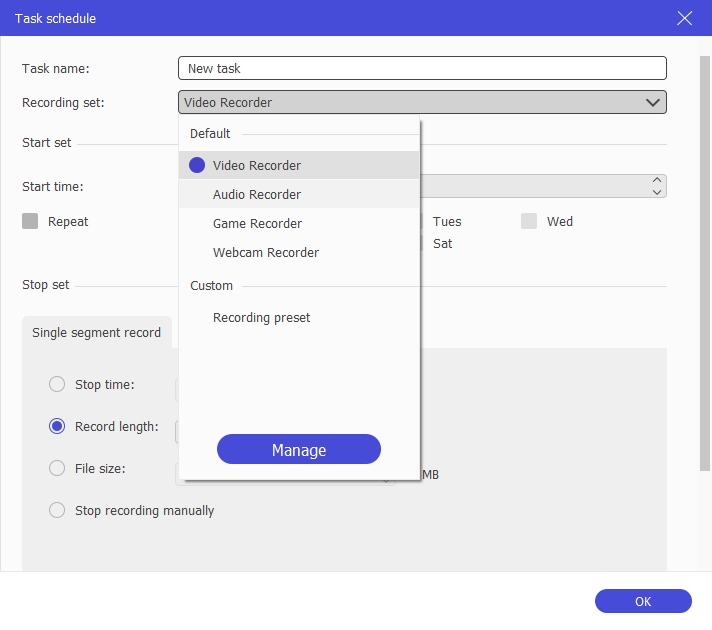
Step 2: Now, click the drop-down icon next to Recording Set and select Video Record. As you can see, the tool also allows you to automatically record audio, game, etc, using a dedicated recorder.
Step 3: Now, navigate to Start Set section and enter Start Time. You can also set days when you want the tool to automatically record your screen at the same time.
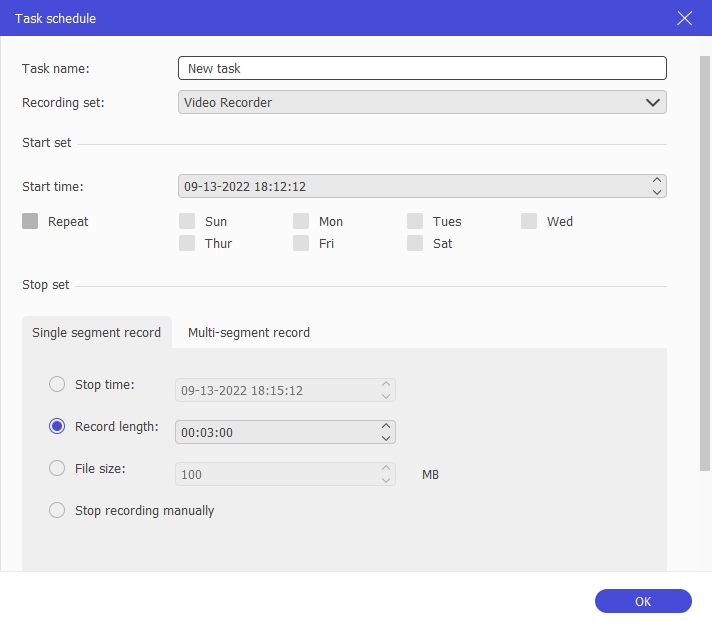
Step 4: For the Stop Set Section, you'll see two option ‘Single Segment Recording’ Multi-segment Recording. Just select Stop time and enter the time when you want the screen recording to stop. You can also using Record Length to indicate this.
Step 5: After you apply all the required settings, click OK.
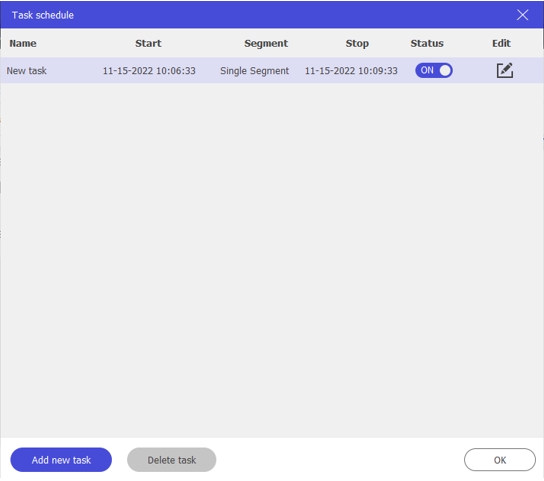
Easily will automatically start recording your Live Stream when it reaches the Scheduled time. It's as easy as that.
The Pros: Why use Task Scheduler in Eassiy to Screencast HD Live Streams?
- Screencast HD live stream automatically. Simply set a start time and date and let Eassiy record the live stream for you.
- Intuitive options like Daily Scheduler to record daily without any interventions. You can access all the captures via the Recording History tab.
- You can edit the live stream recordings whenever you have time, given the recordings are saved automatically in the program itself.
The Cons:
Not a drawback, but remember that you must leave the Computer turned ON for Eassiy to record the live stream automatically.
Part 5: How to Record Live Stream on iPhone - Online
You can also use online screen recorders to capture live streams on iPhone, like Flexclip. Flexclip is an online utility available via Chrome, Mozilla, and Opera, which allows you to record the screen on iOS device without downloading any tool. You can simply record the screen with microphone sound and save the recording on your iOS device.
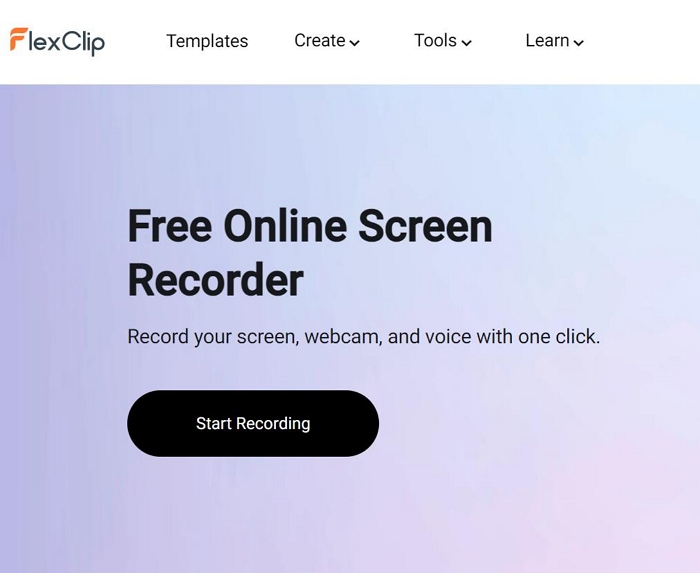
However, FlexClip Online Screen Recorder works only on iPad. You cannot the online utility on iPhone. It is important to note that you can find screen recording utilities via AppStore, but there is no online utility to record the iPhone screen. Nevertheless, when it comes to iPad browsers, you can use tools FlexClip, Clipchamp to capture your screen.
How to Use FlexClip to Record Live Stream iOS screen?
- Visit FlexClip online screen recorder (Download here).
- Click on Start Recording.
- Choose Screen, Screen+Webcam.
- After recording the live stream on iDevice, click on the Stop button.
- Save the recording to the local storage.
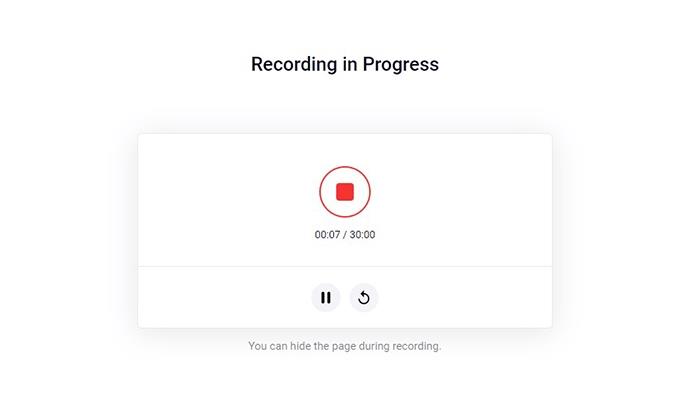
That’s how to record a live stream on iDevice using FlexClip.
Pros of Using an Online Tool to Capture Live Stream on iPhone:
- You do not have to install any tool to screencast live stream on iPhone.
- You can include microphone sound.
Cons of Using an Online Tool to Capture Live Stream on iPhone:
- No advanced recording options like Eassiy Screen Recorder.
- You have to save the recording on the local storage itself, so it does not make sense to using an online tool instead good-old iPhone Screen Recorder.
Conclusion
The built-in screen recorder on iPhone does allow you to capture live streams; however, it is inefficient. You cannot use a webcam overview; plus, it consumes a lot of space. Not to mention, it will not allow you to record long live streams. At the same time, the online tool does not make a difference either. Instead, it is best to use a built-in iPhone Screen Recorder, given it is more intuitive compared to online screen recorders like FlexClip.
On the other hand, Eassiy, to sum up, has everything you need to record live streams on your iPhone. For instance, you can mirror the iPhone screen and record via computer to save up storage space on your phone. Plus, given you only have to reflect the iPhone screen, you can even record long live streams. But Eassiy Screen Recorder takes things to the next level when using it on the computer. You have multiple recording modes, advanced annotation, editing, and sharing tools to record live streams like a professional.


