Updated on 2023-09-12
22 views
5min read
In today's digital world, taking pictures is something we do easily. We can use our phones and the cloud to save these pictures, which is very simple. But if we take a lot of pictures over time, our iCloud storage can become full and messy. This guide tells you how to delete photos from iCloud. By learning this, you can keep important memories and also make sure your iCloud storage works well.
When you're learning about managing your iCloud storage, you might wonder what happens if you turn off iCloud Photos. This part helps you understand that. It explains how your pictures are affected and how it affects your device. By knowing this, you can decide what's best for your iCloud storage and keep your special memories safe and easy to reach.
Part 1: Understanding iCloud Photo Management
A. The Role of iCloud Photos
iCloud Photos is a service from Apple that helps you keep your photos and videos safe and the same on all your Apple gadgets. This means that if you take a picture on your iPhone, you can see it on your iPad and Mac too, almost immediately.
Here's how iCloud Photos works:
- Keeping Stuff Safe: When you turn on iCloud Photos on your devices, the pictures and videos in your Photos app get sent to a safe place called iCloud storage. This storage can hold a certain amount of stuff, and if you need more space, you can get more by paying.
- Same Pictures Everywhere: Once your pictures are in iCloud, they show up on all the devices that you've connected to iCloud Photos. So, if you click a photo on your phone, it quickly shows up on your iPad, Mac, and other connected gadgets. If you change a picture, like fixing it or removing it, those changes happen on all your devices.
- Saving Space: To save room on your gadgets, iCloud Photos has a choice called "Optimize Storage." This choice keeps smaller versions of your pictures on your gadget, and the big versions are kept in iCloud. This way, you can look at the big versions whenever you want, but your gadget doesn't get filled up.
- Shared Albums: iCloud Photos also lets you make albums that you can share with others. You can work together on these albums, meaning lots of people can put their pictures in them. You can also use them to show certain groups of pictures to others. People can look at, talk about, and get pictures from these albums on any gadget with iCloud Photos.
B. iCloud Photo Sharing and Storage Mechanism
iCloud Photo Sharing is a feature in iCloud Photos that lets you make special albums to show others. Here's how iCloud photo sharing and storage mechanism works:
- Making Albums to Share: You can make a shared album in the Photos app on your device. You can give it a name and ask people to join by inviting them. People can join using their Apple IDs or a link.
- Adding Pictures and Videos: Once others are in the shared album, they can add their pictures and videos. This makes it a teamwork place where many people can share stuff.
- Seeing and Talking: Anyone invited to a shared album can look at the pictures and videos. They can also like and write comments. Comments are a way to talk about pictures and videos.
- Storage: The pictures and videos in a shared album don't use up the iCloud storage that the people have. This means the owner of the shared album can control the stuff without using their own iCloud space.
- Getting and Keeping: People can get pictures and videos from a shared album to put on their own devices. But, remember, if they do this, the pictures and videos take up space on their devices.
To sum up, iCloud Photo Sharing is an easy way to work together and show pictures and videos to friends and family. You don't need to use the usual ways to share files. It uses iCloud to work nicely on different devices.
Part 2: Removing iCloud Photos: How to Delete Pictures from iCloud
Taking pictures out of iCloud Photos can be done in a few ways, depending on what you want to do. Here are some ways to get rid of pictures from iCloud:
Method 1: Deleting Photos from iCloud While Keeping Them on Your Device
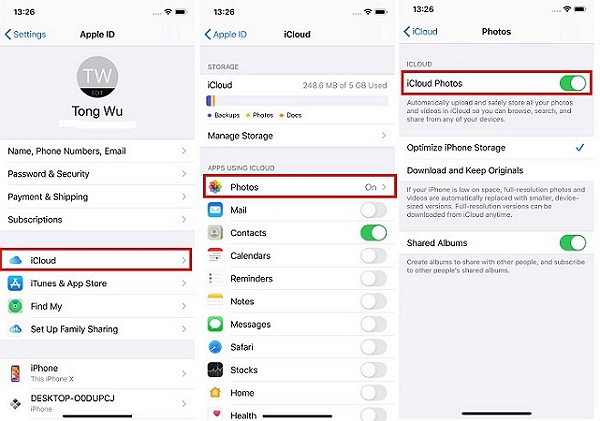
Maybe you want to free up space in your iCloud or not spend money on it. This way, you can remove photos from iCloud without removing them from your iPhone. But make sure to turn off iCloud photos first before you do this. Follow the below steps to delete photos from iCloud while keeping them on your device –
Step 1: First, you have to launch the Settings app on your iPhone. Next, tap on your 'Apple ID'. After that, choose 'iCloud' from the new page, tap on 'Photos', and finally, switch off 'iCloud Photos'.
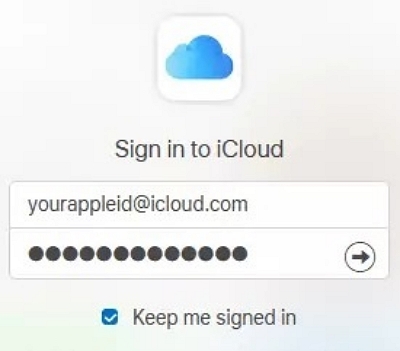
Step 2: Go to icloud.com and use your Apple ID and Password to log in to your Apple iCloud account.
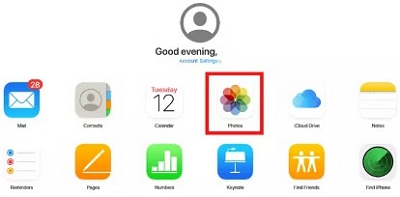
Step 3: On the new page, click on 'Photos'. Then, choose the photos you want to remove from iCloud and click the 'Trash Bin' icon.
Step 4: Users can remove pictures of memories by choosing a moment and clicking on the Trash icon.

Method 2: Disabling iCloud Photos: What Happens If I Turn Off iCloud Photos?
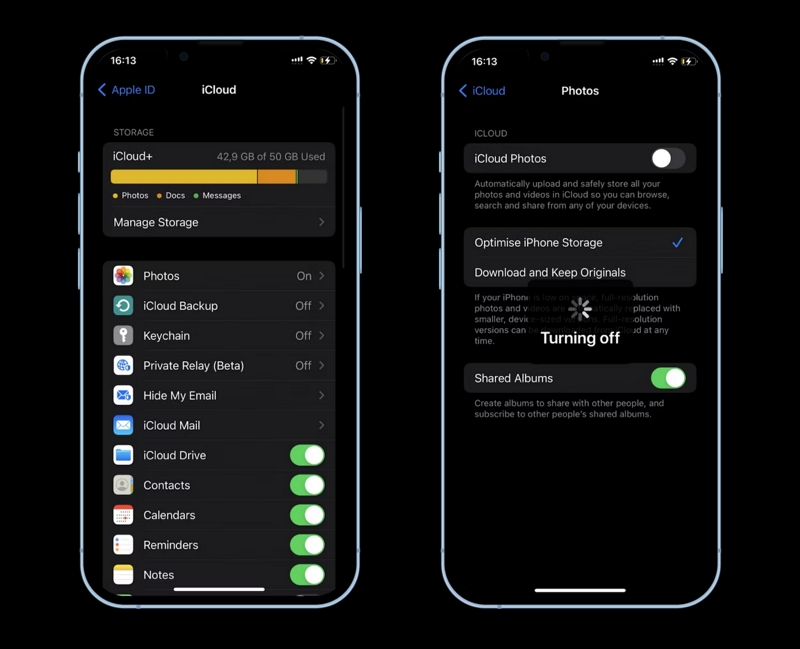
If you stop using iCloud Photos, your device won't copy pictures and videos to iCloud, and it will erase iCloud pictures and videos from your device. Here's how to turn off iCloud Photos on an iOS device:
Step 1: Touch the "Settings" app on the main screen of your iOS device.
Step 2: Move the screen downwards and touch your Apple ID name. It's usually found at the top of the Settings menu.
Step 3: In the Apple ID menu, choose "iCloud."
Step 4: Move the screen down until you see the "Photos" choice, then touch it.
Step 5: Turn off the "iCloud Photos" button. You could get a message asking if you want to take pictures off this device. If you say yes, they'll be erased from your device but stay in your iCloud account.
Step 6: If asked, say yes to turn off iCloud Photos.
When you switch off iCloud Photos, a few important things will happen:
- No More Automatic Sharing: Your device won't send your new photos and videos to iCloud automatically. You'll need to move them yourself if you want to keep them safe.
- Device Storage Usage: Since iCloud Photos won't work, the pictures and videos you take or store on your device won't be saved in iCloud automatically. This could use up more space on your device.
- Can't See iCloud Photos: You won't be able to view your iCloud Photos on other devices like your Mac, iPad, or the iCloud website. Any changes you make to your photos, like edits or deletions, won't happen on all your devices.
- Shared Albums Not Accessible: Any albums you've shared or that others have shared with you won't be available. If you're part of shared albums, the pictures and videos you contribute won't be seen by others.
- No Backup: iCloud Photos acts like a safety net for your pictures and videos. Without it, if your device gets lost, stolen, or damaged, your photos and videos won't be automatically saved in the cloud.
- Getting Back to Normal: If you decide to use iCloud Photos again later, it might take a while to put all your pictures and videos back on your device.
Before you turn off iCloud Photos, make sure you have another way to keep your important memories safe. This might mean connecting your device to a computer often to move your pictures and videos, or using a different online storage service to keep them secure.
Method 3: Removing Photos Completely from iCloud and Devices
By deleting photos from both iCloud and your devices, you'll make sure the content is taken off all connected devices and iCloud storage. Remember, this action can't be reversed. Follow these instructions to completely remove photos:
Step 1: Open the Photos App and find the pictures you want to remove.
Step 2: When you go to the photos, touch the "Select" choice at the upper right. Then mark the pictures you want to remove by putting a check on each of them.
Step 3: After you've chosen the photos you want to get rid of, find the trash can icon in the bottom-right corner and tap it. The pictures will be removed from both your phone and iCloud at the same time. Once you delete these pictures from your iPhone, they will also disappear from your iCloud. To make sure, you can visit the iCloud website and see for yourself.
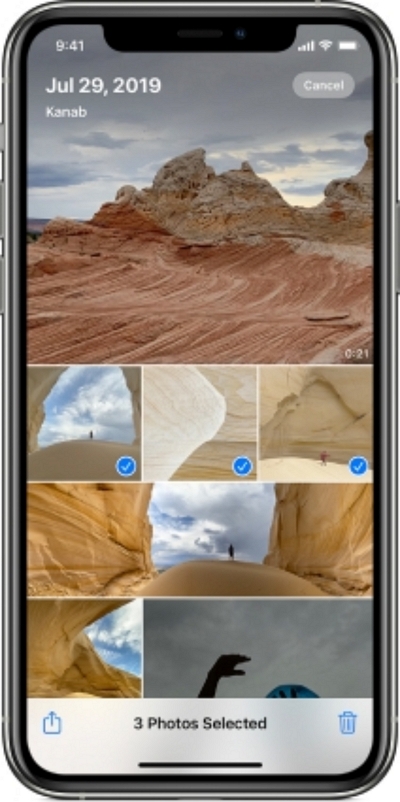
When you delete photos completely from both iCloud and your devices, here's what will happen:
- Photos Gone for Good: The photos you choose will be forever removed from iCloud and all the devices linked to your account, like iPhones, iPads, and Macs.
- Can't Get Them Back: Once these photos are deleted, you can't get them back from iCloud or any linked device. So, make sure you have copies of important photos before you start.
- Changes on All Devices: If you edit or delete a photo on one device, the same thing will happen on all your linked devices. Deleting photos will take them off all devices using your iCloud.
- More Space: Deleting photos will free up space in both iCloud and on your devices. This is helpful if you're running out of room.
- Shared Albums Affected: If you shared any albums with others, the photos you delete will disappear from those shared albums too.
- No iCloud Recovery: Since the photos are wiped out from the "Recently Deleted" folder in iCloud, you can't recover them from iCloud itself.
Remember, deleting photos like this is a big step, so be careful. Always make sure you have backups of important photos before you go ahead.
Part 3: Transfer Photos Between iOS Device and Computer without Any Limits
Do you want to move pictures between your iPhone or iPad and your computer with no restrictions? Well, you're in luck! Eassiy Phone Transfer is one of the best phone transfer and manager for transferring and managing your phone's data. It can easily move things between various devices like tablets, phones, and computers. With Eassiy, you can transfer various types of files such as contacts, messages, photos, music, videos, and more. It can also help you organize your data and create backups.
Features:
- Helps you to control your data, make backups, and recover lost data.
- Allows you to move data easily between your computer and your phone.
- Supports moving files between Android phones, iPhones, or from an iPhone to an Android phone.
- Transfer data from iPhone to iPhone without using iTunes or iCloud.
- A wide range of data type is supported including images, videos, music, contacts, etc.
Here are the steps to transfer between an iOS device and a computer without any limits –
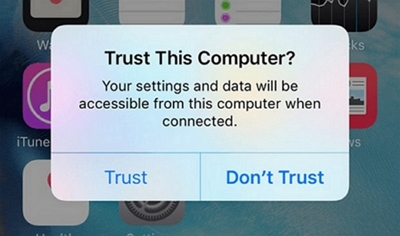
Step 1: Plug your iPhone or iPad into your computer using a USB cable. Then, open the Eassiy Phone Transfer program on your computer. You might get a message asking if it's the first time you're using it. Just tap "Trust" and put in your iPhone or iPad password. This helps Eassiy Phone Transfer connect the right way.
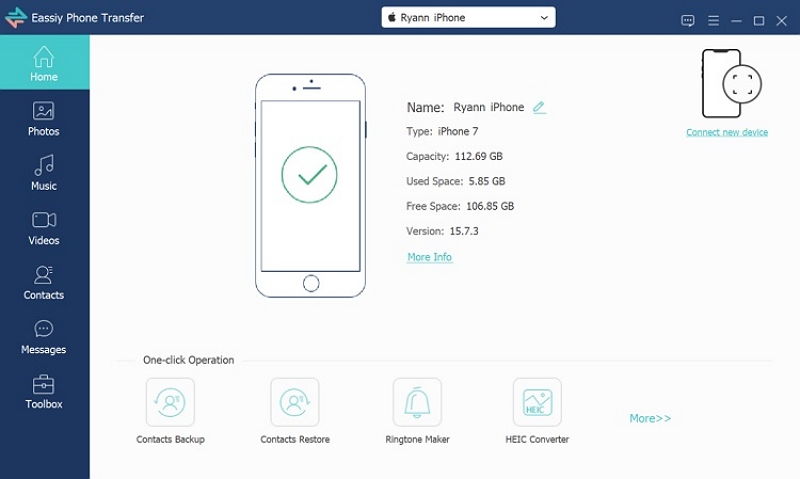
When your iPhone or iPad connects to Eassiy Phone Transfer, you'll see information about your device like its name, type, storage capacity, how much space is used, and how much is still available. You can also see what you can do with Eassiy Phone Transfer.
Step 2: There's a list of things on the left side of the screen like pictures, songs, videos, contacts, messages, and Toolbox. Now, you have to tap on the one you want to move. You can see what's inside it, like names, when they were made, and how big they are. Choose what you want to move.

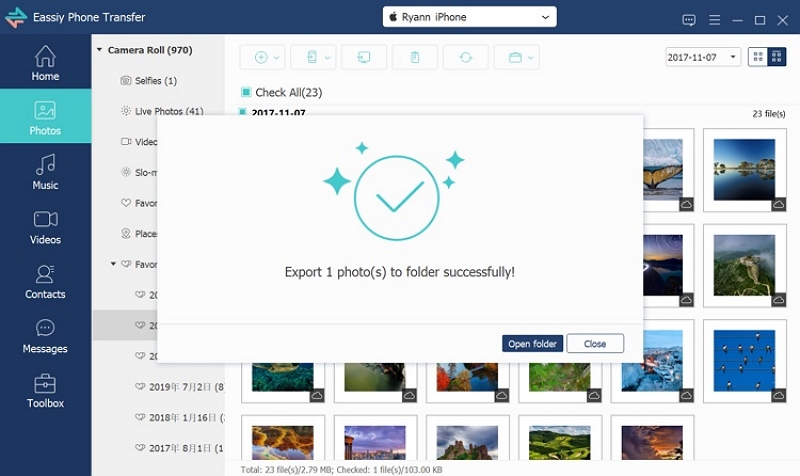
Step 3: Tap on the “Export” icon once you've picked the files you want to transfer. Eassiy Phone Transfer will then move all those files to your computer or iPhone. This usually happens quickly. The program will also let you know which files were transferred and which ones were not.
Conclusion
In today's digital age, taking pictures with smartphones and storing them online is easy. But this can fill up your iCloud storage. You can clean up and arrange your photos by learning about iCloud's features. See what happens if you turn off iCloud Photos to decide wisely. However, we would recommend you to use Eassiy Phone Transfer to move photos between iOS devices, and Macube to keep your Mac organized. Follow these tips for a better iCloud experience.


