Updated on 2024-01-05
26 views
5min read
Whether it is for a short film, feature film, podcast, infomercial, or an interview, it is binding to remove white noise from audio to make the audio sound more professional and transmit the message more effectively. And if you are thinking that opting for a high-end recorder is going to unravel your problem, you are mistaken. Because irrespective of the recorder, white background, and ambient noise is practically inevitable while recording something. Nevertheless, there exist pieces of codes designed only for audio white noise removal, refining the audio to every bit. Read on to discover the three best ways to remove white noise from audio.
Part 1: Remove White Noise From Audio Using Audacity
Audacity is a free, open-source, cross-platform audio editor that works on any device, including Windows and Mac OS. Laden with options ideal for dialogue, sound effects, and trimming music tracks, Audacity is still the most opted audio editor for quick-and-dirty work. It can work smoothly with up to 32-bit/384kHz audio, complete with built-in dithering. It means regardless of the audio quality - you can rely on Audacity to remove white noise from the audio clip efficiently. Plus, with the multi-track nature of Audacity, you can edit more than one audio file at once. Additionally, there are tons of basic as well as advanced effects to make your audio sound more professional.

Key Features:
- It supports 16-bit, 24-bit, and 32-bit (floating point) samples (the latter preserves samples in excess of full scale).
- Numerous editing options to Cut, Copy, Paste, and Delete parts of the audio clips
- Remove static, hiss, hum, or other constant background noise with a single click.
- Tons of built-in effects like Echo, Paulstretch (extreme stretch), Phaser, Reverb, Reverse, Truncate Silence, Wahwah, and more
How To Use Audacity To Remove White Noise
There is a bit of a learning curve before you figure out Audacity at its full potential. Follow these simple steps to learn how to use Audacity to remove white noise:
Step 1: Visit the official page of Audacity and download the application on your computer.
Step 2: Go to File. Then from the list of options, choose Import and select Audio from the drop-down menu > navigate to the folder where the audio file is present.
Step 3: After uploading the song to the program, you will have to choose the frequency level you want to extract. You can do this by choosing a bit where the background noise is visible. (Ensure not to select the parts where someone is talking). You can use the Selection tool and drag the section where background noise is audible.

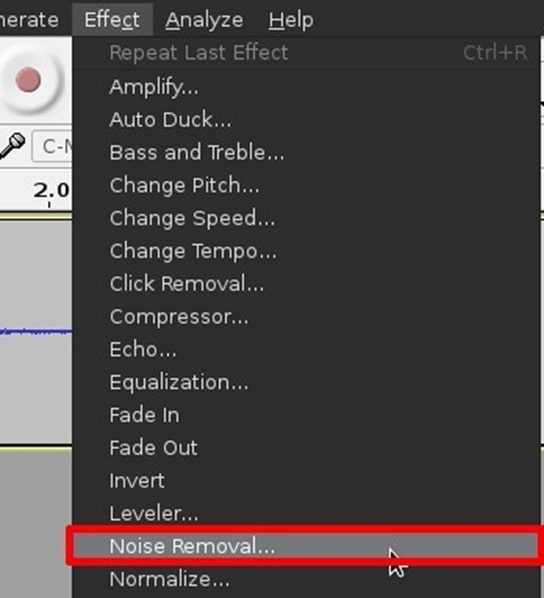
Step 4: After isolating the sound, hover to the Effect section and choose Noise Reduction.
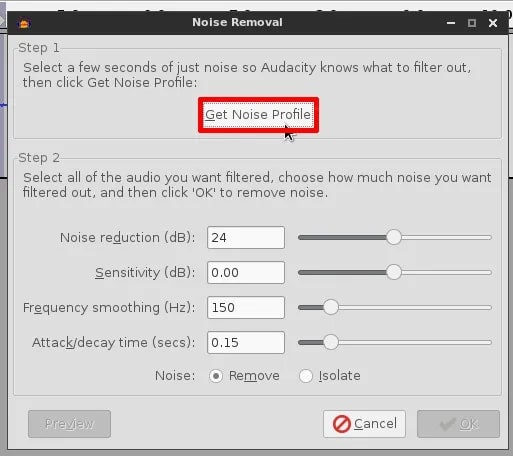
- Choose Get Noise Profile and allow Audacity to determine the frequency to be eliminated from the audio clip.
- Once Audacity determines the frequency, choose the section you want to remove the white noise. You can very well choose the entire clip.
- Hover to the Effects section again and choose Noise Reduction from the list of options.
Step 5. You will have to perform several tweaks like:
- Choose the amount of noise reduction that Audacity should perform (12 decibels should be ideal in most cases)
- Adjust the sensitivity and frequency-smoothing bands as needed. You can leave it to the default setting of six and three if you do not know what you are doing.
- You can use other levers to isolate the noise frequency as per need, but you can stick with default options.
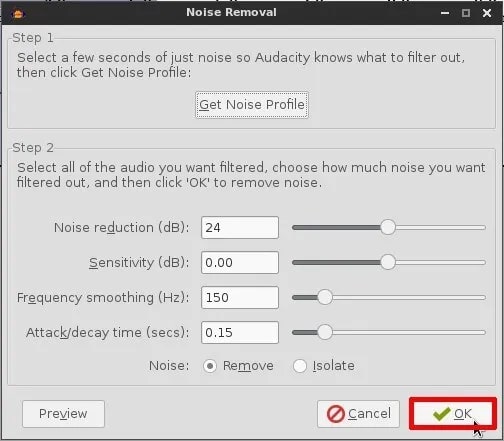
Step 6. After adjusting the levers, choose to preview the clip. In case you are still hearing the background noise, it means the audio white noise removal hasn’t been a success.
- To clear out the background noise, increase the noise reduction measure to 13, 14, 15 decibels, and so on until you get the desired result.
- Once you get the perfect sound, choose OK.
Of course, it is more troublesome. Especially for beginners who do not know much about the industry jargon. Still, with good practice, it will become easy. And you adjust audio levels and edit the audio files efficiently.
Part 2: Remove Move White Noise From Audio Using Online Tool
In case you are looking to remove white noise from audio online, Xaudiopro is the tool for you. An advanced, real-time audio editing tool, Xaudiopro includes both professional and basic features to completely transform your audio like a professional. Coming to its denoising capabilities, XAudioPro includes functions for low-pass spectrum reduction and filtering out high-frequency noise. You can also make the low-frequency clearer. And filter out the high-frequency part through the cut-off coefficient adjustment. Additionally, you can really get to the bottom of the audio clip and work on noise reduction gain coefficient. For instance, the higher the gain, the stronger the suppression.
Key Features:
- Allows Online Audio Denoising with options to control every bit of the denoising operation
- One-click operation to add BGM for your music creation.
- XAudioPro can identify the input format and output audio format with bit rate. And it intelligently recommends how to get the best bit rate.
- It supports all most common audio formats like wav, FLAC, ape, mp3, aac, m4a, ac3, Ogg, opus, Vorbis, WMA.
How to remove White noise from audio online using XaudioPro?
XAudioPro is an online tool. In case you have large files, it is best to opt for Audacity, i.e., an offline tool that is more sophisticated than XAudioPro.
Step 1. Visit the official page of XAudioPro.
- On the main interface, you will find the Start Use option.
- The editor will load on the same page.
- From the upper-left, choose Open and navigate the local storage where the audio clip is stored.
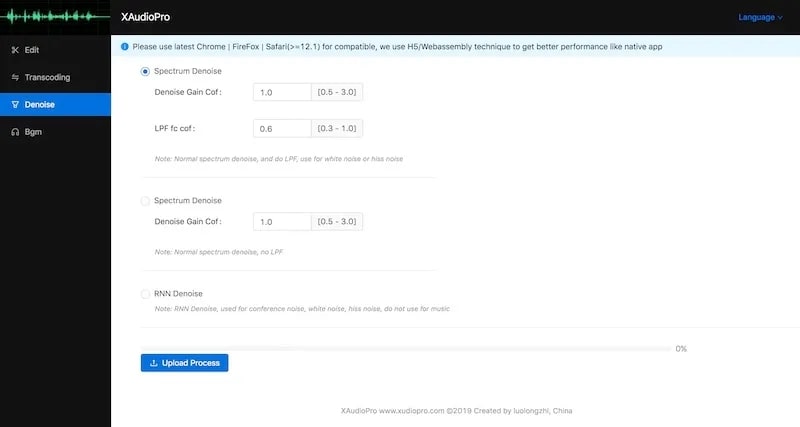
Step 2. Once the audio is uploaded, choose Denoise from the left pane options.
- You will find several options like Denoise Gain Coefficient, LPF fc cof, Spectrum Denoise, and RNN denoise.
- Adjust the parameters as desired.
Step 3. After the file is processed, choose Export and save the file to the computer.
It is critical to retain that you will have to upload the audio file in WAV format. You can transcode the file into WAV format using XAudioPro itself.
Bonus:
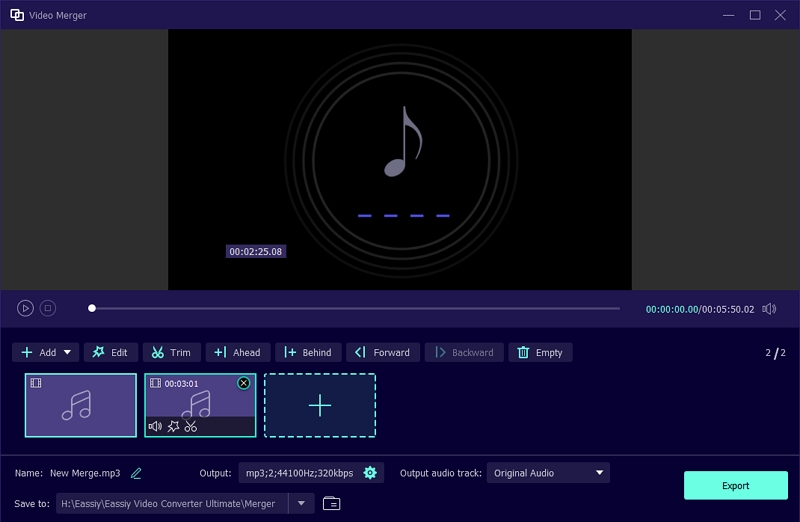
Are you looking for a program to edit your video and audio files besides removing white noise from audio? Then you can try using Eassiy Video Converter Ultimate. Though it cannot help you with removing white noise from audio files, it can help you customize your files with various editing features. This program lets you remove noise from video files but is not able to remove noise from audio. You can convert and compress your files without losing the original quality. It supports 1000+ formats including MKV, MP3, MP4, M4A, AAC, OGG, MOV, WMV, WAV, etc. You can add effects, subtitles, and watermarks, adjust video sound, change video speed, merge, split, and more by using this software. With its simple and efficient user interface, even newbies can run this program and complete their tasks. The free version can be downloaded on both MacOS and Windows PC.
Key Features:
- Able to reduce video shaking and remove video noises.
- Multiple videos and audio can be merged into one single file.
- Supports advanced features such as adding subtitles, watermarks, video effects, changing video speed, and more.
- Have the ability to remove watermarks from video files.
- Both video and audio files can be converted and compressed with no quality loss.
Conclusion
Here, we have discussed the top 3 effective ways to remove white noise from audio in 2024. Among these 3 ways, you are free to choose anyone and perform your task with ease. Also, we have mentioned a program named Eassiy Video Converter Ultimate which is a bonus for you from us. This software can be used to customize your video and audio files though it cannot remove white noise from audio. You can check out it if you are also looking for an ultimate tool.


