Updated on 2025-03-16
29 views
5min read
Few things are more frustrating than a device running low on storage. Naturally, you start clearing space, expecting photos and videos to be the usual culprits. Then, to your surprise, you find Spotify sitting at the top, eating up gigabytes.
Confused? You’re not alone. Even without downloading songs, Spotify can hold a significant amount of storage space on your device through cache memory. And it doesn’t even need your approval to store such large files. The good news is that it is simple to clear Spotify cache. No matter what device you are using, whether it’s Windows, Android, iPhone, or Mac, we’ll walk you through how to clear the Spotify cache on every device.
What Happens If I Clear Cache on Spotify
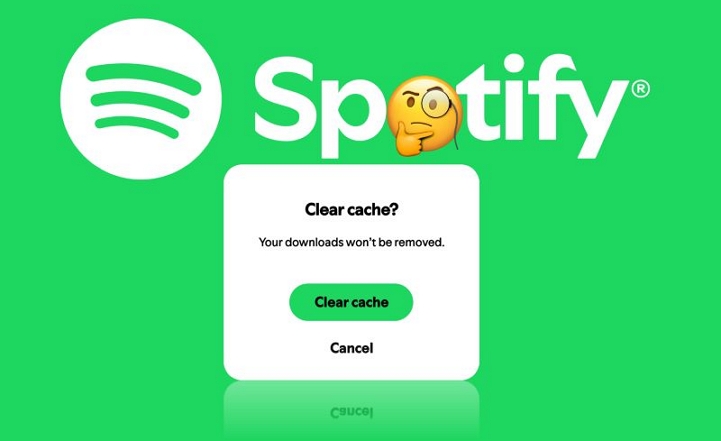
Most importantly, clearing the cache on Spotify frees up storage space on your device. In fact, it also helps fix minor glitches, making the app more responsive. It does not affect anything important. Your playlists will remain available. You won’t need to log in again. Your downloads stay exactly as they were. Even your listening history is untouched. And if you're worried about buffering or slower playback, there's no need to be. Yes, cached memory can help reduce buffering slightly. However, as long as your internet speed is decent, the difference in playback speed after freeing up clutter is barely unnoticeable: just a matter of milliseconds. In short, clearing the cache only benefits you.
Tip: If you're concerned about losing your downloaded Spotify music due to accidental operations or software glitches when clearing the Spotify cache, you can download Spotify music to your computer in advance using Eassiy All-in-One Music Converter, a Spotify to MP3 downloader.
How to Clear Spotify Cache on Computer
On Windows PC and Mac, you can clear the cache files directly via the Spotify app itself. The steps are simple, and both Windows and Mac users can follow the same process to clear cached files. Let’s go through the steps.
On Mac or Windows 11/10 PC
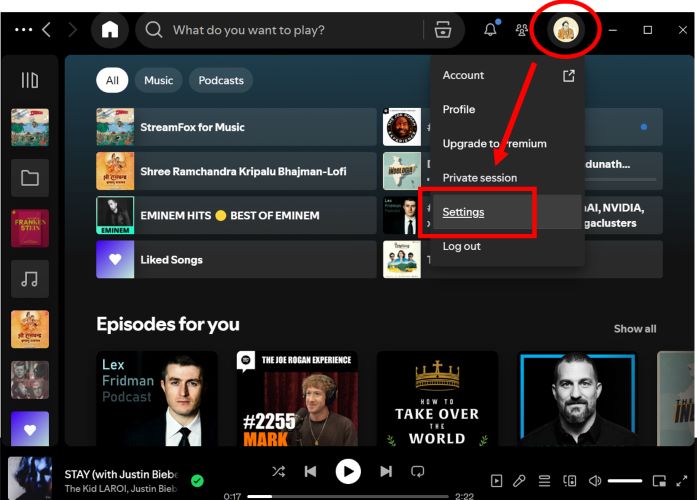
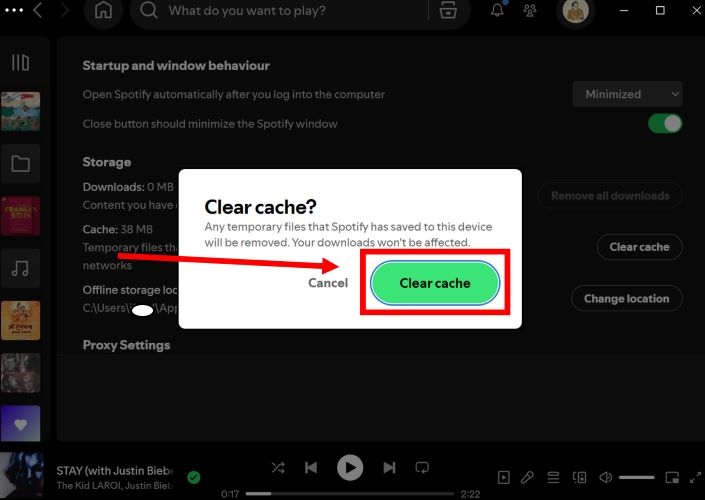
Step 1. Launch Spotify on your computer. Head to the top-right corner, click your profile icon to reveal the drop-down menu, then select Settings.
Step 2. Scroll through the Settings window until you reach the Storage section.
Here, you’ll see details about how much space is occupied by downloads and cached files. Simply click the Clear Cache button next to the Cache option.
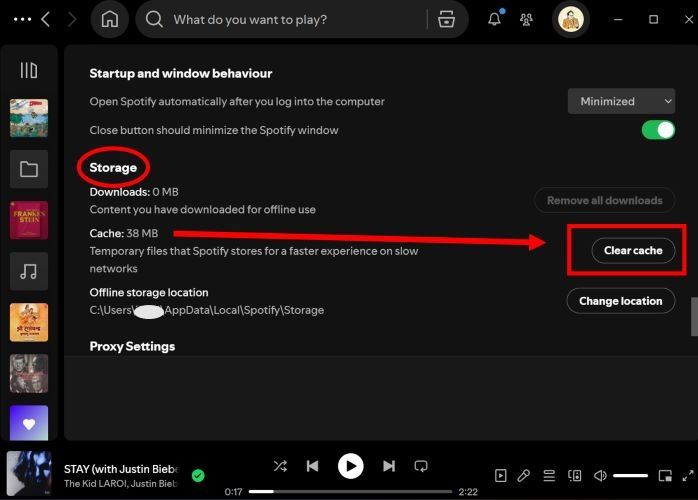
Step 3. A confirmation pop-up will appear on your screen. Hit Clear Cache to free up disk space.
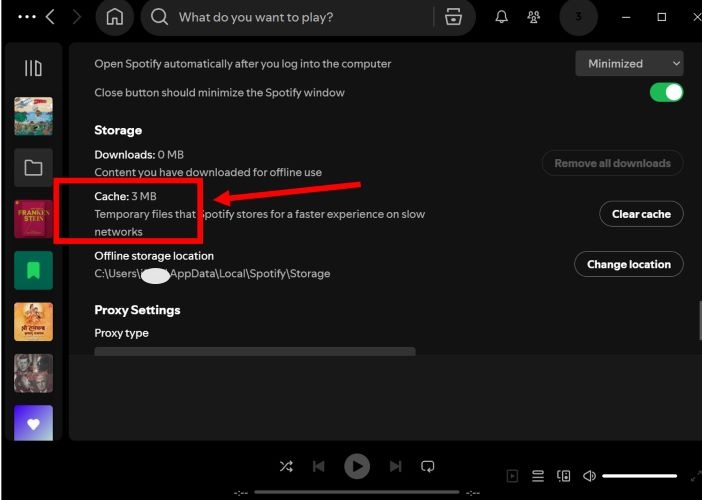
Once done, the cache storage space will refresh. Some residual files (around 5-10 MB) will remain, but that’s normal. In all, if there’s a significant drop in occupied space, the cache has been successfully cleared.
Tip: To change where cache files are stored on your Windows or Mac computer, click the Change Location button just below the Clear Cache option. A Finder (Mac) or File Explorer (Windows) window will open, allowing you to choose a new folder for Spotify cache and offline files.

How to Clear Spotify Cache on Phone
The steps to clear cache on iPhone and Android are nearly identical, differing by just one step. However, to keep things clear, we’ll cover both separately.
On iPhone
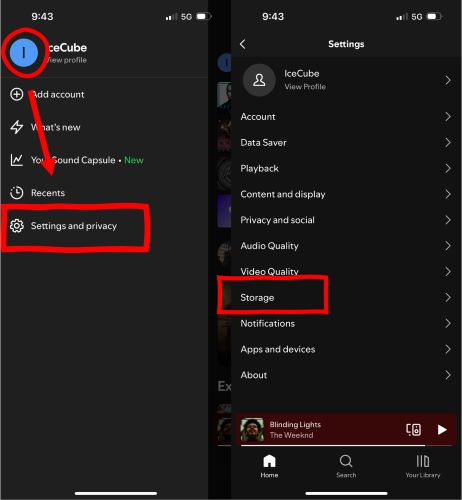
Step 1. Open Spotify, tap on your profile icon at the top-left on the home screen and choose Settings and Privacy. In the Settings menu, select Storage.
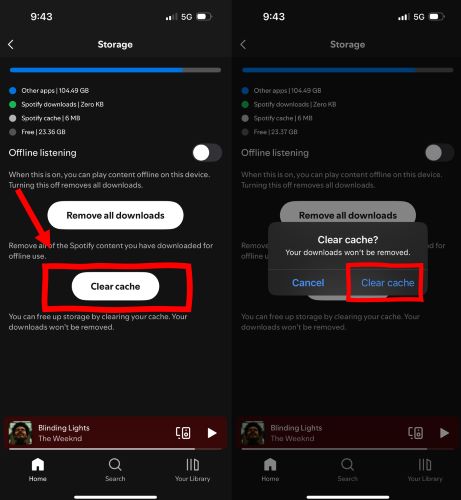
Step 2. Inside the Storage section, you’ll find details on how much data Spotify has accumulated over time. Tap the Clear Cache button. Confirm by selecting Clear Cache in the pop-up.
That’s it! You can see the refreshed temporary storage is in single digits.
On Android
Tip: You can clear the cache on Android either through the app settings or directly within Spotify. Both methods yield the same result, but using the in-app option is more straightforward. Let’s go with that.
Step 1. Navigate to your account settings on Spotify. Tap on your profile icon, positioned near the top section of the app.
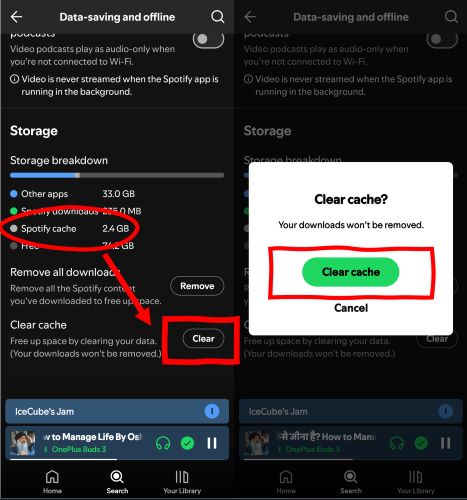
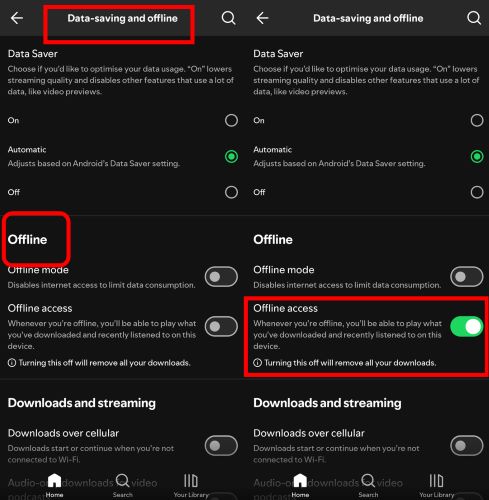
Step 2. Select Settings & Privacy. Then choose Data Saver & Offline Mode from the options list.
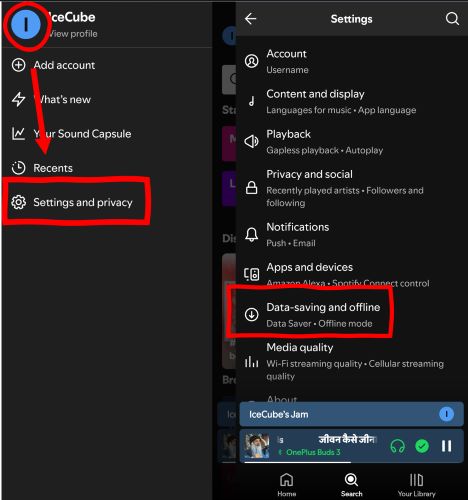
Step 3. Scroll all the way down until you see the Clear Cache option. Next to it, you’ll find a Clear button—tap on it. Tap Clear Cache once again to confirm.
There you go! In an instant, Spotify will remove all temporary files from your device, reclaiming storage.
Bonus: How to Download Spotify Music as MP3
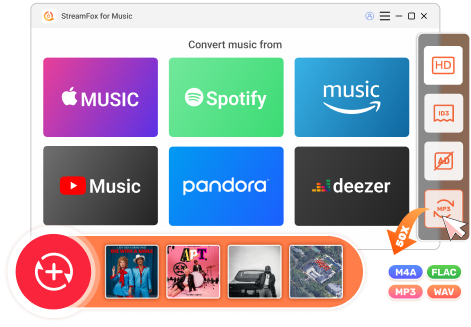
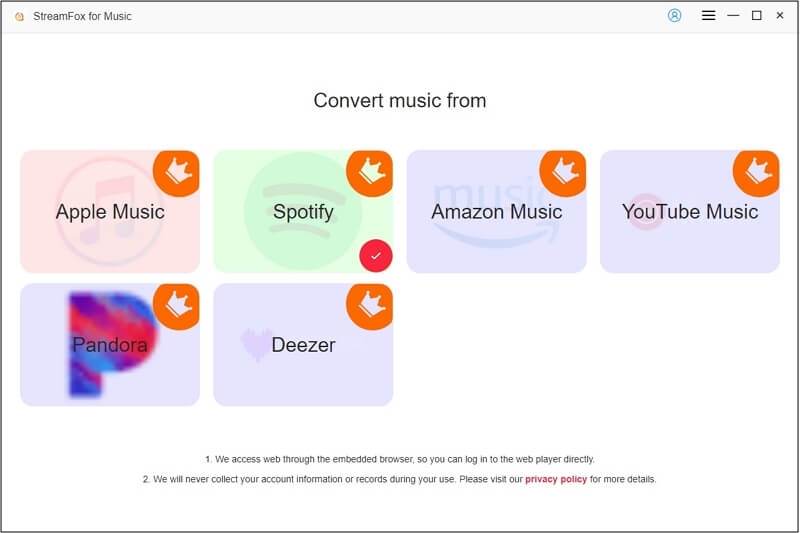
One of the best ways to listen to Spotify music is to download it, not just as encrypted audio within the app, but as MP3, FLAC, or AAC files. So you can save Spotify downloads permanently on your device. This is made possible via StreamFox for Music, the Eassiy All-in-One Music Converter.
First of all, StreamFox for Music is user-friendly, meaning it works for both free and premium Spotify users. You can download Spotify songs in 320 kbps high-quality audio and export them to your device with all ID3 metadata intact. This means that the sound quality, song title, artist name, and cover art remain unchanged, giving you the same experience as Spotify, but playable through any media player.
Eassiy All-in-one Music Converter
Download music from Spotify, Apple Music, Amazon Music, and three other music services as local MP3 in 320kbps with ID3 tags retained.
Key Features
- Direct account login provides seamless access to your Spotify library for instant downloads.
- Batch mode with 50x acceleration lets you save multiple playlists and albums easily.
- Self-organization while downloading ensures tracks are sorted and arranged automatically.
- Not limited to Spotify, it also supports high-quality downloads from Amazon Music, YouTube Music, and Apple Music.
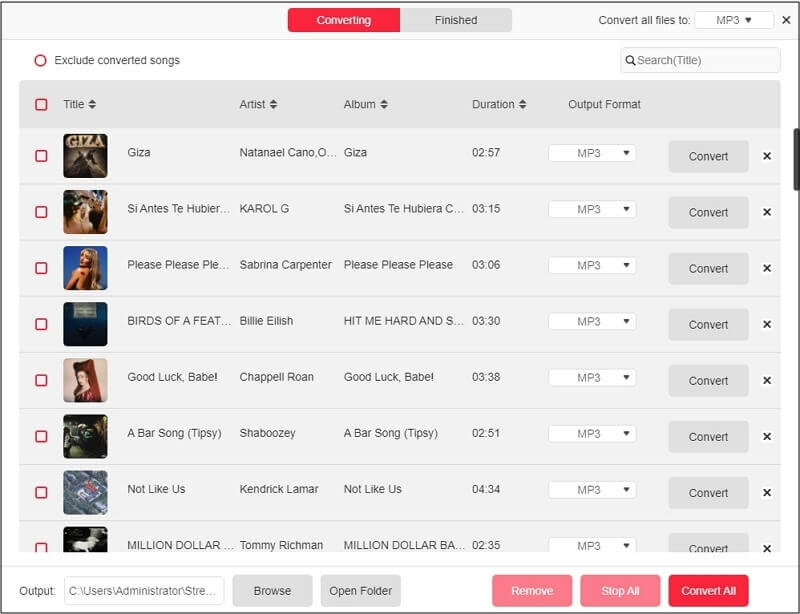
Steps to Download Spotify Songs in MP3
Step 1. Click on the Mac or Windows installer above to get StreamFox for Music on your computer. Once the app is ready, select Spotify from the home feed.
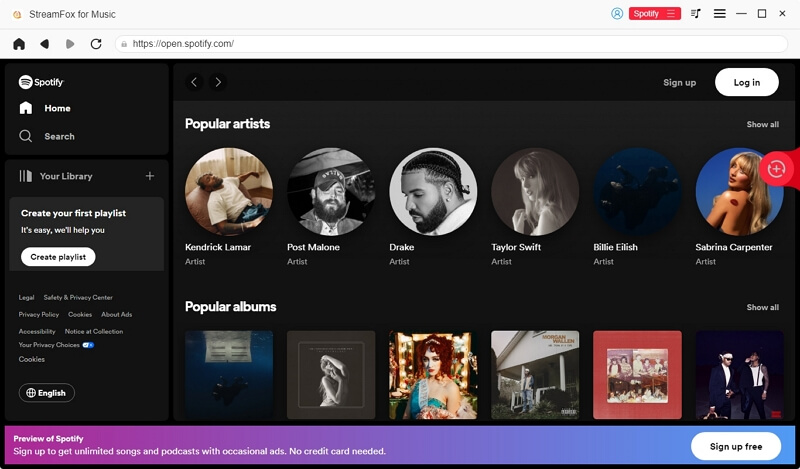
Step 2. You’ll be taken to the Spotify login screen inside the software. Enter your free or premium account details to access your favorite songs quickly.
Step 3. Pick the playlists, albums, or individual tracks you want to save and drag them to the red plus (+) button at the top-right corner.
Step 4. With everything lined up, tap Convert All to begin. The songs will be stored in 320 kbps MP3 by default, saved in your computer’s downloads directory.
Note: It’s available to choose another output format and destination.
External Tip : How to Fix Can’t Clear Cache on Spotify
Even after clearing the cache files successfully, you’ll see some leftover fragments (like 5MB to 10MB). Spotify retains this minimal set of essential data to maintain app functionality. So, if you see a small cache footprint, there’s no need to worry, it’s expected behavior.
However, if the cached size remains unchanged, it means the flushing didn’t work. To tackle this, here are two reliable fixes that will force Spotify to discard its temporary files, ensuring a clean refresh.
Fix 1. Update Spotify
Updating the app won’t directly clear the cache, but it can resolve bugs that interfere with cache management on Spotify. Once updated, you can retry the steps above to remove temporary files.
Here’s how to manually update the Spotify app on Android and iPhone.
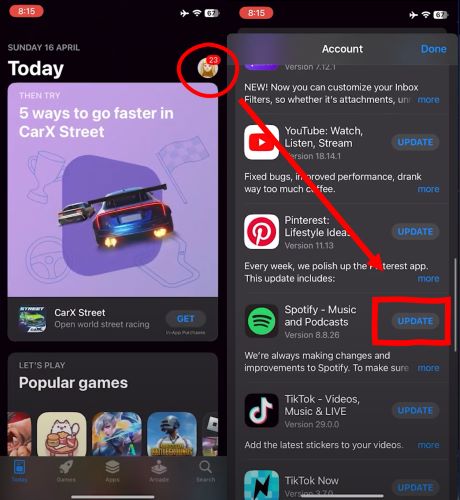
On iPhone
Step 1. Open App Store. Tap your account iconat the top-right.
Step 2. Scroll down to the Available Updates section. Look for Spotify. If you see Spotify in the list, simply tap the Update button.
Note: If Spotify doesn’t appear in the list, it means that Spotify is already on the latest version.
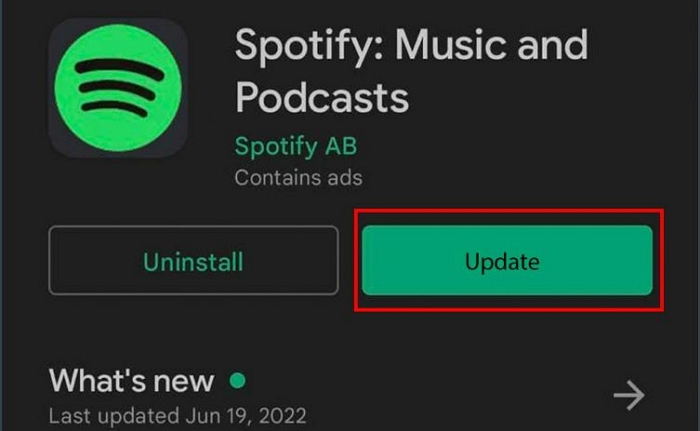
On Android
Step 1. Open Google Play Store and type Spotify in the search bar.
Step 2. Select Spotify from the results to open its app page.
Step 3. If there’s an Update button, tap it to install the latest version. If you see Open instead, it means there is no update available.
Reinstall Spotify (Remove Cache & Downloads)
Reinstalling the app will restore Spotify to its clean state, so proceed with caution. Along with persistent cache data that refuses to clear, this will also remove downloaded playlists and albums from the Spotify app. Still, if the app size has grown too large and, more importantly, the Clear Cache button isn’t working, this method is the most effective way to refresh Spotify.
Now, here’s how to uninstall and reinstall Spotify properly.
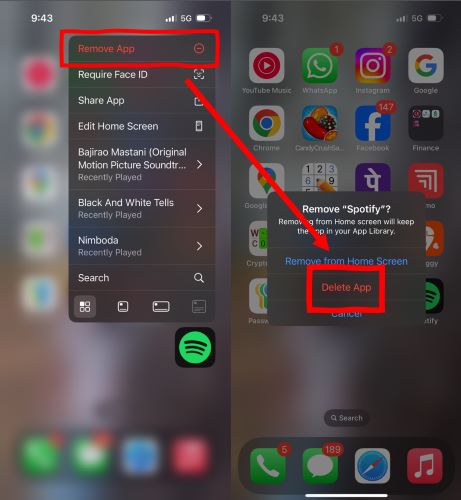
On iPhone
The fastest way to remove the Spotify app on an iPhone is via the home screen. So, long-press the Spotify app icon until a menu appears. Then:
- Tap Remove App.
- Select Delete App from the options.
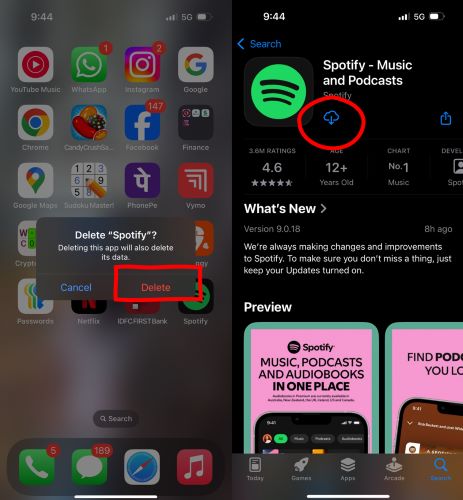
- When the confirmation pop-up appears, tap Delete again.
- Run App Store, search for Spotify, and tap the download button to reinstall it.
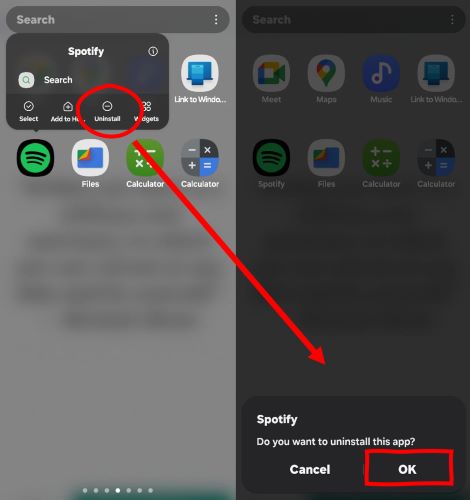
On Android
Locate the Spotify app on your device’s main screen. Press and hold it until a menu with multiple options appears. Then:
- Select Uninstall from the list.
- Confirm by tapping OK or Uninstall when prompted.
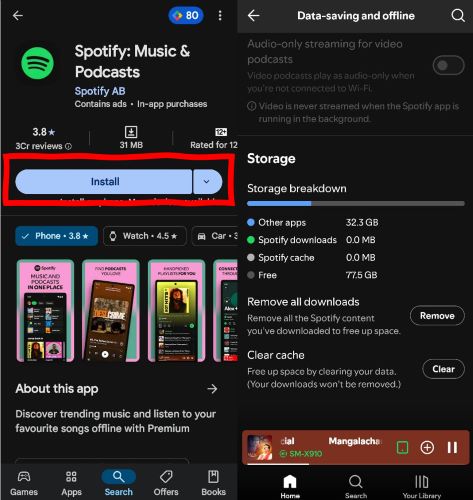
- Open Play Store, look up Spotify, and tap Install to reinstall it.
Once installed, open the app and log in again. Navigate to the storage section, and you’ll see that all temporary files have been cleared.
Pro Answer: Why Is Spotify Cache So Large
Spotify cache isn’t inherently large by design. It is built to replace older cache files with new ones as you stream. However, despite this dynamic storage system, cache size can still grow significantly over time due to the following reasons:
- Streaming at higher-audio quality results in larger fragments being stored.
- Spotify does not offer a preset cache limit, meaning the app continuously builds up stored data.
- Spotify’s new Offline Access feature. While this is specific to Premium users on mobile devices, the Offline Access feature saves entire songs that you stream to your device as cache, not just fragments of it. You can turn this off: go to Settings > turn off the toggle associated with Offline access/listening.
Final Words
That would be all for today. Stick to this page and you won’t go wrong with clearing Spotify cache on any device. If you couldn't clear the temporary data, you can give the fixes mentioned in this guide a try.
And you don’t have to stop there. Give it a shot to StreamFox for Music and see how you can take full control of your Spotify songs. StreamFox allows you to save Spotify songs in original quality as MP3 files, storing them directly on your device. The best part is that you don’t even need a Spotify Premium subscription to do this.